
In the previous section we looked at the idea of playing rock & roll solos by taking a common riff, adding a few notes to it and playing them as single notes or double stops while moving them along the neck to play over each chord change. In this section we’ll take a look at a few more ideas we can use to spice things up a bit and then put them together to create a solo.
In general, you can make up your own licks and ideas over the A chord pattern and then when the chord changes, simply move the same licks along to the next chord position – most of the time these will work and sound OK. Some licks may not work quite as good over each chord change, but many of them will. There’s no rule here, simply try something and if it doesn’t work – then don’t do it. With practice and repetition your ear will soon develop a sense for it. Also, although moving around with the chord changes generally sounds good, you don’t necessarily need to do so. If we’re in the key of A, for example, then you might find that this single position works OK over all of the chords. In other words, you can move along the fretboard with each chord change … or just stay in the A position the whole time. Don’t worry about rules, there is no right or wrong here, just jam along, practise and get used to what works and doesn’t.
Let’s now run through a few more ideas.
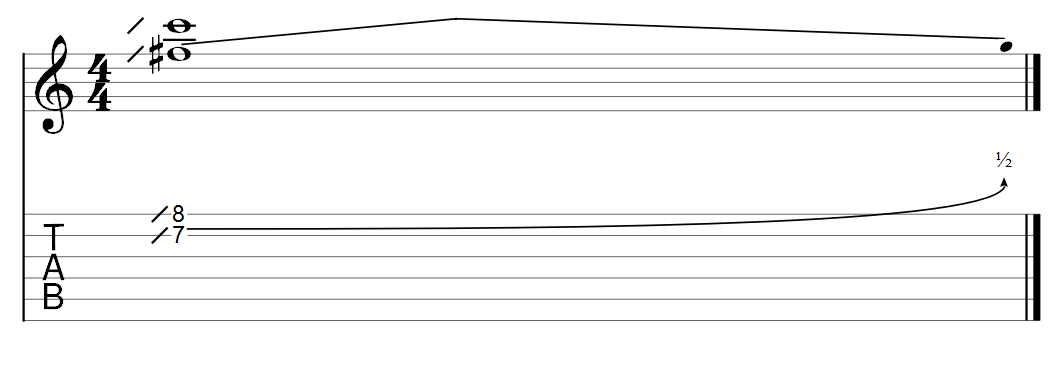
Example 13:
Double stop with a bend. Here we play a double stop but bend up a semitone on the second string.
Example 14:
Same as above but we’ll include it within a phrase.
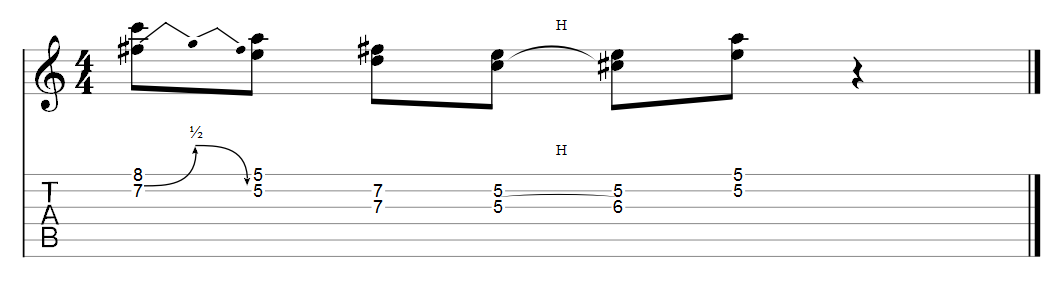
Example 15:
Same double stop but this time without bending the string, this adds some nice dissonance which can work well in this style of music.

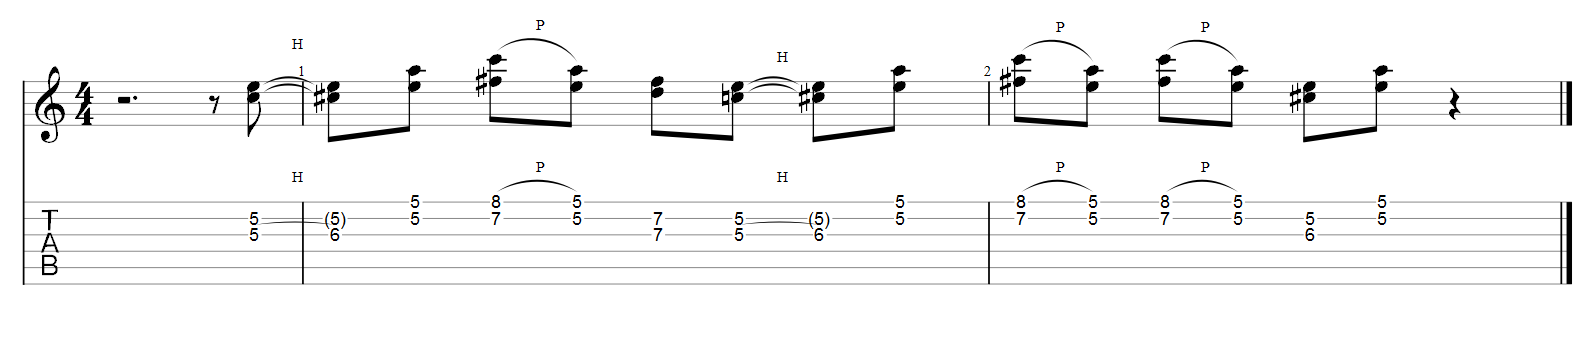
Example 16:
As above but included within a phrase
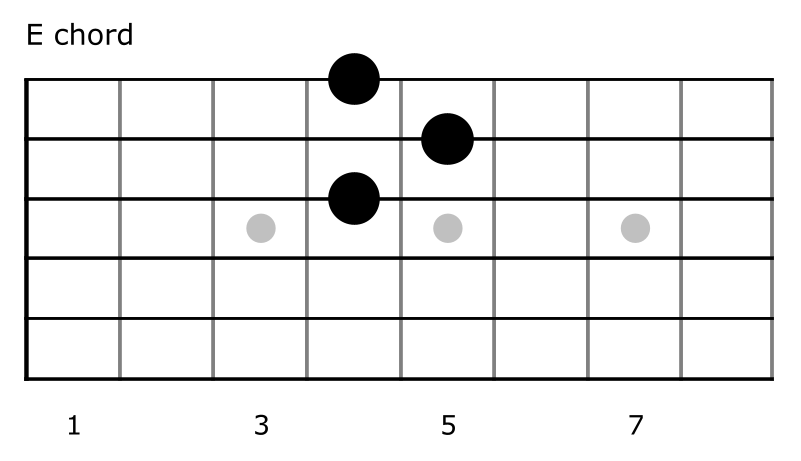
In part 1 we looked at double stops using the string pairs straight out of the E form bar chord. We can do the same thing with other chord shapes as well. For example, here’s an A7 chord.
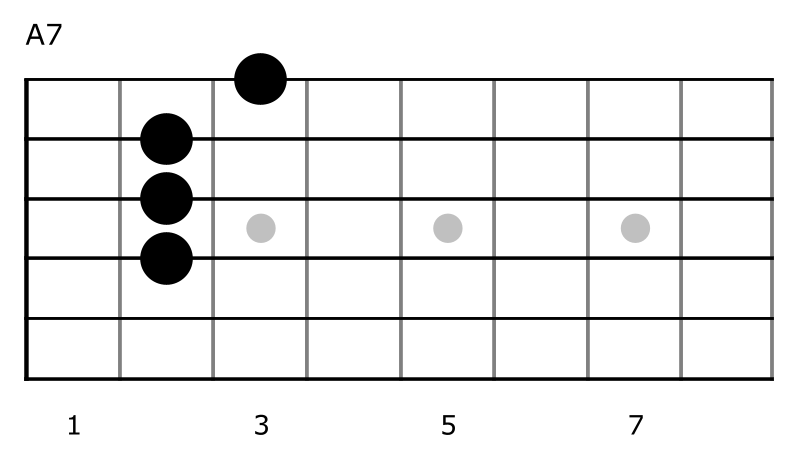
Here’s the chord played as double stops.
Example 17:

I’m only showing the chord on four strings here. Normally this chord would also include the open A string but I’m just not using it for the sake of this tutorial.
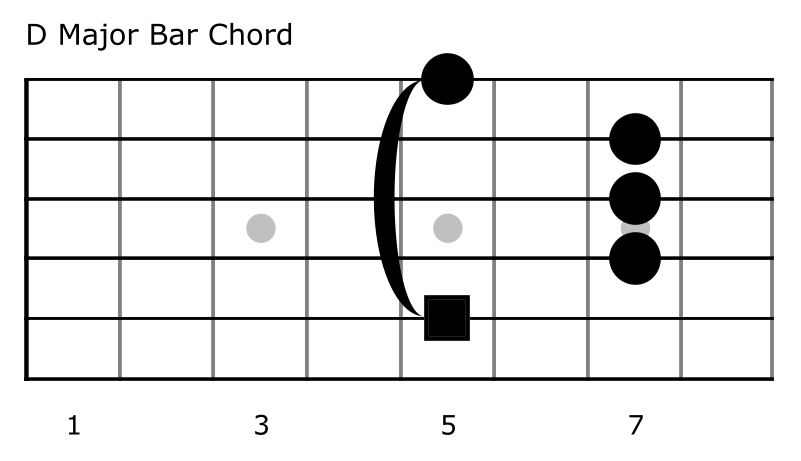
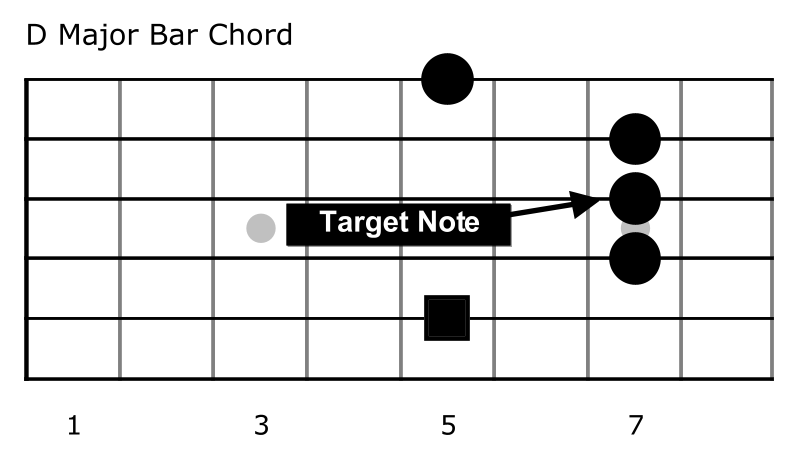
This A7 chord in the CAGED system is what we call the A form chord. If you know your bar chords then you should recognise it as a five string bar chord like this – here it is in D (just the major chord without the 7th).
And here it is again with the 7th added. You can see from this that it’s just the A7 shifted along from the 2nd to the 7th fret, I’ve highlighted the notes in red.
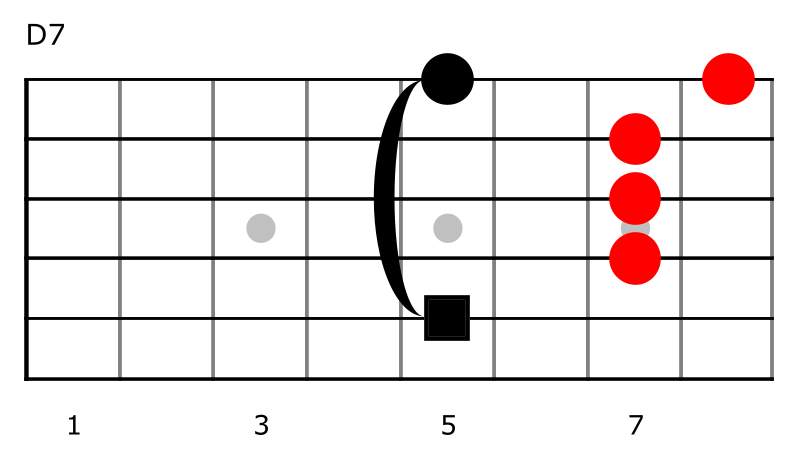
Shift this whole thing up another two frets and we now have E7. So what can we do with all of this? Well, as far as actual notes are concerned, we can’t do much more than what we could already do when we moved the E form along to the 10th and 12th fret for the D and E chords. What we can do, however, is bring everything closer together to the A at fret 5 so that we don’t need to always shift around the fretboard so much.
To be honest, a lot of licks will still sound better when moved along the neck simply because the E form position has a lot going for it, it’s easy on the fingers. Like everything, however, doing the same thing too much can become predictable and eventually boring to ourselves as well as the listener. What we have now are a few more options to mess around with. Let’s put some of this into an example with something that relates to a simple guitar solo.
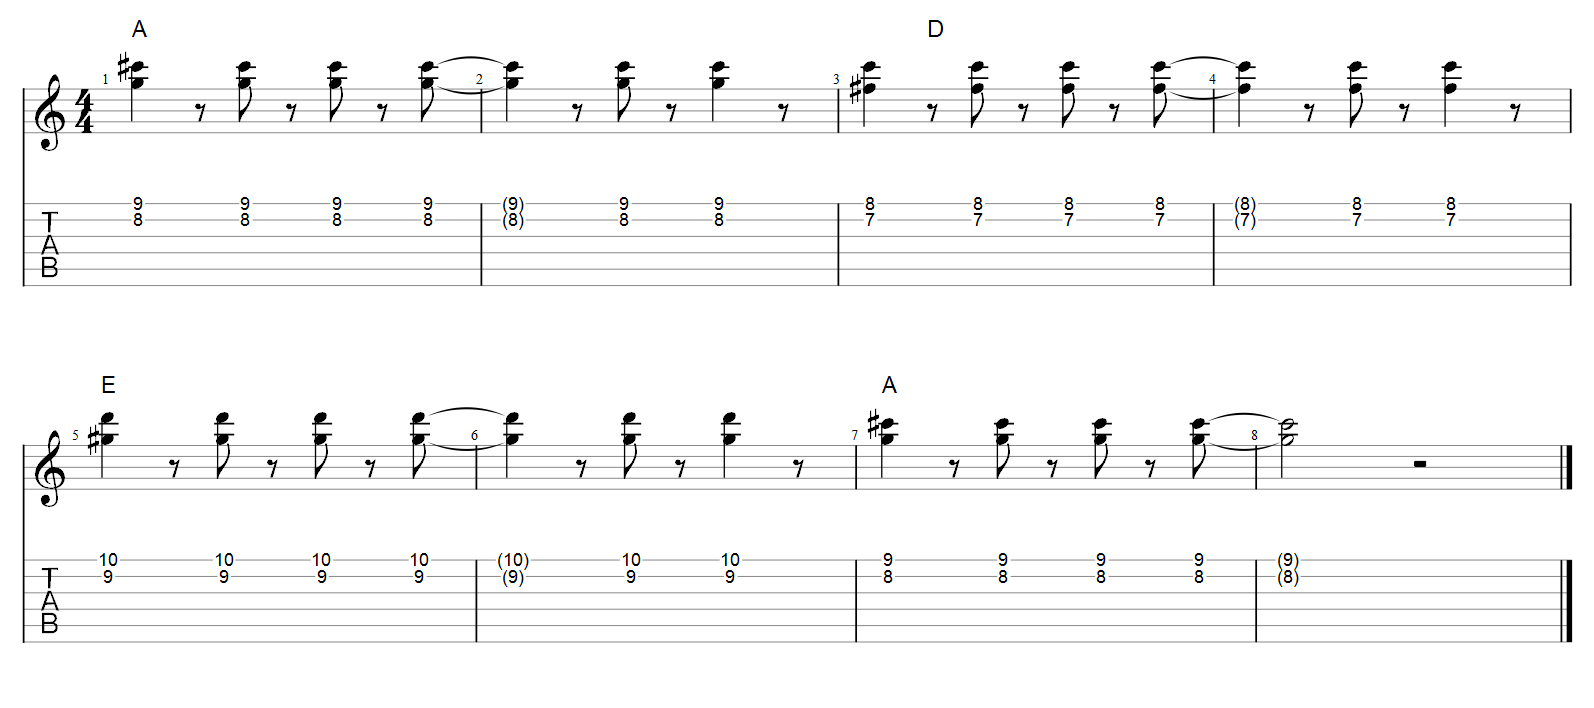
Example 18: Guitar solo with double stops
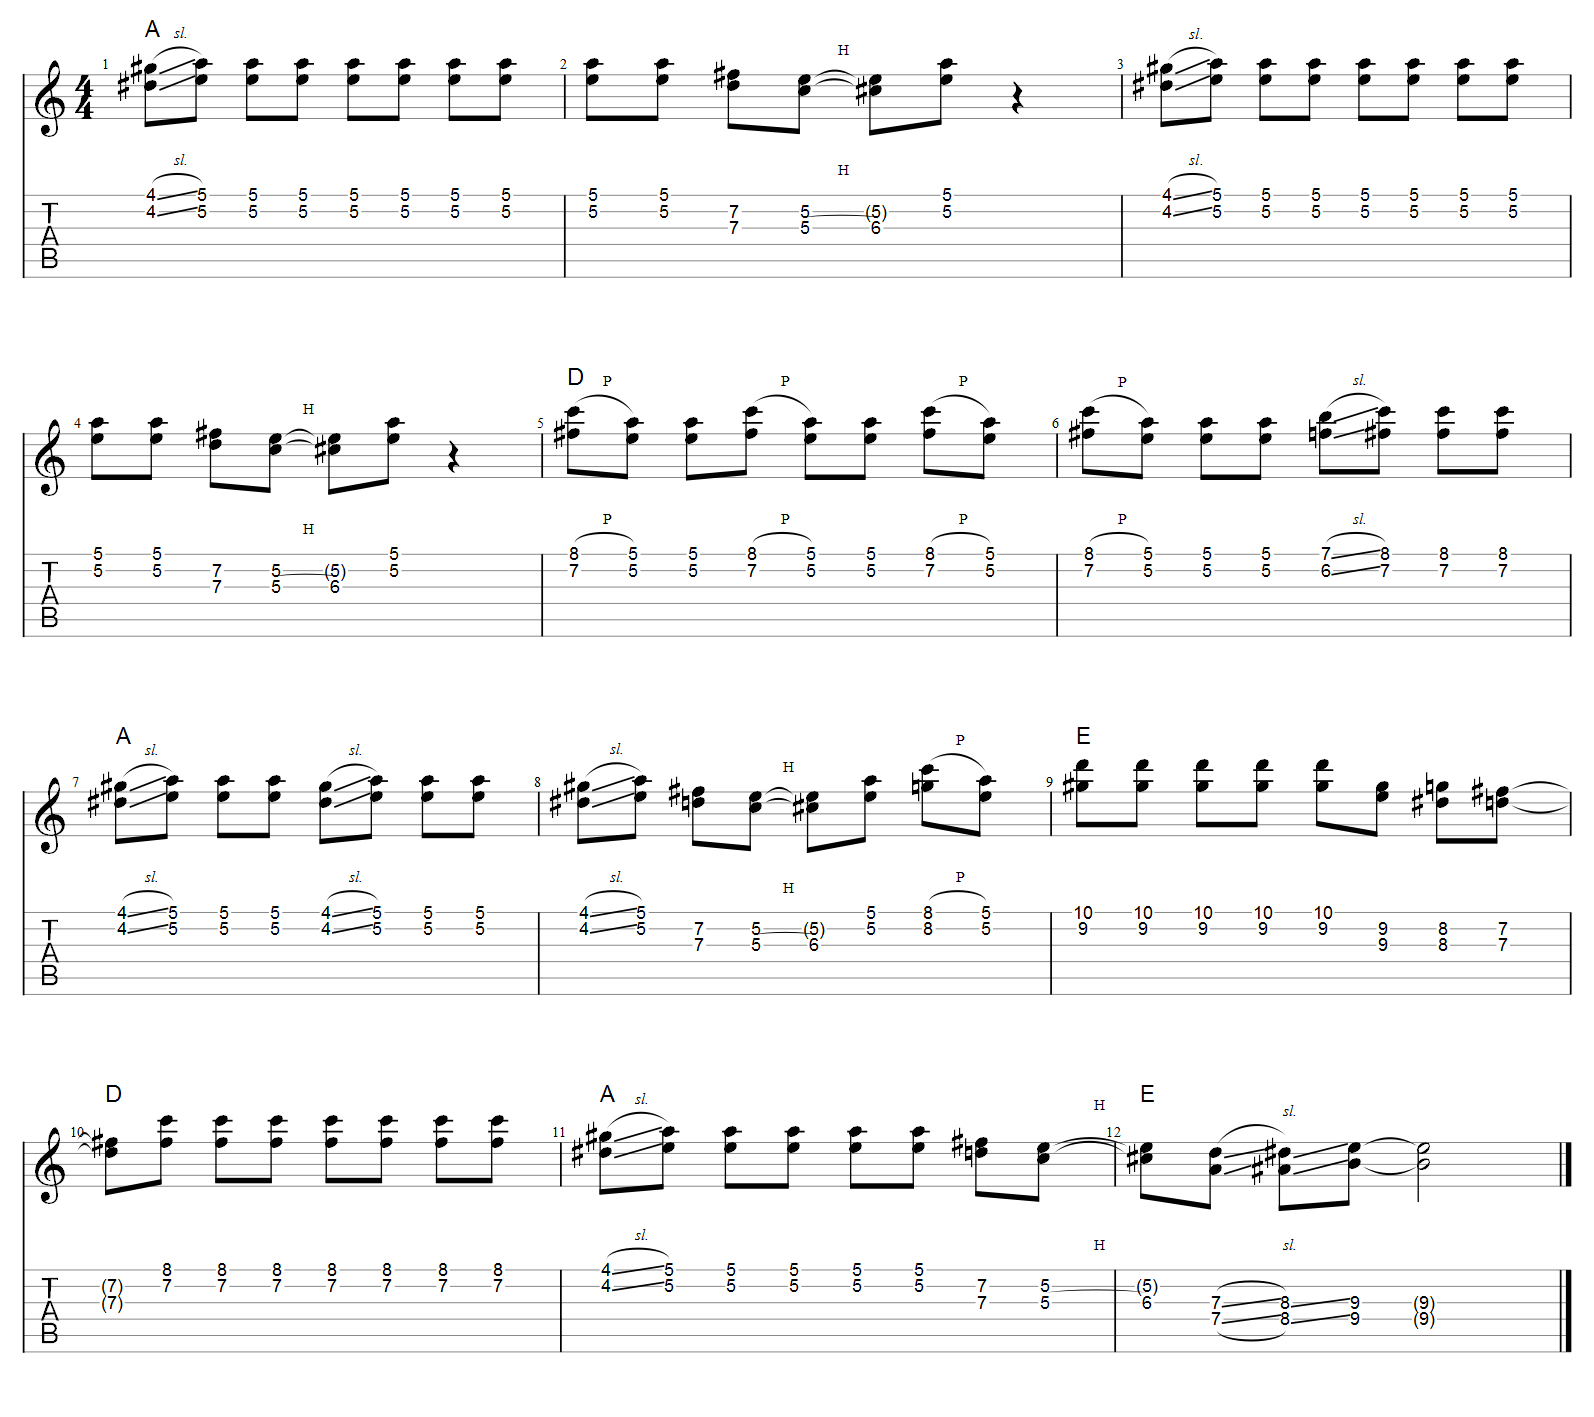
Let’s break it down. We start with a two bar lick over the A chord with a slide in from the 4th fret – we repeat this over bars 3 and 4.
In bar 5 we change to the D chord using a double stop pull off on the top two strings taken from the D7 (A form).
In bar 6 we do the same thing but then slide in from a semitone below.
Bar 7 and 8 we’re back in A with a similar A lick.
At bar 9 we play the E7 double stop on the top two strings but then switch to the two strings below (still working from the A7 chord form) and then do a chromatic run down to the D chord.
Bar 10 we’re now in D and we switch back to the top two strings.
Bar 11 and 12 we just end off with a lick in A followed by a chromatic walk up to E on the third and fourth strings.
Let’s now take another look at the chromatic part. In the turnaround where we go from the V to IV chord (D to E, bars 9 to 10) moving down chromatically usually sounds pretty good. We could do this with single notes, for example E, Eb, D but it should also work just as well with double stops from any part of the chord forms. For example, if we’re playing in the E form chord at 12th fret we could move from the E down to the D using any of the string pairs like this.
Example-19
And here’s the same thing from E to D with the A form chord.
Example-20
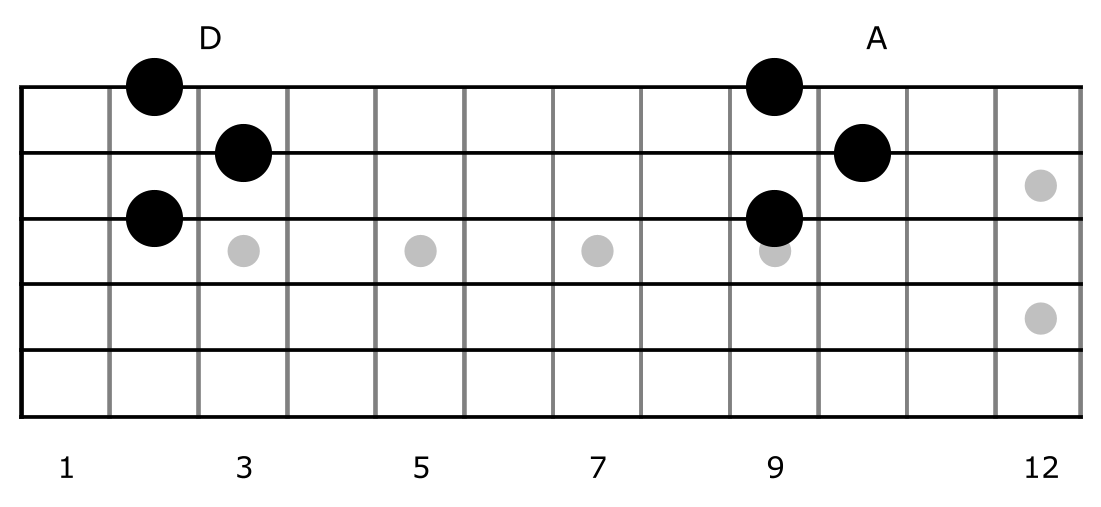
We can also use the very common D form chord. Here it is shown on the top three strings, along with the same chord moved along to the 10th fret to become A.
And here’s the same thing again with D7 and A7.
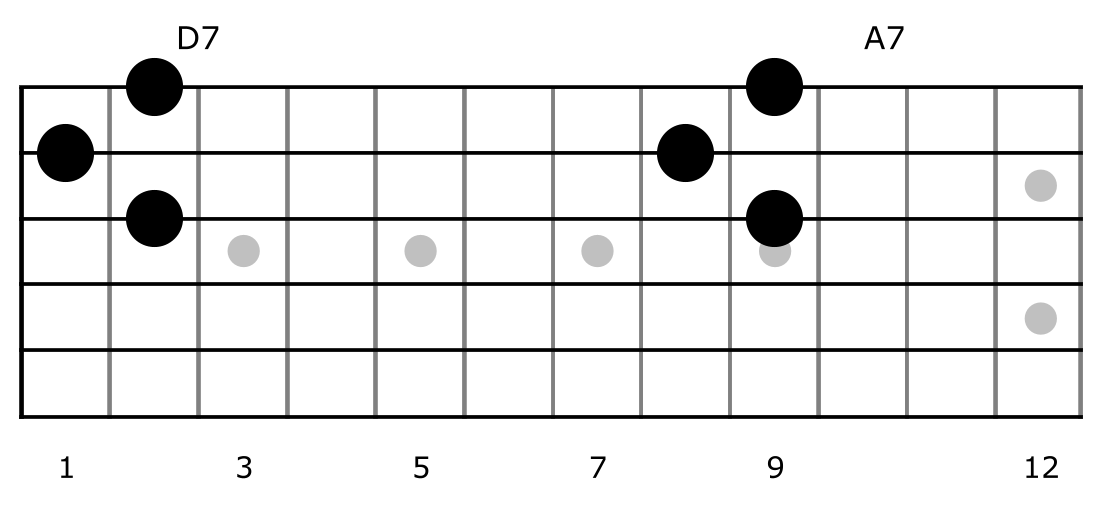
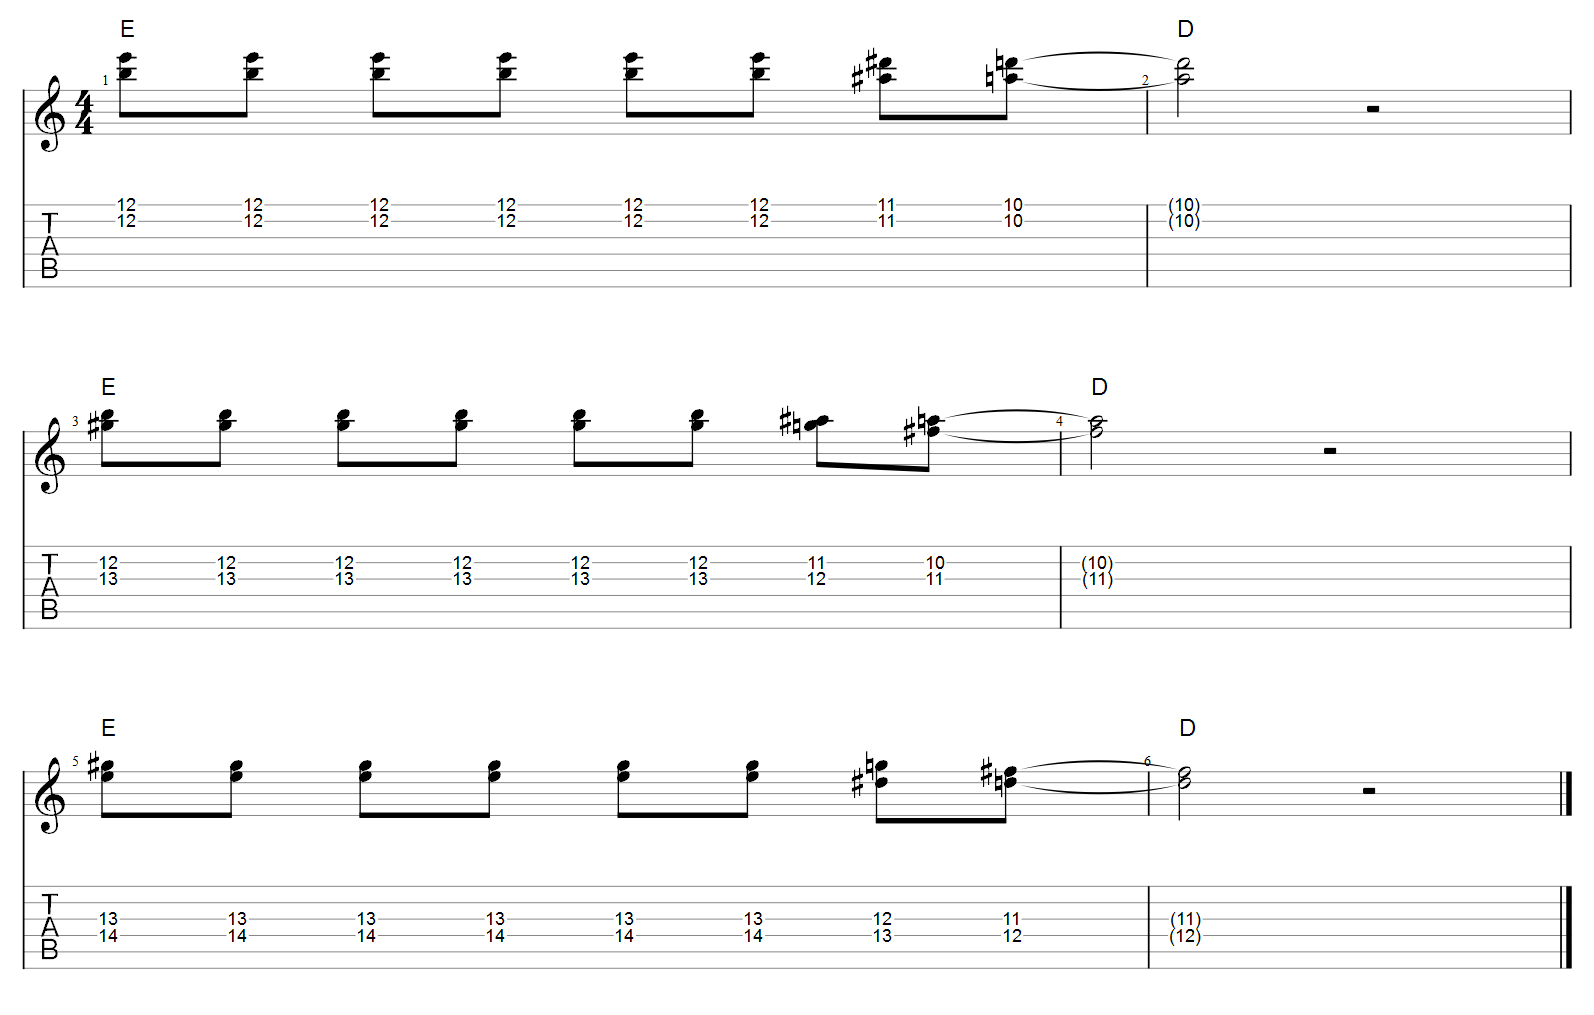
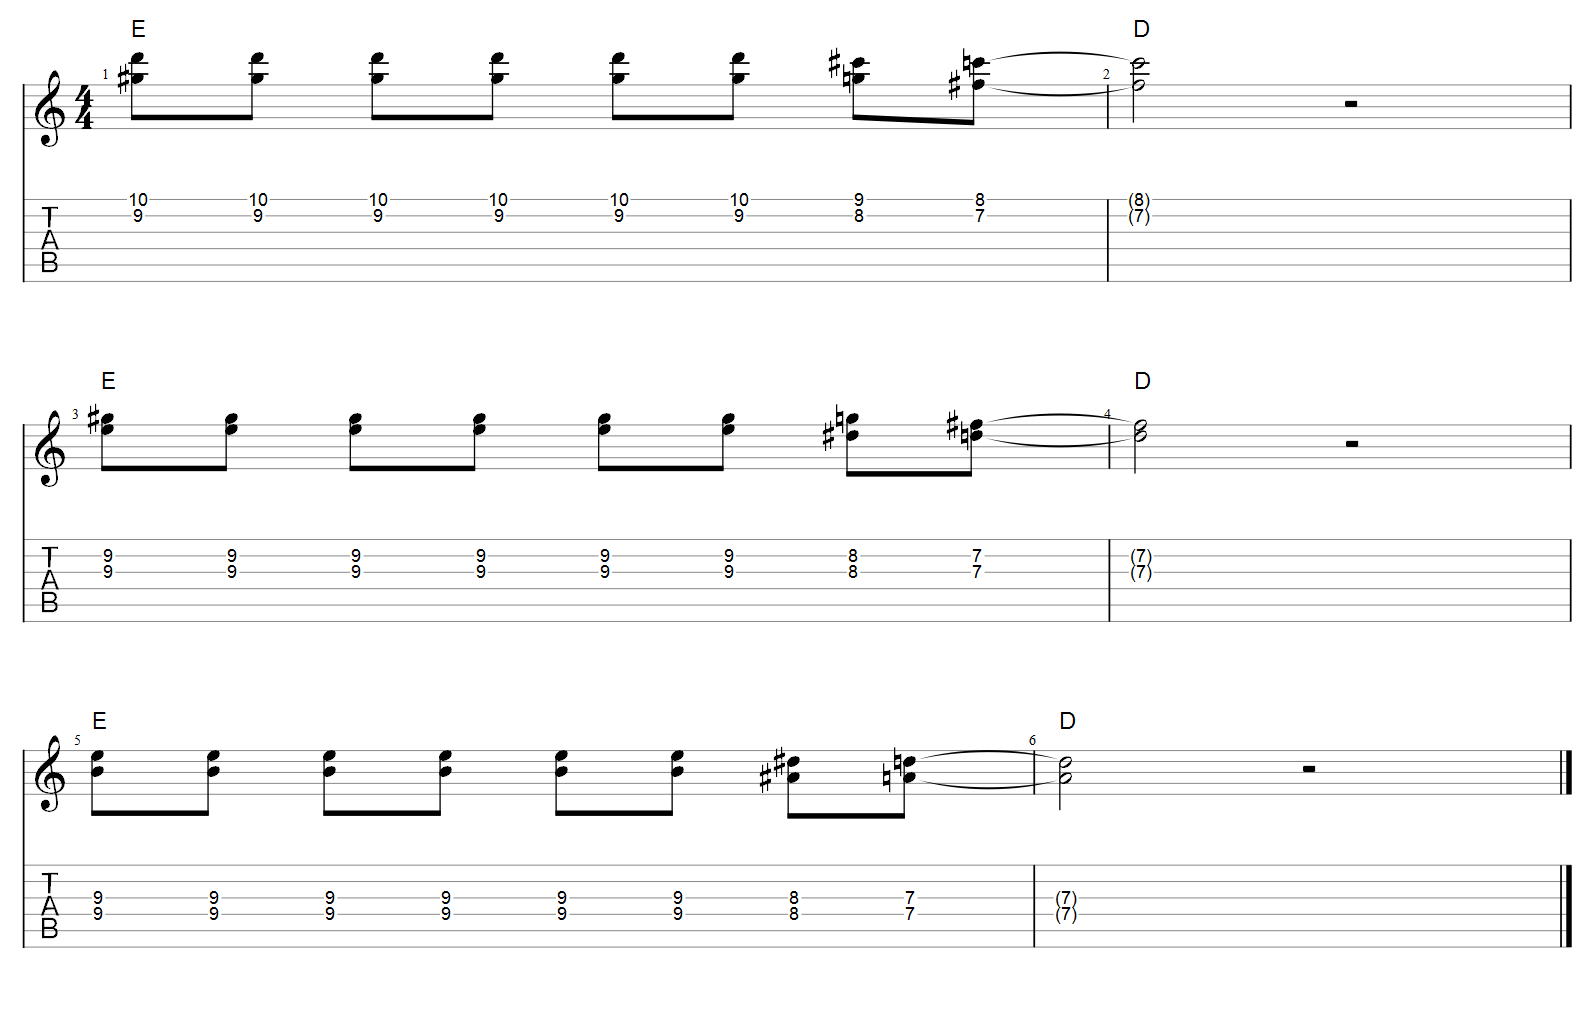
You can mess around with any of these just like we have done with the others but there’s something worth noting about the double stop on the top two strings of the A7 in the above diagram. We can do something cool with it. If we play this double stop over the A chord then all we have to do is move it one fret down or up for D and E. If this sounds confusing then just scroll back up to the A7 form diagram with the red dots and you’ll see why – the top two strings for D7 will be on frets 7 and 8. Move this up two frets (9 and 10) and it becomes E7. The A7 shown above sits right in the middle. Now we have a double stop for all three of the I-IV-V chords all grouped right next to each other. Here’s a TAB showing each double stop over the A, D and E chords.
Example 21:
That’s almost it for now but let’s look at one more idea – bringing the “scales” closer together. As usual, I use the term “scales” loosely. This is an exercise that will help demonstrate “chord thinking” as opposed to single scale thinking, i.e., just playing around with something like the A minor pentatonic over the entire chord progression.
Let’s start by making up a phrase over the A chord, we’ll go with this.
Example 22:
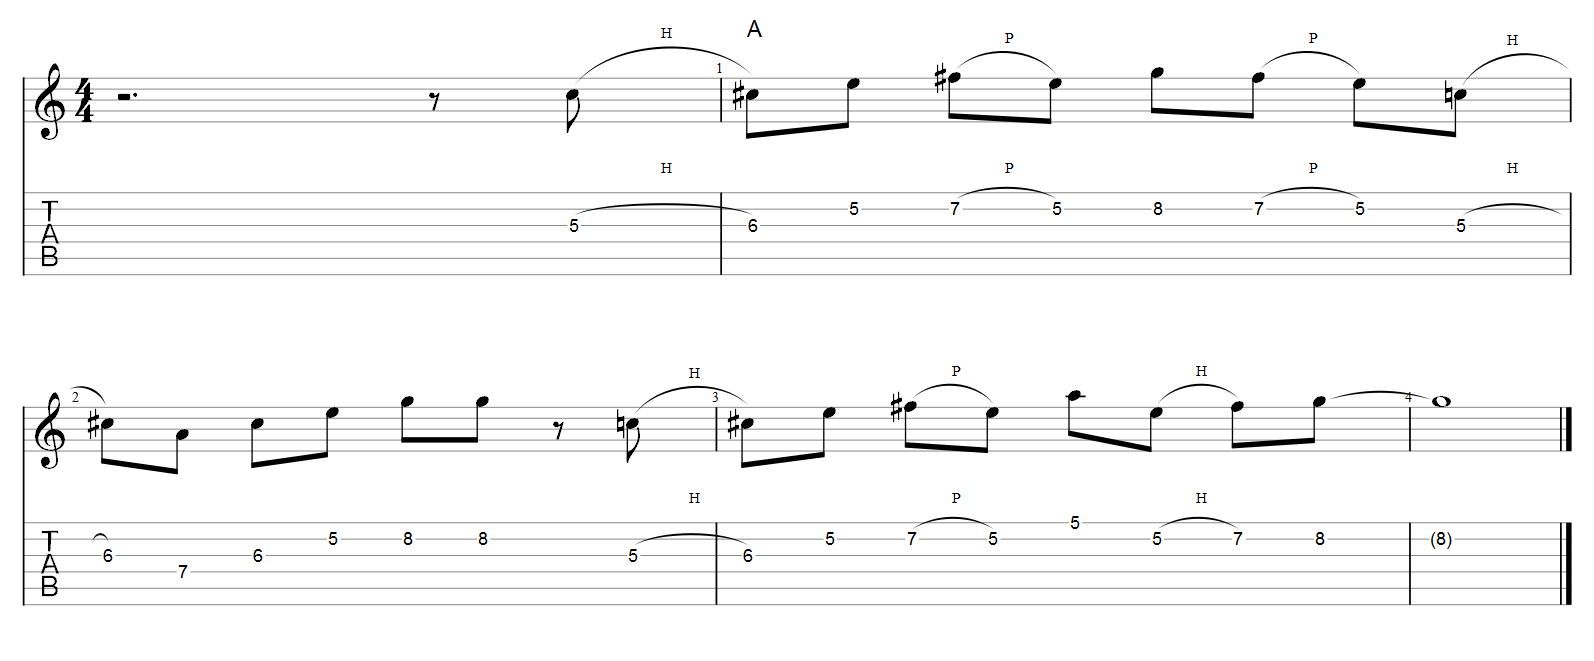
As usual, we can move this along to the 10th fret to play over the D chord and the 12th fret over E. What we’ll do now is play the same phrase over D, but instead of moving it along to the 10th fret, we play the same thing over the A form chord for D, allowing us to stay around the 5th fret. In case that’s at all confusing, here’s two TABs the first showing the riff moved to the 10th fret and the next staying in position. I’ll just show two bars of each chord to keep it simple.
Example 23:

Example 24:
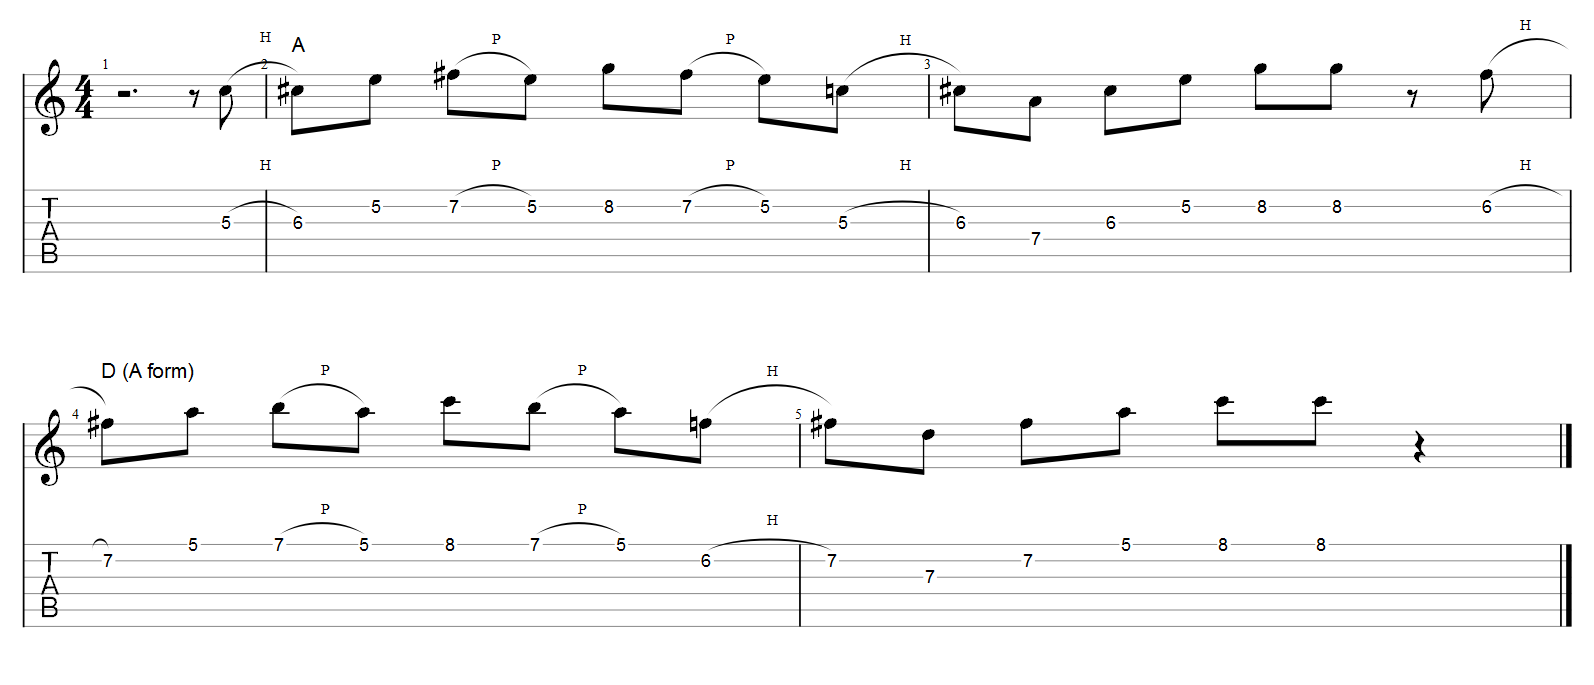
The notes played in examples 23 and 24 are exactly the same thing. The only difference is the location of where the D part is played on the fretboard.
Let’s create a 12 bar exercise using this idea. The example is over a backing track but you should also try it without, this way you’ll hear how the solo itself implies the chord changes. This type of thing is good practice no matter what style you are into, blues doesn’t have to be your thing, this kind of soloing exercise will help you out with your fretboard knowledge regardless of genre.
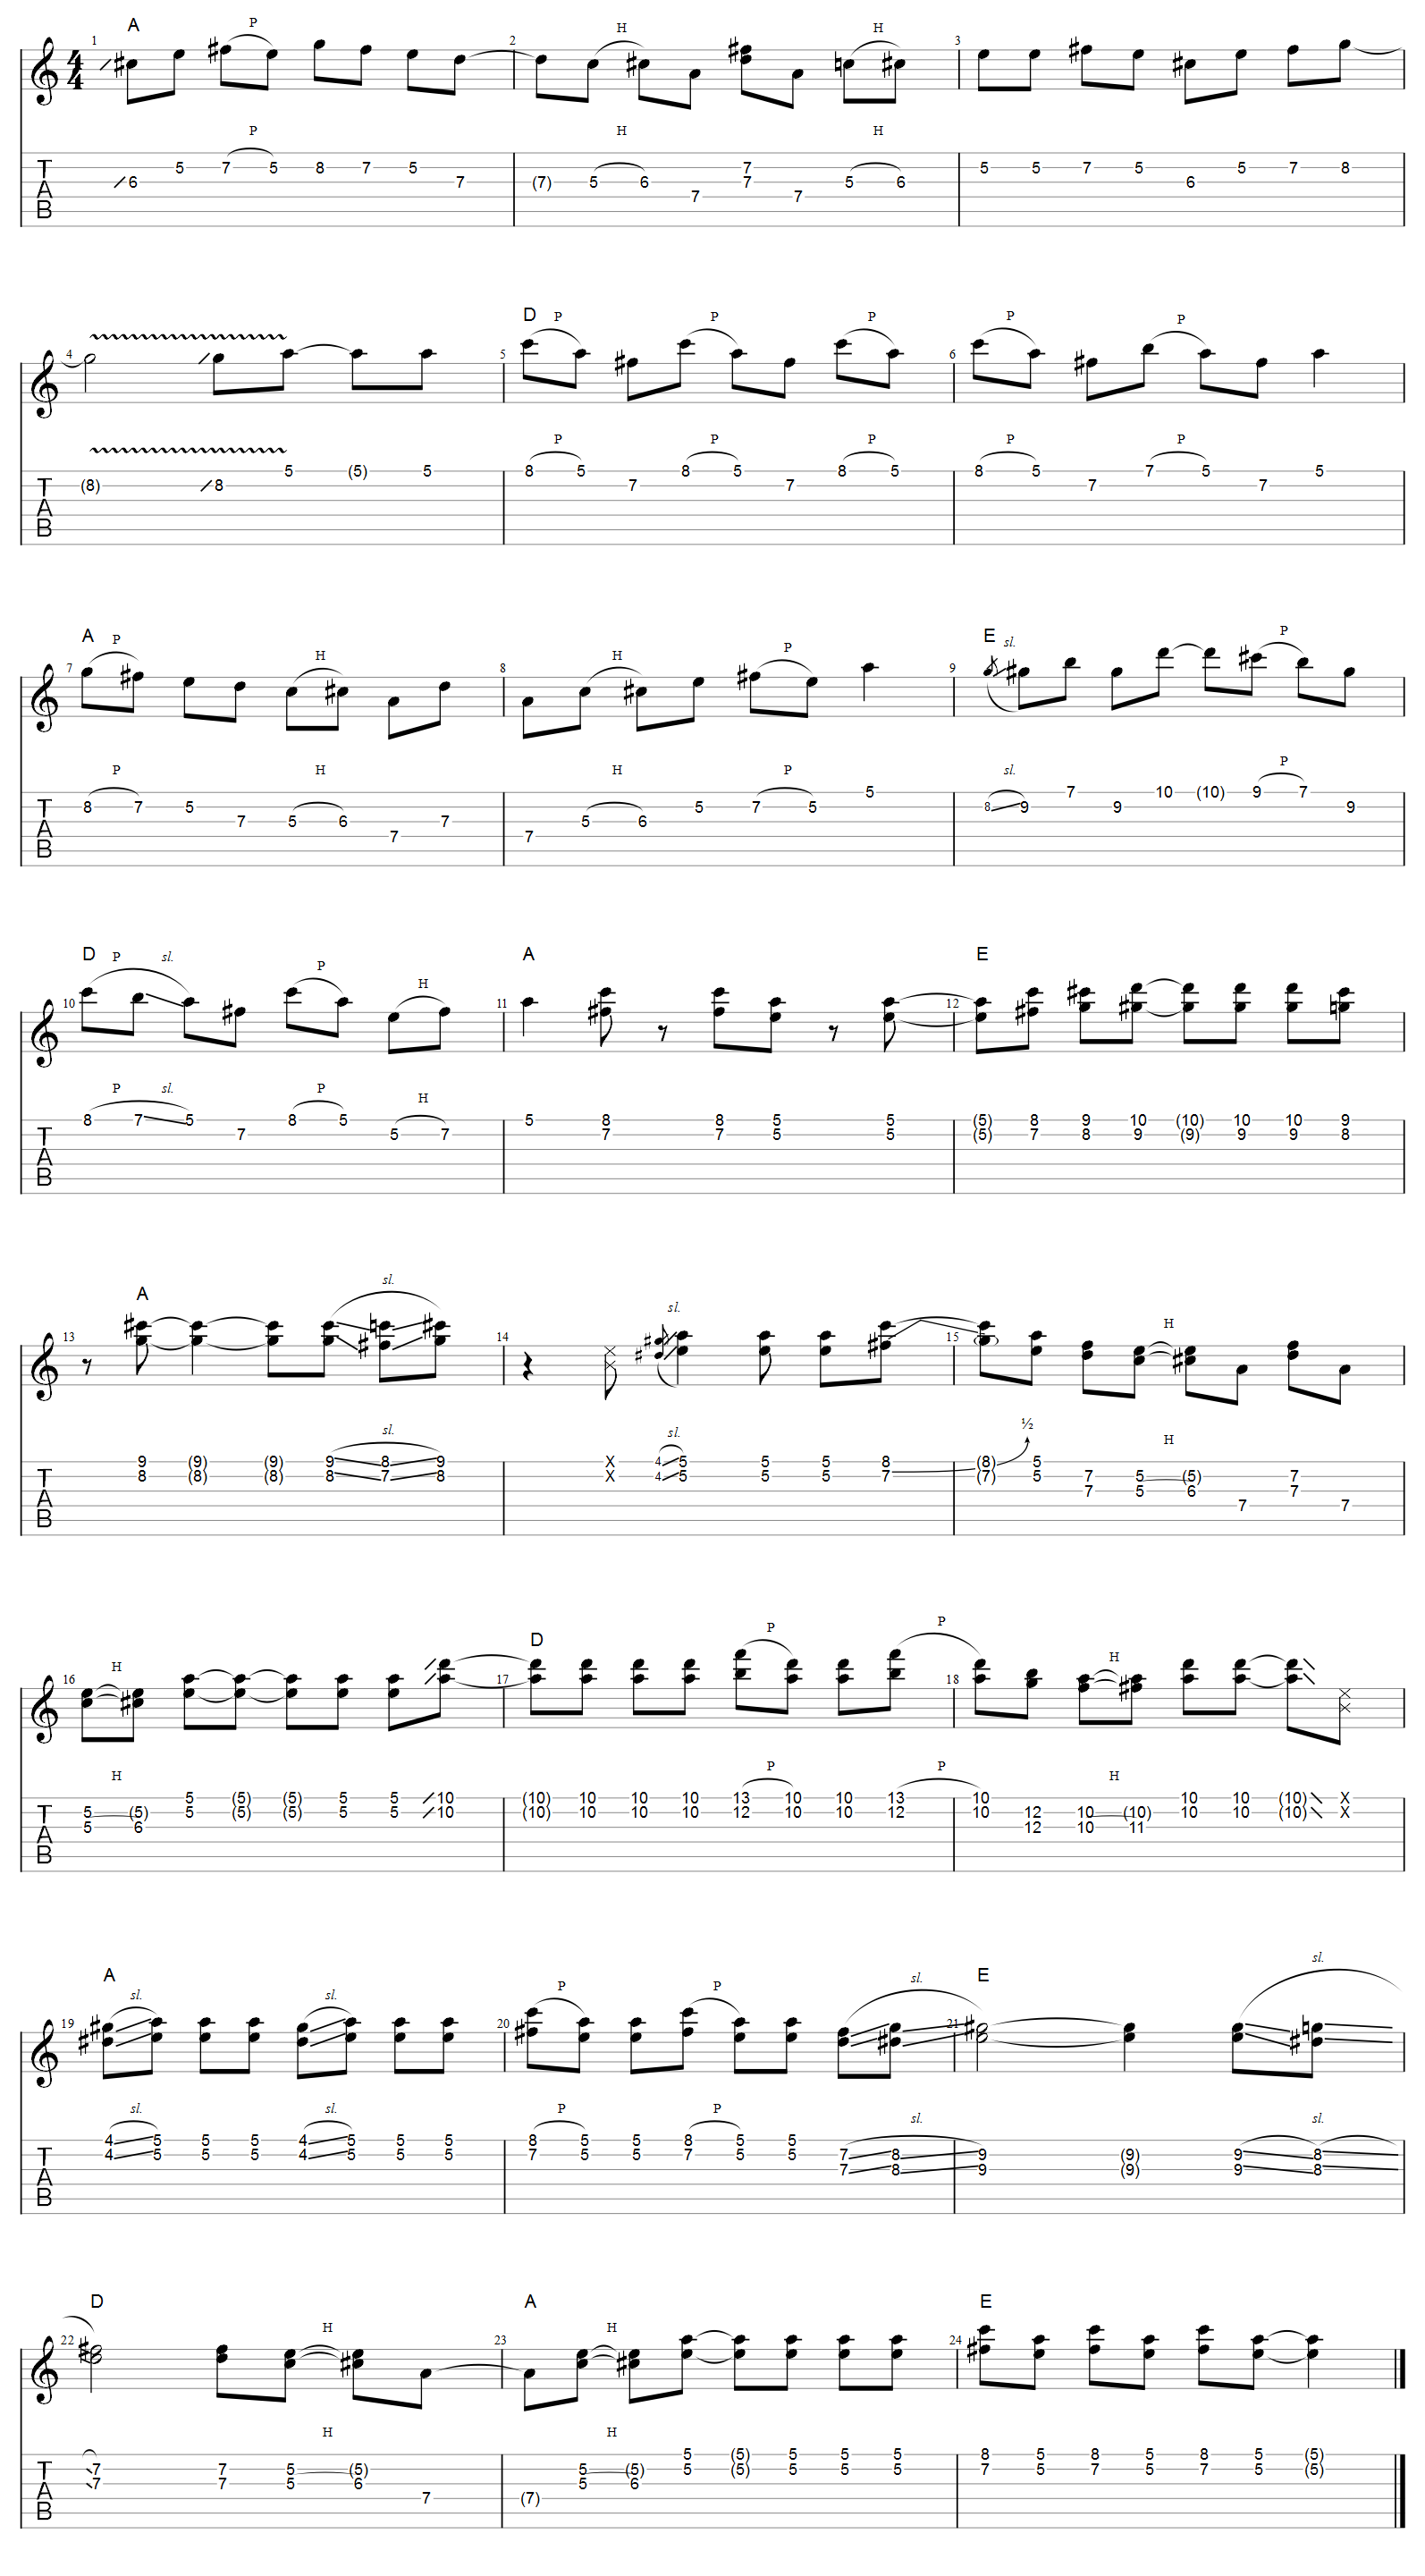
Example 25: 12 Bar Solo Exercise
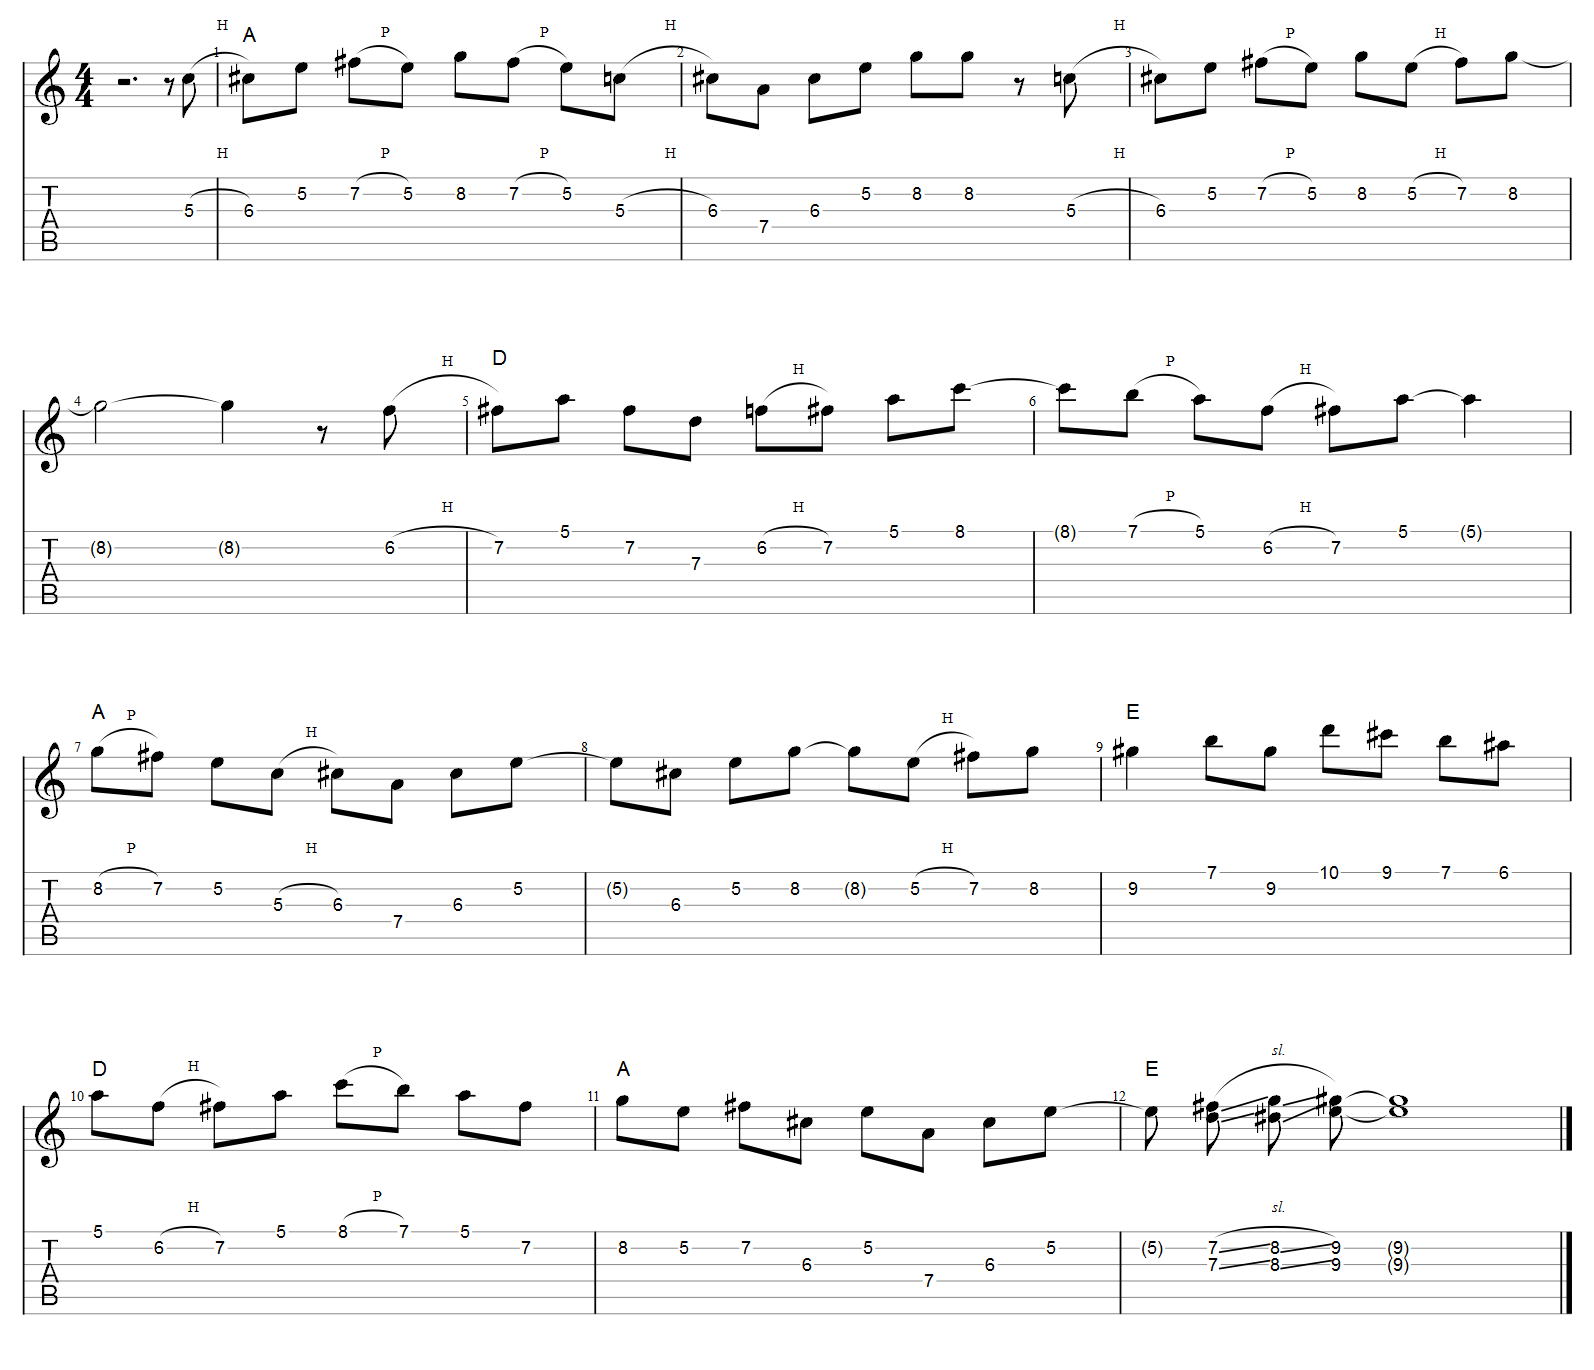
It’s all pretty straightforward with a few small variations in the way some phrases are played. There’s a couple of chromatic parts linking the chord changes between bars 9 / 10 and also in the last bar where we move back up to the E chord with double stops.
Here’s another idea – pretty much the same thing as above but we’ll do the turnaround slightly different in bars 9 and 10. Here’s the full 12 bar TAB again but with the alternate turnaround.
Example 26:
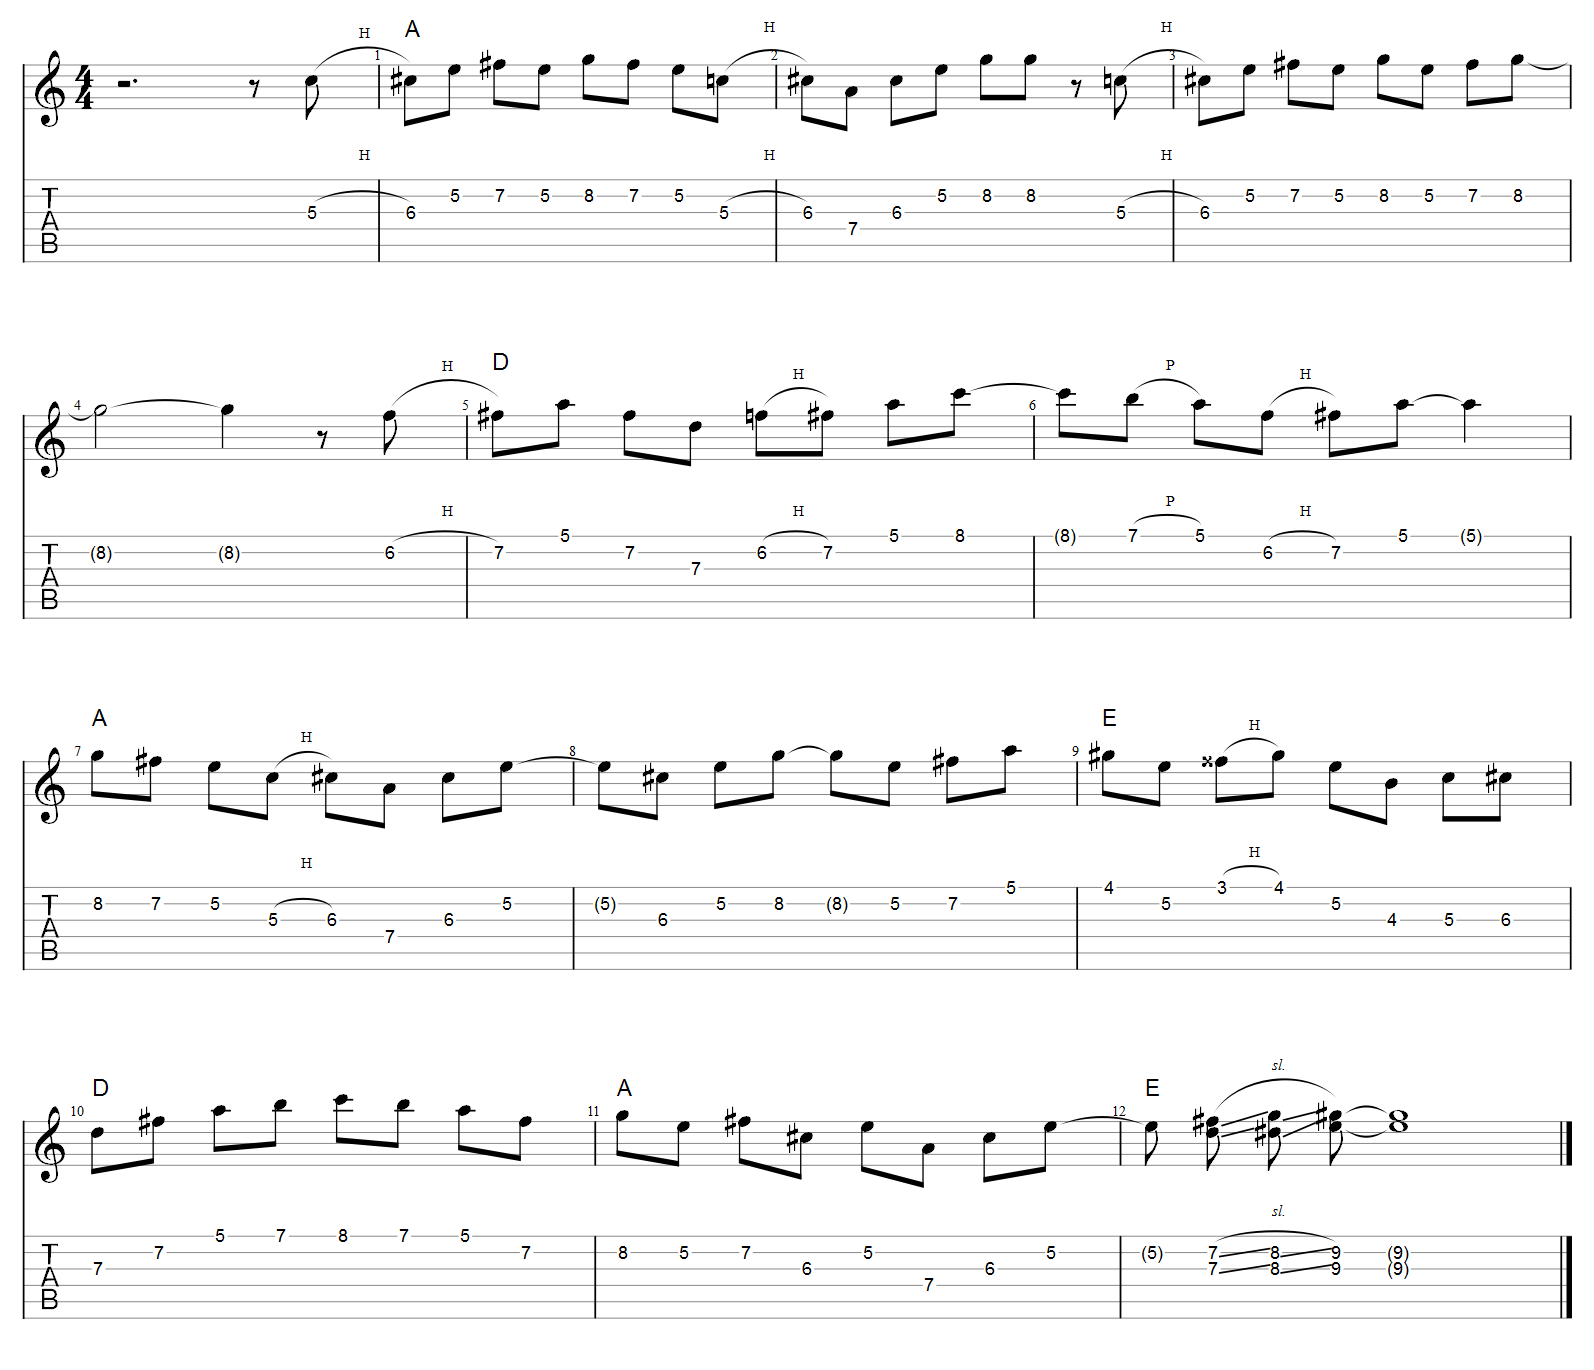
These two bars (9 and 10) might look a bit more complicated but they’re not really once you understand what’s going on. Let’s take a closer look anyway.
For the E chord at bar 9 we’re using the D form chord – just think of a D chord moved up two frets, here’s a diagram for clarity.
We start bar 9 playing the two notes straight out of the chord on the top two strings. We then hammer on to the 4th fret first string from the fret below (minor third to major third) followed by the second and third string chord notes. All we’ve done here is basically played the chord notes but added a hammer on from minor to major third. This takes us to the last two notes of the bar which is just a chromatic walk up into the D bar chord at the fifth fret, basically targeting the third string / 7th fret as shown in the below diagram. From here we’re just playing around the scale phrase again.
All of this pretty much covers the lesson. We started with a cliche riff, played it in different octaves, added some extra notes to it, looked at sliding into notes, learned some double stops based around chord notes, seen how we can move things around the fretboard using the E form and A form chords as our reference and looked at a few chromatic ideas. It’s pretty much all we need. Go ahead, play around and experiment with all of these ideas and you’ll have enough to create some cool sounding solos that sound like rock & roll
I’ll end this with a soloing example so we can see some of this stuff put to use.
This has been a bit of a crash course, and if I’m honest, I think I’m suffering from a bit of lockdown brain melt. If any of it doesn’t quite make sense – just pop a question in the comments.
Here’s a solo. Have fun.
Example 27: Solo
Hi,
thanks for taking the time to do this. Very helpful and informative.
Great stuff, Lee! Lots to work on.
AWESOME!!!
Thanks
Hi Lee really inspirational. Only been playing 9 month but well and truly absorbed. By the way your breakdown of chords and scales is very educating. Thanks loads
This is superb. Can I arrange all these riffs as a guitar solo?
If yes, how?
Great
How can I download the tracks for the examples?
Gib
Hmm, didn’t think of that, I’ll sort some out.
Thanks for taking the time to explain all this. I appreciate this as do others. Well done!
Very well structured!! Great approach…
Thanks everyone, hope it’s useful.
Well done and thank you.
Excellent tuition on some real ‘rock style’ guitar.
24bar?
3×8? Or 2×12?
2x 12
Great stuff, been looking for this for ages. thanks.
I just wish i had found your website sooner. Wasted so much time feeling like guitar playing was not for me. Your teaching method just removes all the doubt and confusion. This how guitar should be taught. Why are there some many confusing teachers and methods out there? Thanks and I love your site.
Finally found a web site on Guitar that makes it easier to Understand,Thank You