
Sometimes we can get too caught up worrying about scales when it comes to guitar soloing. Nothing wrong with scales, they play an important role when it comes to soloing, however, for some styles of music it’s perfectly OK to forget all about scale thinking and just concentrate on what works with the chords. Rock & Roll and many styles of blues (particularly major blues) will often be taught explaining scales, Mixolydian modes, arpeggios or mixing major and minor pentatonics and so on. Theoretically this is all true. Good to know if you’re into that sort of thing – but knowing and understanding it isn’t always a necessity. Whether it’s Chuck Berry, Beach Boys, Rockabilly or up tempo blues – for the sake of this lesson let’s just throw away traditional scale teaching and try something else – we’ll just call it “chord stuff”.
This is nothing new or revolutionary, no trickery or amazing “secrets that the professionals don’t want you to know” (sigh) – it’s simply something that most experienced musicians do, which unfortunately doesn’t get talked about nearly enough as it should. There generally seems to be a need to justify teaching methods with the theory to back it up. I have nothing against that, it has its place, but can end up misleading or confusing – many of the 50’s & 60’s guitarists did what they did simply by trying to imitate the piano.
This ends up with a chicken and egg situation … “how do we explain what they were doing?” We could analyse these guitar solos and find some correlation with scales, particularly the mixolydian and / or a mix of major and minor pentatonic etc. But why bother? It confuses everything. Many of these old rock & rollers didn’t think about this stuff and neither should we, at least not for this kind of stuff anyway. If we try too hard to apply scale thinking to this style then we’re more likely to veer away from the typical sound.
There are some arguments that could be made against what I am saying here but then the whole thing will just get bogged down with unnecessary nonsense. Moving on …
Most rock & roll and blues songs are based around three chords, the I-IV-V, usually 12 bars, sometimes 8 or 16 or whatever, it doesn’t matter. In the key of A the I-IV-V chords are A, D and E. The majority of up-tempo rock & roll will have a major or dominant feel and might use dominant 7th (or 9th) on all three chords or just the V or the IV and V. It doesn’t matter much, let’s just say all, or any, of the chords could be major or dominant, we’re just going to think of them all as the same thing – A, D and E, regardless of whether they are 7th’s or not.
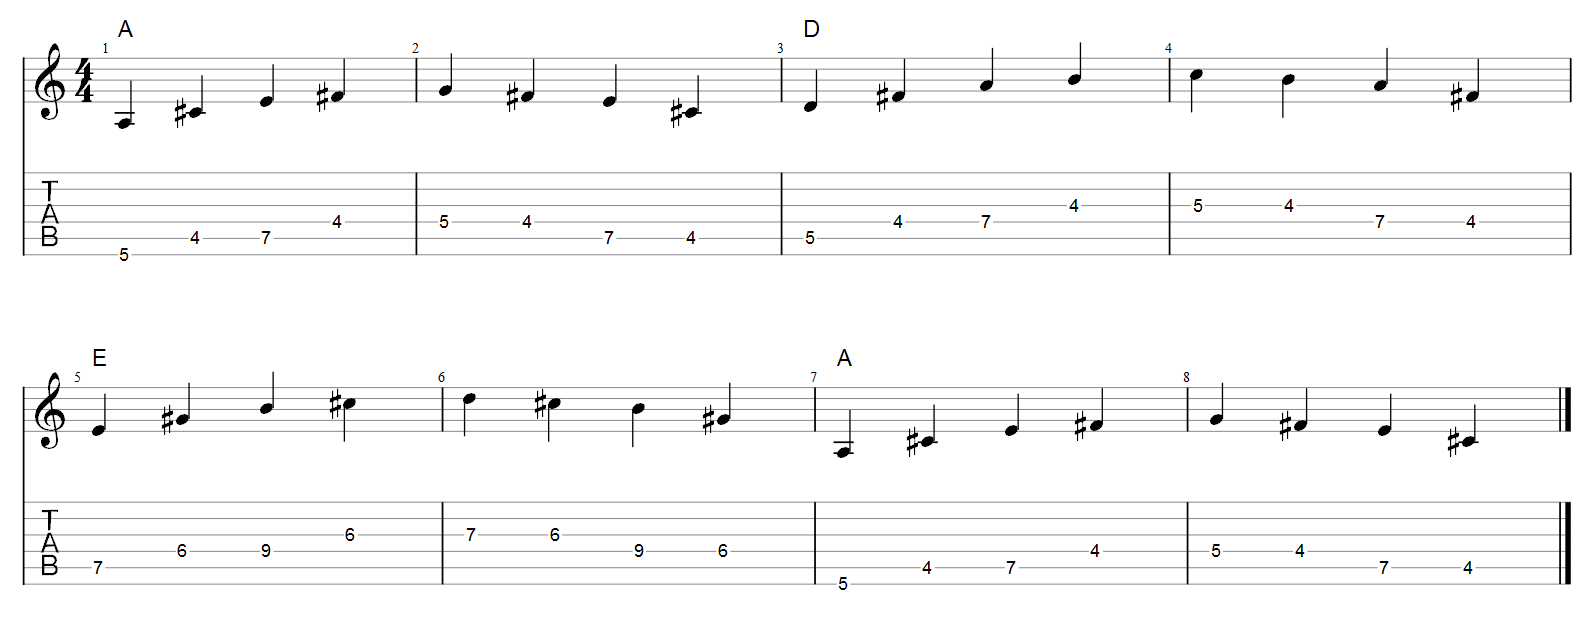
Let’s start with the basic rock and roll riff, something you’ve heard thousands of times as a guitar riff but more likely a bass line.
Example 1

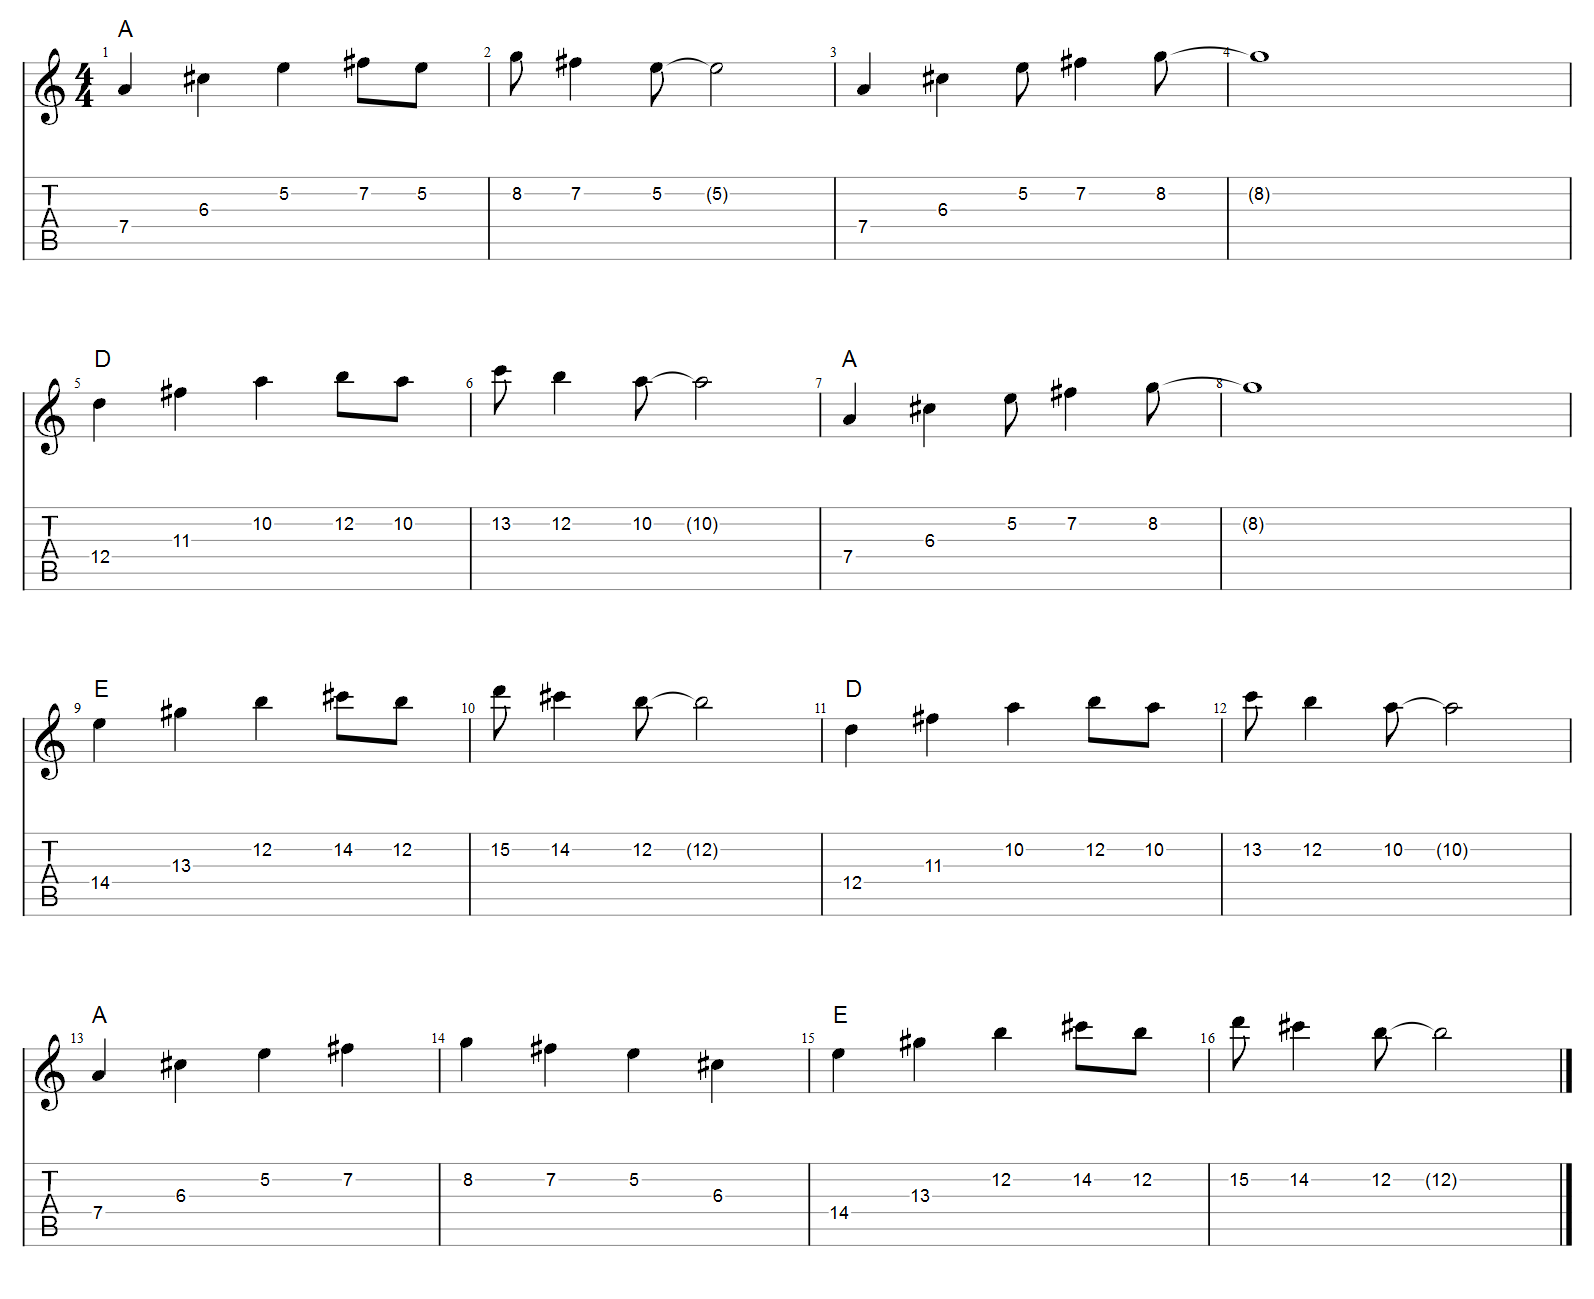
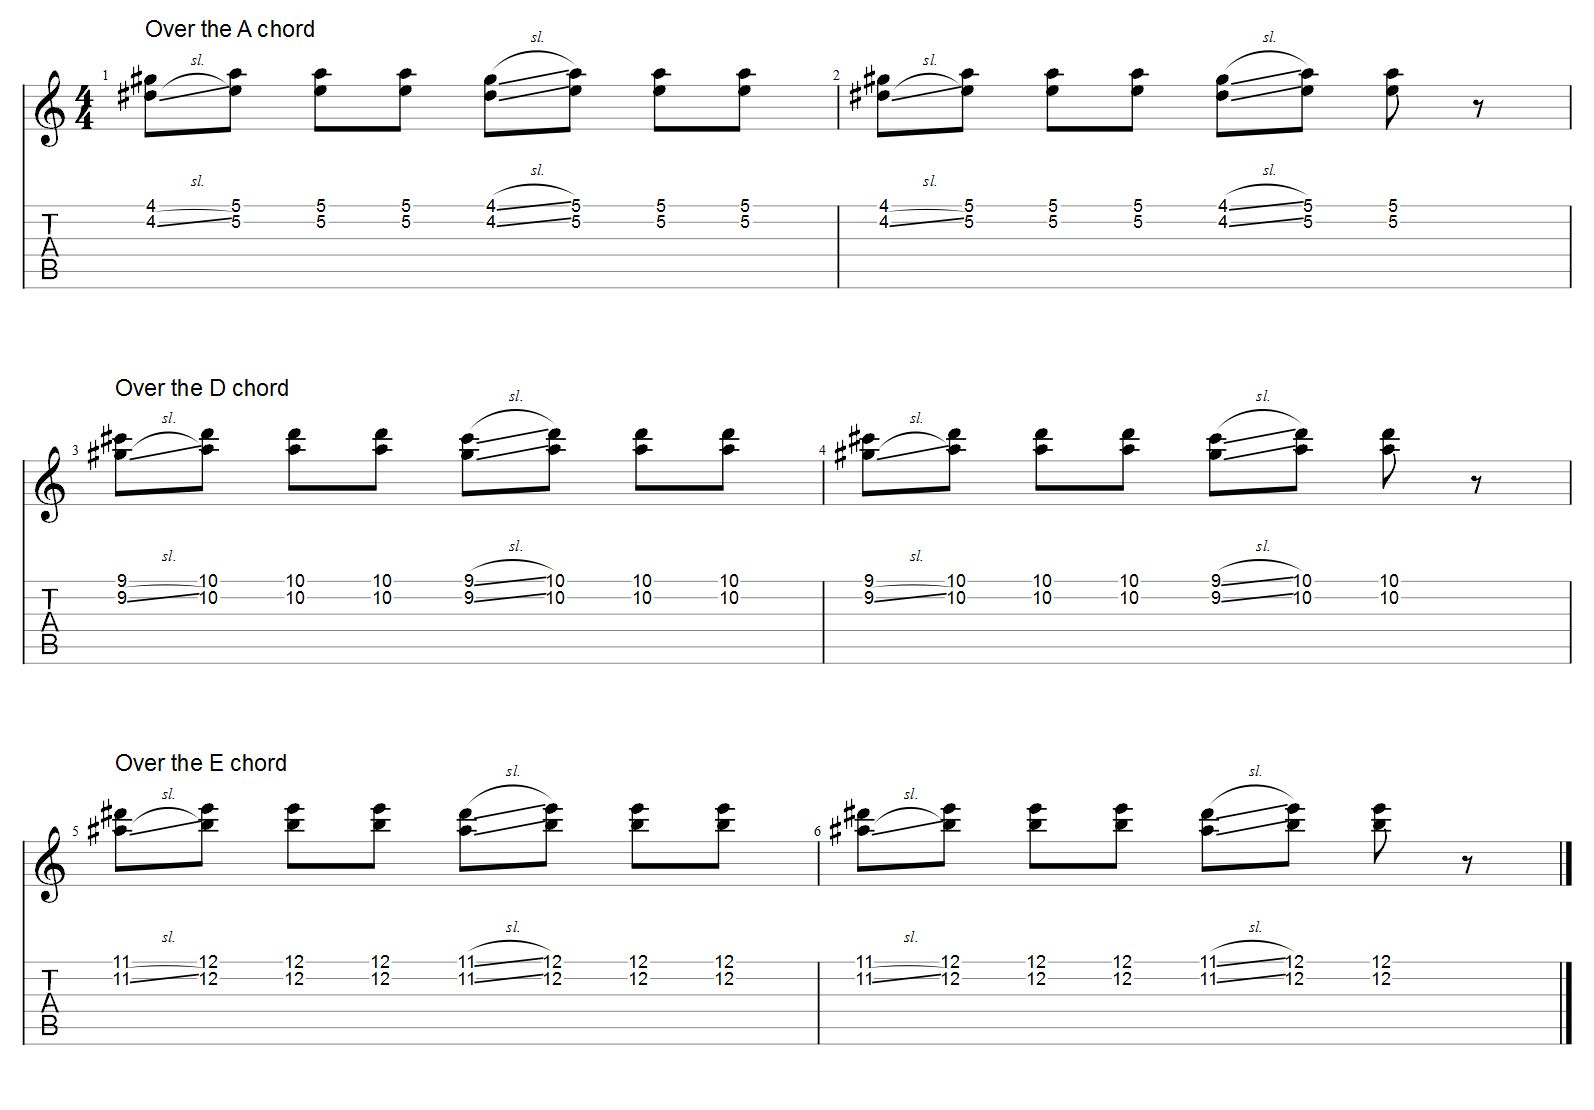
This common riff starts on the A and we play it over the A chord. We can move this same riff to play over the D and E chords. Here it is played over eight bars of A, D and E.
Example 2
We could, if we liked, think of this as separate scales, or phrases, each played over their associated chords. Throughout this lesson I might refer to these kinds of phrases as “scales” or “riffs” just for want of a better description.
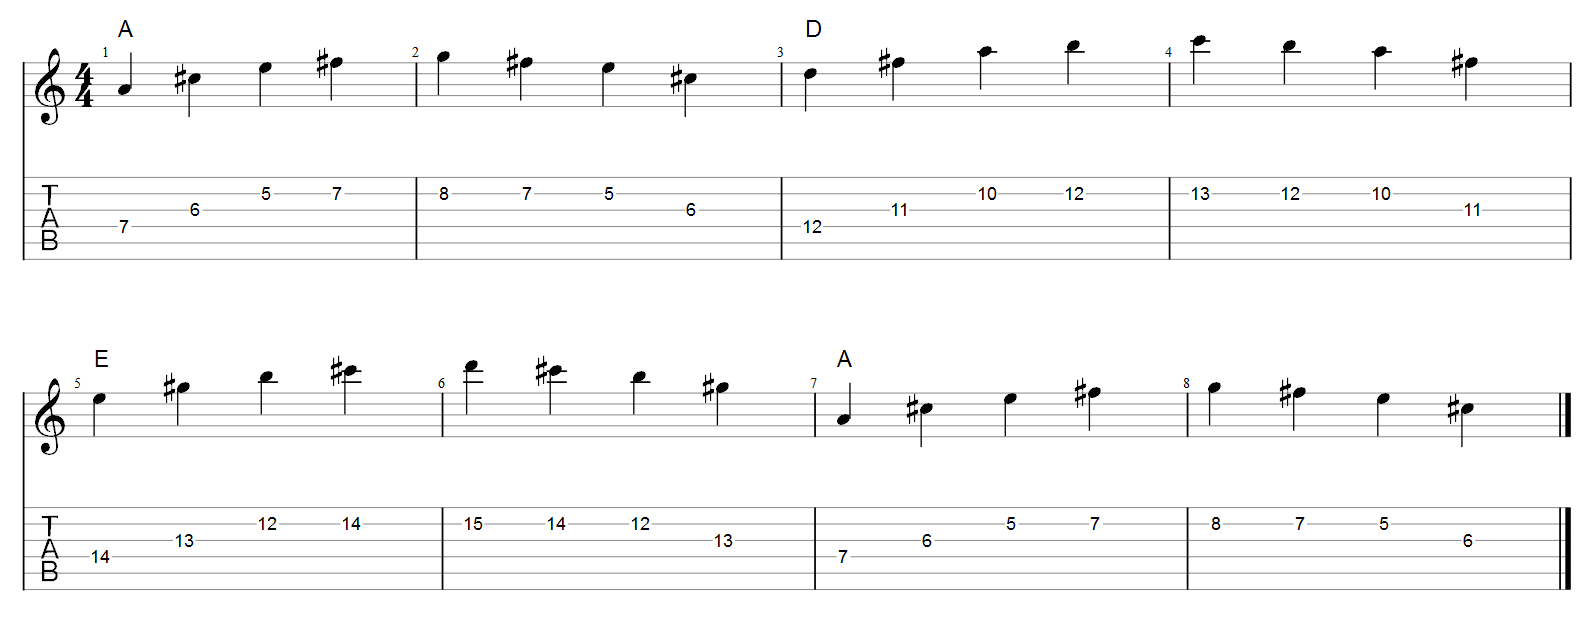
Let’s take a look at this same A “scale” played an octave higher.
Example 3

Hopefully you already know the common six string (E form) bar chord – if you don’t, go learn it. Here it is at the fifth fret – A major chord.
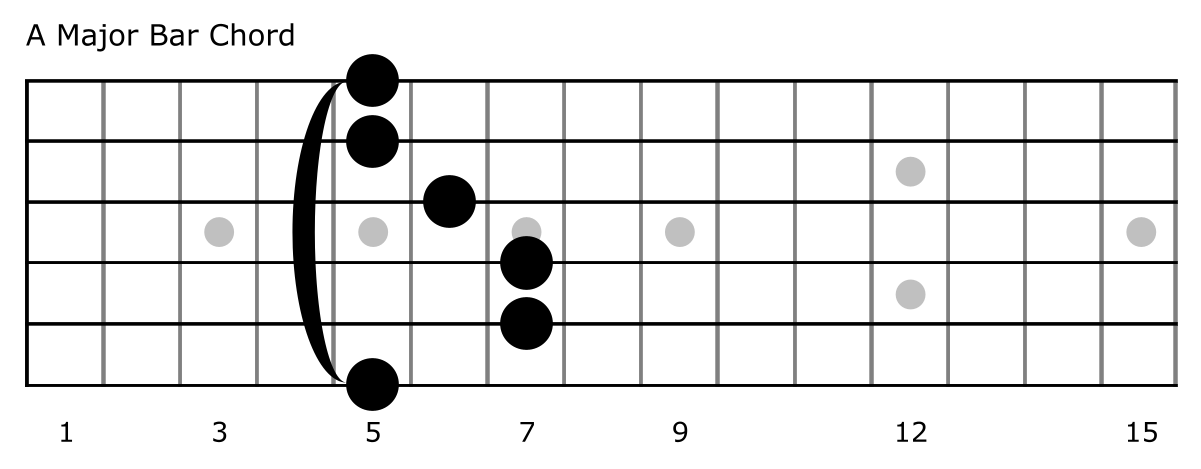
If we move it to the tenth fret we have D major – move it to the twelfth fret and we have E major. If you’re not already used to playing a three chord I-IV-V this way, then start practising and get used to it.
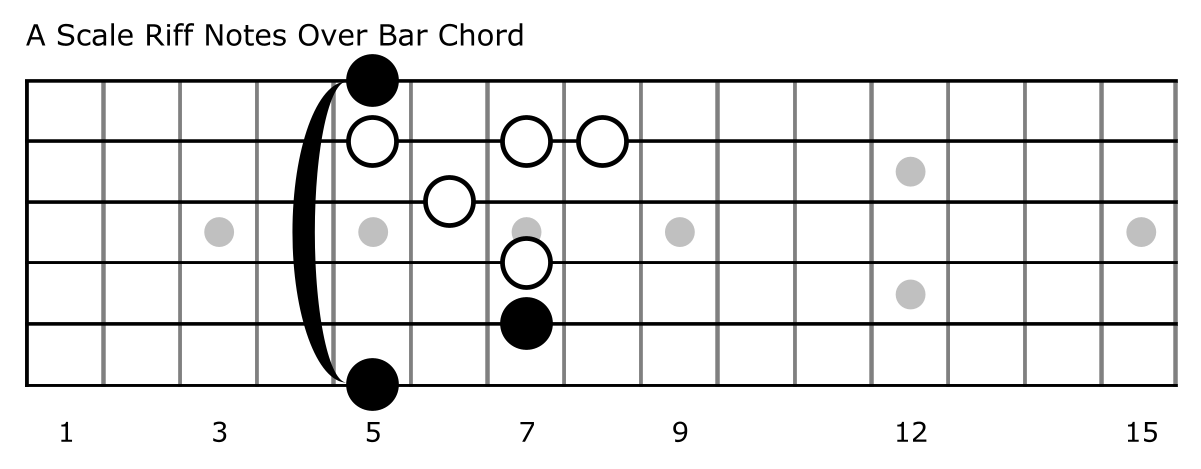
Here it is again with the A scale / phrase notes overlaid shown as the white circles. From now on we’ll use this chord in the A, D and E positions as a guide to quickly move the scale phrase around.
Here’s the eight bar riff again, this time using the pattern above. All we do is simply move it along the fretboard when the chords change.
Example 4
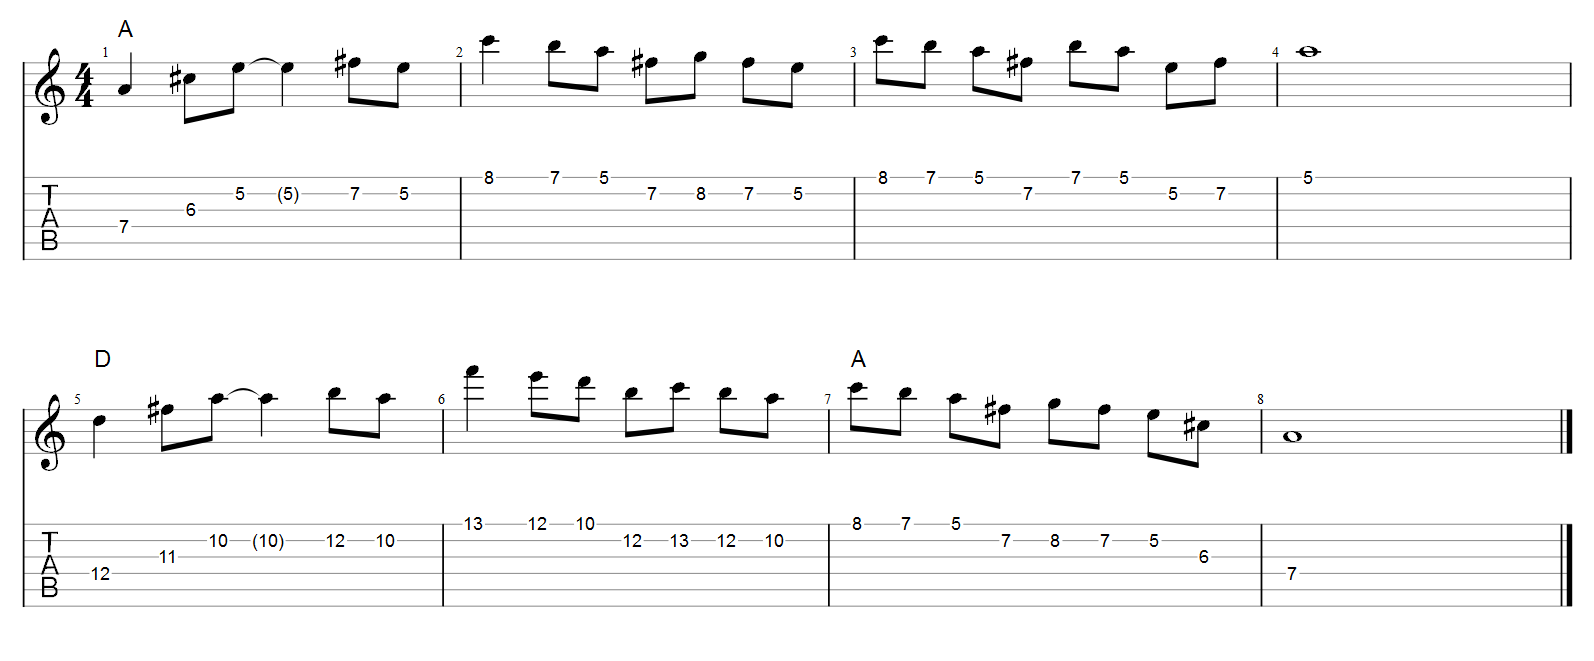
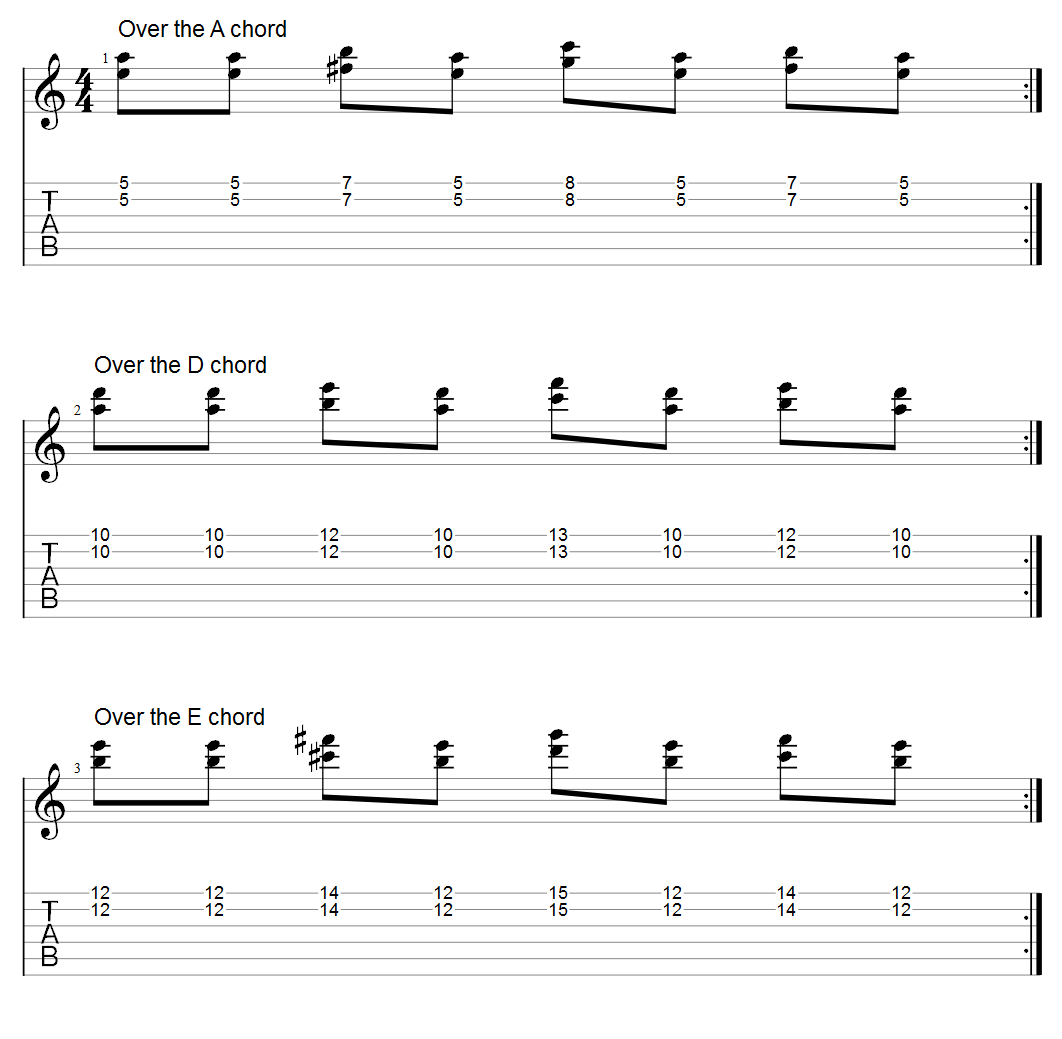
We don’t need to play the riffs verbatim, we can vary things up just like when would when we use a scale and play around with the notes. Here’s a very basic example of doing that, we’ll do it over 16 bars.
Example 5
The general idea so far is we have a riff that works over each chord change, which we can play around with just like we do with something like a pentatonic or major scale. Despite the simplicity, what we have here is a method of playing a solo that reflects the chord changes – take away the backing and you can still get a sense of the chord changes which makes the solo sound a bit more like we know what we’re doing.
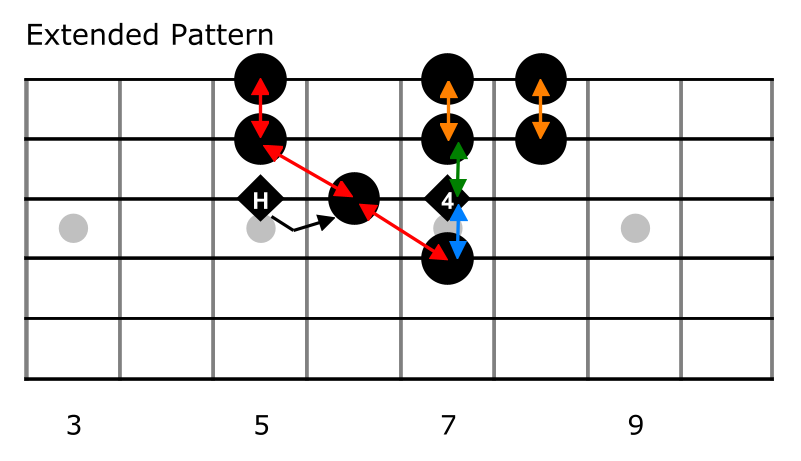
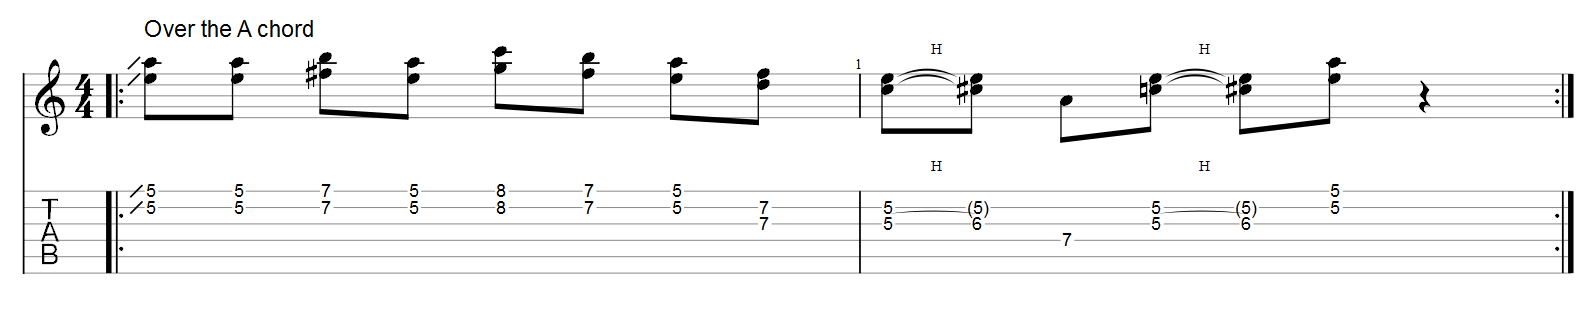
We don’t need to stop there. Let’s add a few more notes to the movable scale pattern.
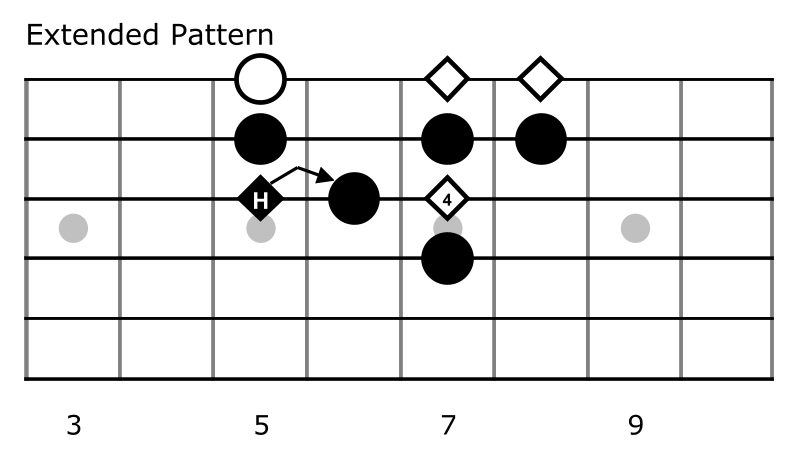
We have added five notes, sort of. For the moment let’s just pay attention to the ones on the first string. The white circled note is a root note so it needs no special attention. The other two (white triangles) will generally sound OK but might need a little more care as they can sound a bit dodgy if we overuse them. We’re not going to get hung up in theory here, we’ll just use a simple rule … don’t hang onto these notes for too long, keep them moving or play them with a staccato feel and they shouldn’t cause any problem.
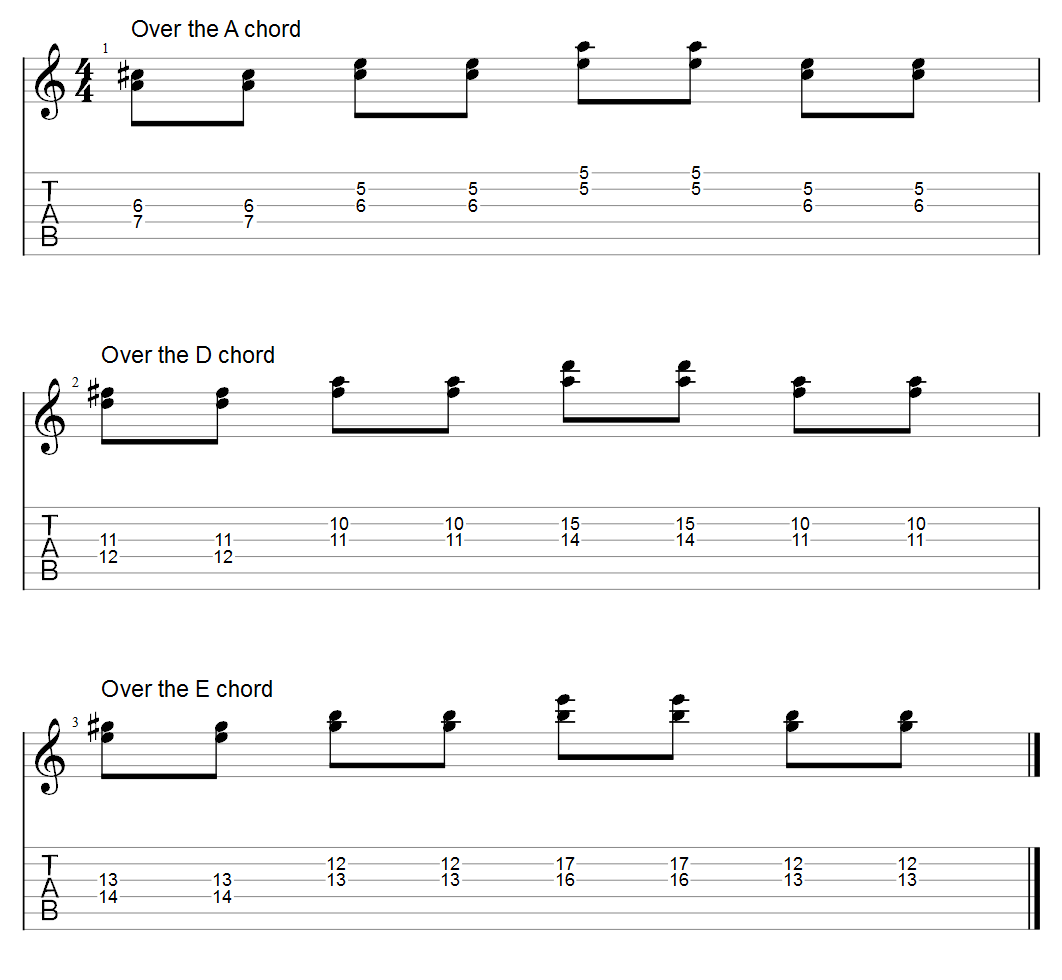
Here’s another basic example including the added notes on the first string, just over A and D to keep things short and simple.
Example 6
The remaining two notes are either side of the note on the third string. The one marked with an “H” is the minor third and it’s mostly used to hammer on (or slide) to the major third beside it. Next to that is the note marked with a 4, which is, you guessed it – the 4th. Hammering on from minor to major third will always work and give us that common major bluesy sound as long as it’s not overdone (like anything). The 4th is a little less stable on it’s own but as a passing note or part of a lick it generally works well.
The best way to get used to what works and what doesn’t is to just play around with it all – some things just can’t really be explained, it’s just down to what we’re used to hearing over years of listening to music. Listen to the two examples. The first one sounds a bit off (to my ears) and the following one sounds a bit more rock & roll – both examples are using the exact same notes, they’re just played a bit differently.
Example 7a

Example 7b

We have to find our own way when deciding what sounds good and what doesn’t. The best way to do this is just learn a few licks that work and use them a thousand times, you’ll soon get used to it. To be honest, we wouldn’t use this scale pattern alone, there’s a lot more we can add to it yet – we’re building these ideas up one at a time.
The full pattern with the added notes can be moved around to each chord position, it will work over the D and E as well as the A chord but to be honest it would probably start to get very boring. It will, however, also work over all three chords by just staying in the A position throughout. For now this is just about the idea of having a set of notes that can be moved around and played over each chord – we still need to make it sound more interesting.
To recap so far:
1: The commonly used blues / RocknRoll bass line is a simple riff that is repeated starting on the root note of each chord when the chords change.
2: We can play this same riff an octave higher (or as high as we have enough frets), using the six string bar chords as our guide.
3: We can play around with the notes in the riff to spice things up.
4: We can add some more notes to the pattern to spice it up further, and like above, shift the scale pattern along the fretboard over each chord. Only now with more notes we may need to take a bit more care, they mostly work but will sometimes sound a bit dodgy. We improve at this with practice, experimenting and playing over backing tracks regularly.
Double Stops
This is where we can turn something very basic into something very usable and cool sounding. Double stops are where we play two strings at the same time. These really drive home the rock’n’roll, Chuck Berry style fifties / sixties sound. To some extent it probably defines this style of music.
If you’ve never used double stops before then they might take a little bit of practice but aren’t really difficult. You can play them how you like on the right hand, all pick, pick and finger (hybrid picking) or just two fingers, I tend to use all of the above depending on what mood I’m in or sound I’m going after. If you use just the pick then you’ll probably find using all downs-strokes where possible will suit the style and sound a bit more aggressive and exciting.
Let’s first take a look at something very straightforward to get the idea. So far we’ve seen how we can move the bar chord along the fretboard and play with the riff notes that overlay the chord. Now we can make things even easier and just play actual chord notes – only instead of strumming the full chord we’ll only play two notes at a time – it could be something like this (I won’t bother tabbing out all 12 bars).
Example 8
Now, it might sound a bit boring but it’s quite important so don’t jump ahead just yet. The theory is obvious, if we can play a full chord then there’s no reason we can’t play a partial chord – it all works, no wrong notes. If we look at these double stops as just partial chords then we have stuff we can play around with to form a basis for riffs and licks. Just about the simplest thing we could do is to play just one double stop per chord, let’s say the one on the two thinnest strings … but we’ll spice it up a bit by sliding into it from a fret below (or you could hammer on, both work well).
Example 9
Very simple but now we’re starting to sound a bit more like rock & roll. We could do the same thing on each of the string pairs used in the previous example. I won’t bother tabbing it out, it should be self explanatory.
Let’s take it a bit further. Just like in the earlier riff examples we added a few extra notes, there’s no reason we can’t try these as double stops too. Here’s a simple idea.
Example 10
Now let’s take another look at the extended scale pattern (that we used earlier) with some arrows added to represent the double stops. The red coloured arrows show the double stops involving chord tones, the orange show the added scale notes. The 4th can also be used as part of a double stop, the notes between the green arrow probably sound better than the those between the blue, personally I rarely use this but by all means experiment with it.
There are many ways yo can mess around with these double stops and, to some extent, we could apply a few “rules” to them like we did with the riff / scale idea earlier.
1: the string pairs in red are chord tones so will always sound OK.
2: Orange pairs will work well but don’t hang onto them for too long.
3: Green and blue use sparingly.
I’m only mentioning these as an explanation to make the point that sometimes things work out and sometimes they don’t. What works over one solo might not work over another solo in a different song, even though we’re using the same notes. As the saying goes, we just have to use our ears.
There is no point in trying to explain the theory of this, I’m not even sure I could.. Just know that it happens and move on – it’s not important. Just experiment and play over jam tracks regularly, learn a few solos and licks and your ears will get used to what works and what doesn’t – you’ll just start to develop a sense for it.
Here’s one to get you started using double stops on the 2nd, 3rd and 4th strings. This is a great example of something you should practice often. Once you nail it you’ll find yourself messing around and adapting it without much thought.
Example 11
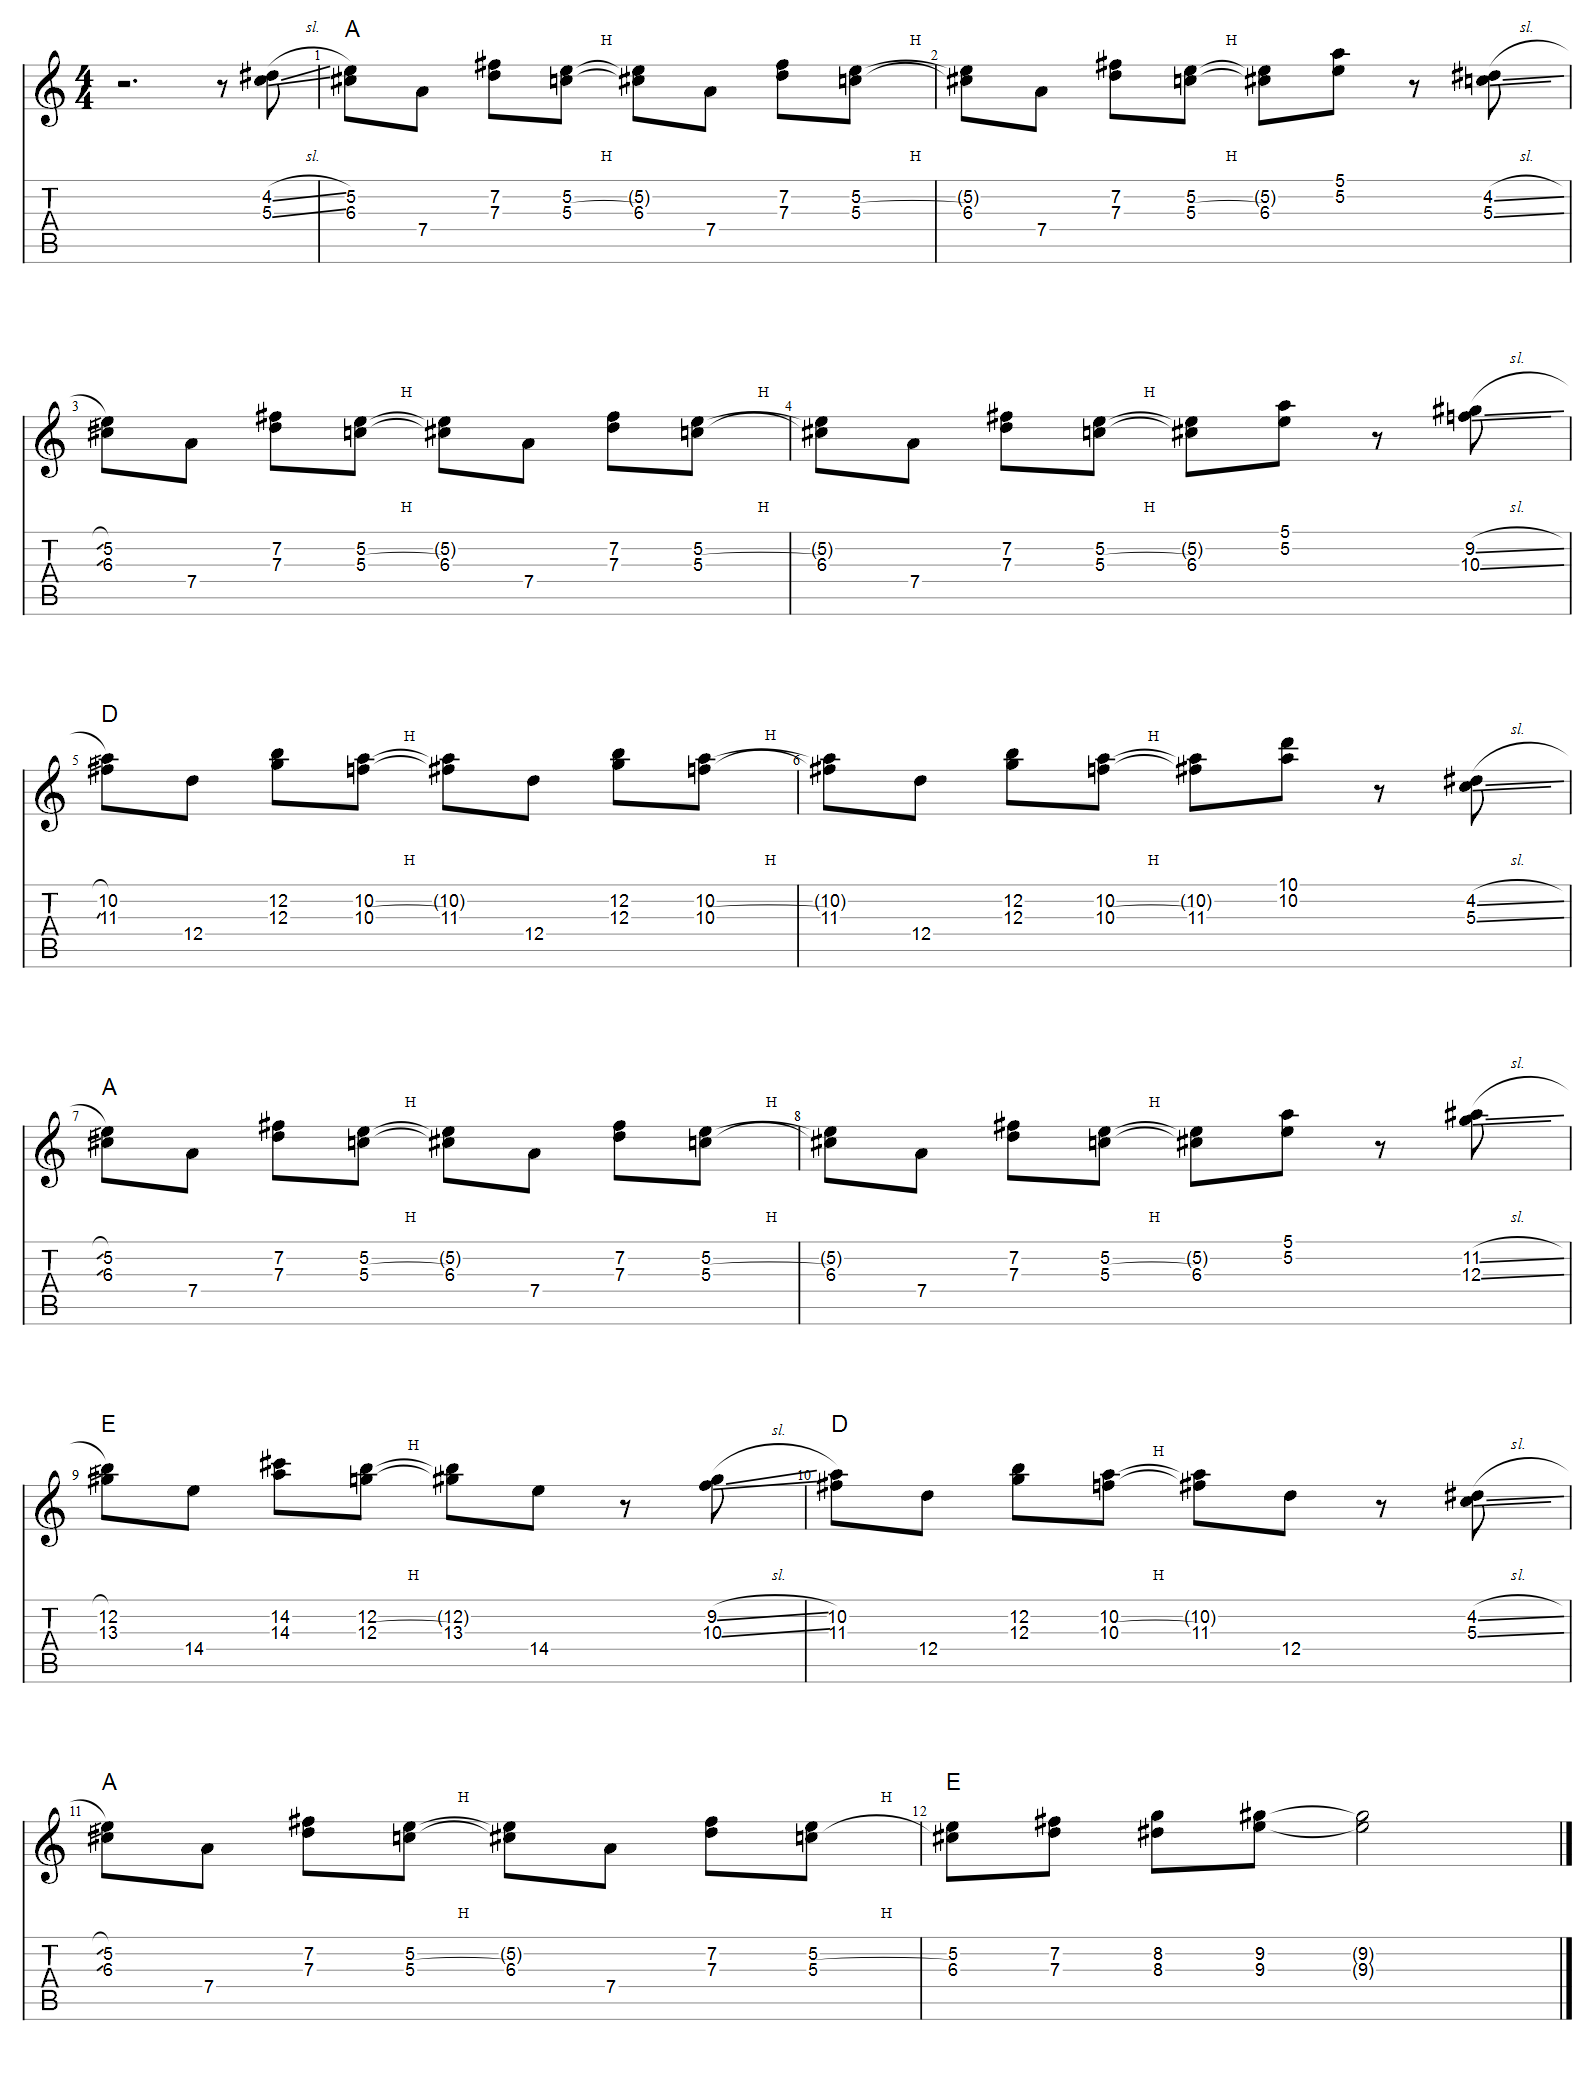
We can combine the above example with the previous one and maybe come up with something like this. I’ll just show an example over the A chord – you can move it along the fretboard to start on the tenth and twelfth fret to play over D and E.
Example 12
This pretty much covers the entire concept used to create solos for these styles of music. Using nothing more than the ideas described on this page is enough to experiment and come up with your own licks and ideas which can be moved along the fretboard to match the chord changes. Just using the scale pattern played as single notes or double stops is enough to create full solos that match the style and sound like we know what we are doing – it doesn’t necessarily need much more.
Next, in part two we’ll take a look at some ideas we can mess around with to spice things up some more and then piece them together to create a full guitar solo.
Go to: Part 2
Want to improve your guitar soloing? Why not check out my course on Soundslice – Pentatonic Workshop

Very cool! Just been playing for about 10 months but starting t tie things together. This is a big help!
I cant believe how much USEFUL information is on this site. Really, its so good. Ive been playing for abot 11 months and this is far wand away the most helpful !
This is fantastic — I was aware of the basic idea of moving the same patterns around with the changes, but somehow this still is a big help. Moving the pattern always seemed a bit like cheating/ not quite right in the light of theory, it smacked too much of modulation in a way, as in, with notes outside the I triad, surely we are “still further outside the key” if we, play the same pattern in IV or V. Trust your e.at more, I suppose! Now I need to bridge between this and playing in position, and (less trivially) this and sticking to within a scale — as in, can I make sense of the minor 3rd of the IV in the context of the scale? I’m sure I’m overthinking again, and “under listening”.
What would help the auditorily challenged would be more examples of rhythmic and melodic variations, to help us break free of the familiar 1-3-5-6-7b-6-5-3 in eighths.
I guess you could be overthinking or possibly even underthinking. Sometimes it’s good to just throw away the analysis and get on with things. After a while of doing so, things start to make more sense all on their own as you piece things together slowly.
Moving patterns around can be thought of as just another way of using a scale. For example, let’s say a I-IV-V major chord sequence G, C and D. This is the key of G major and we could play a G major scale or G major pentatonic over the whole thing.
We could also try something like G major pentatonic over the G chord, C major pentatonic over the C and D major pentatonic over the D. Same scale pattern, just move it along the fretboard using the same idea as outlined in this article. In this instance we aren’t going out of key at all. Example…
G major scale notes: G A B C D E F#
G Triad notes: G B D
C Triad notes: C E G
D Triad notes: D F# A
All of the triad notes for each chord belong the G major scale. Now let’s look at the major pentatonic notes.
G pentatonic: G A B D E
C pentatonic: C D E G A
D pentatonic: D E F# A B
Again, all notes belong to the key. All we are doing by moving things around is ensuring that more chord tones are likely to be used over the relative chords.
The rock & roll / blues idea is really just that. The majority of note are still in key but with a few outsiders added for effect. The more we get used to listening to “wrong” notes, the more normal they become. Often these notes will be used in short duration and not sustained for too long. In essence I guess you could think of moving patterns around in this way as still being mostly in key but with a bit of sparkle added.
Some rhythmic and lick / melodic variations might be a good idea for the next article. I just need a burst of enthusiasm at the moment, I’ve gone a bit stale with lockdown blues lately!
Many thanks!! – I didn’t expect a reply to my musings, let alone a thoughtful and detailed one. I think it is a case of over- and underthinking 😬. I had forgotten / not considered that the three major pents cover all scale notes (this a case where I was underthinking) and provide the structure, the outside notes are spice (overthinking). Thank you again. Much looking forward to a future article on variations.
Speaking of articles: this may be a dumb question, but I cannot find an index of articles on the site! I can navigate within the parts of one series, but discovered both series I’m aware of (CAGED/chord tone solos and this one) through google, from “outside” the site, but can’t find a menu of blogs/articles. Or is this menu unlocked after registering?
Thanks again!
You’re right about the links and navigation. It’s something I need to work on … so much to do!
16bar = 12bar with last 4 bars double duration…what?
It’s just 16 bars. Not quite sure what you are questioning. Blues or any other genre doesn’t have to be 12 bars, could be 8, 12, 16, or anything you like. 16 bars is quite common.
This is a very cool approach in my opinion . It’s like T bone walker, Carl Hogan to Chuck berry. Really useful stuff, very clearly demonstrated and the written notes are very useful swell. I bought the pentatonic fluency book and found the site from there. I’ll definitely look at more stuff here.
Thanks Robin. This approach (or variation of) is used by most soloists but unfortunately isn’t taught often enough, I think most teachers assume it’s obvious, but it isn’t to most … all everyone talks about when soloing is scales, scales and more scales.
sorry about the typo in the second line of the above message – ‘swell’ should read ‘as well’ .
I have had this site on my iPad for months and never looked into it until today. Just fantastic. I have real problem adlibing solos and this has helped. Any chance you can provide a full example for a 12 bar blues solo.
I think there is one or two solos at the end of part 2 of this lesson, have you tried those?