
My guitar solos suck! What scales should I use?
It’s a question we hear often among amateur and even some advanced intermediate guitarists. The title sentence reads like a statement followed by a question – in actual fact it’s more like a question followed by the answer. Let’s rewrite it:
Q: Why do my guitar solos suck?
A: Because I don’t know how to use scales.
In other words, you think your solos suck and you’re hoping that using a different scale will improve things … and that is where everything has already gone very wrong for you. Not your fault, with the majority of books and lessons about guitar soloing, it’s pretty much all they talk about – scales and scale patterns.
Bear with me here, the chances are that you’ve been so buried deep in confusion about scales that all of this will take a while to sink in, so we’re going to take things slowly.
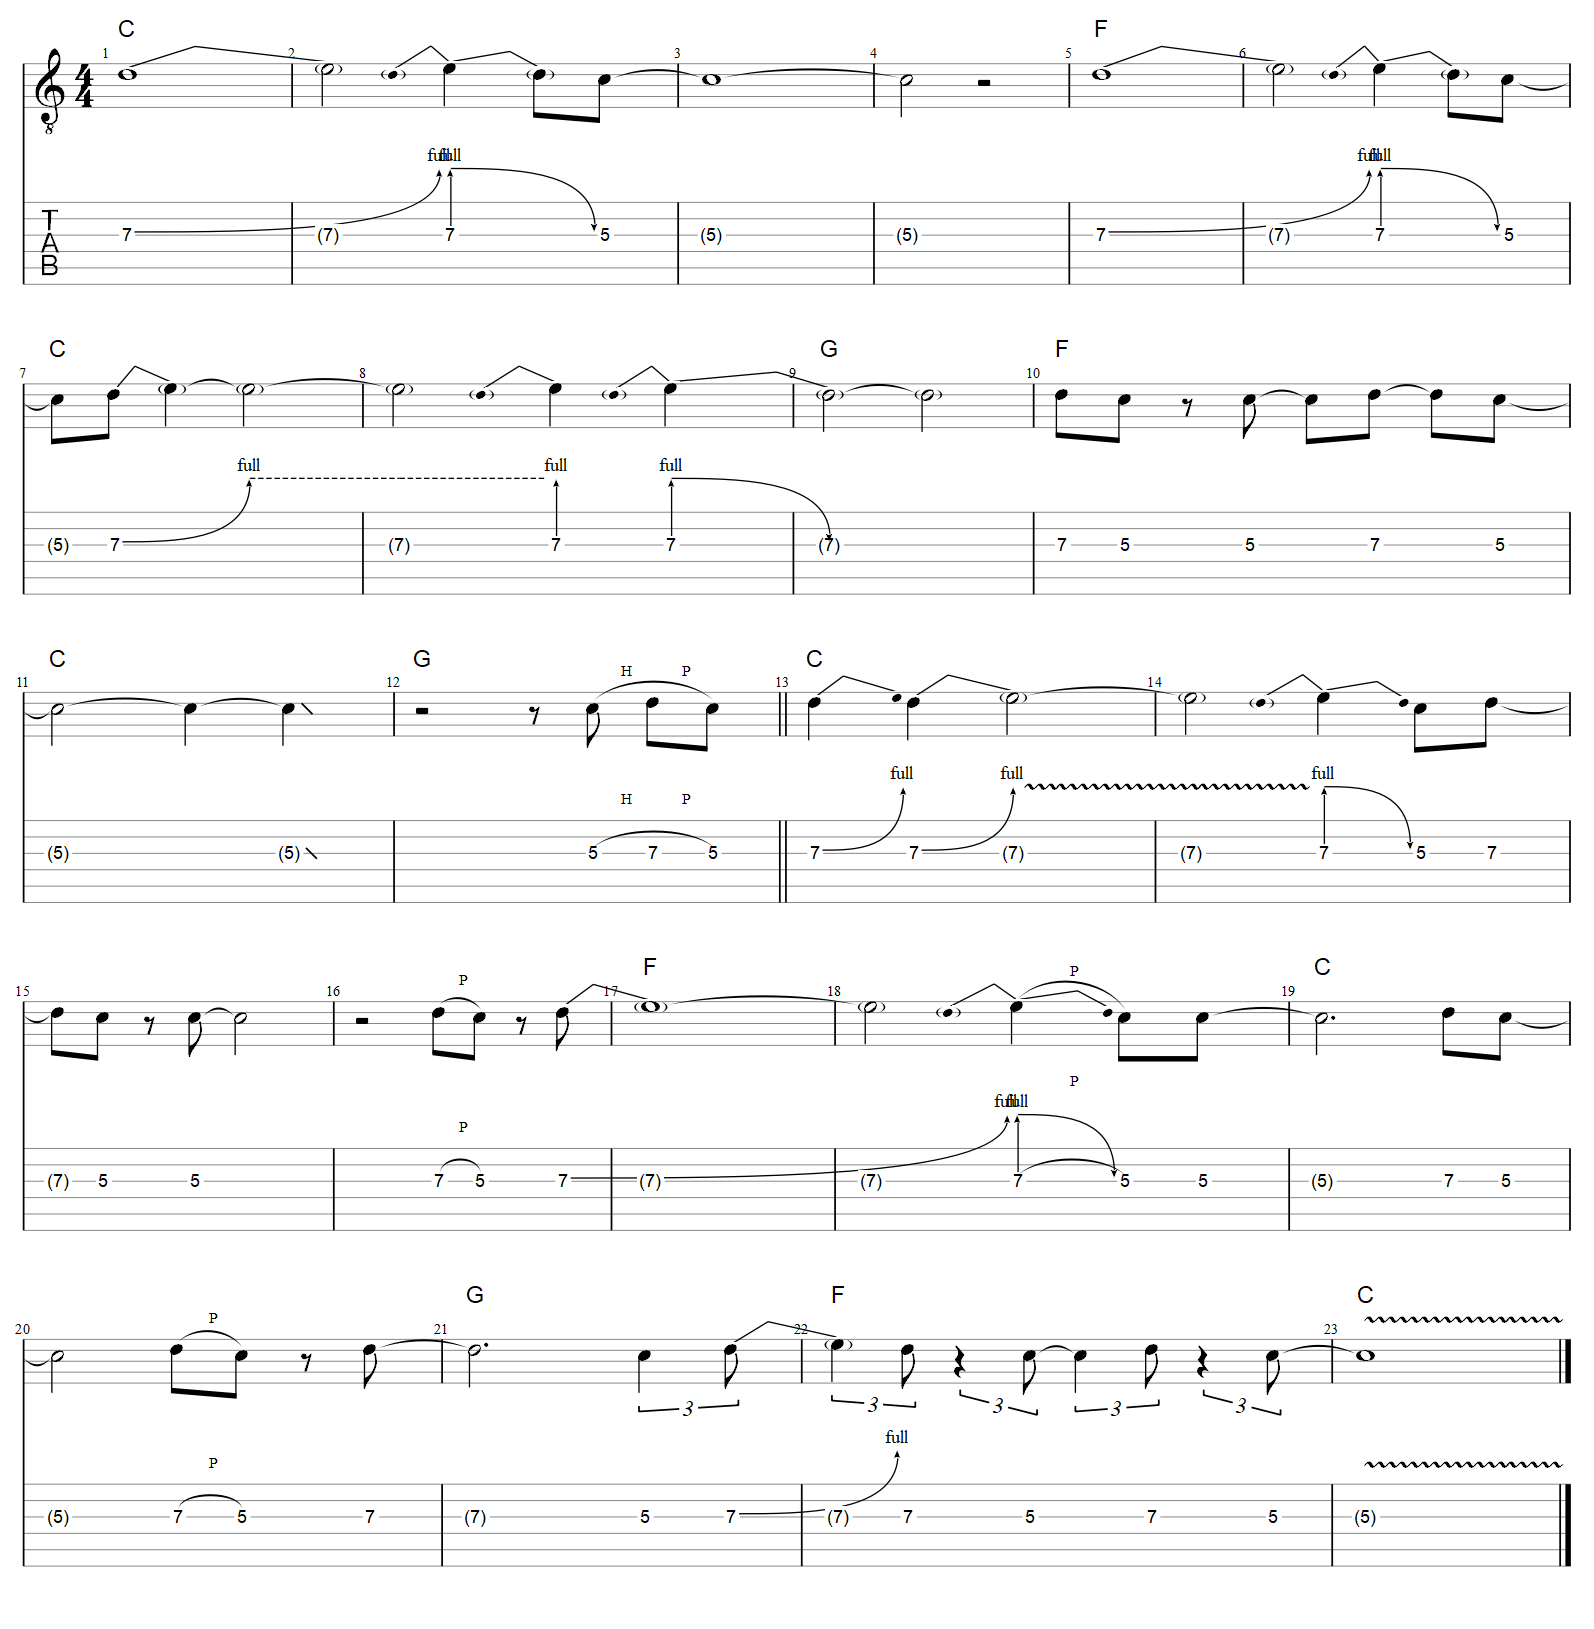
Let’s start with a simple chord progression, a I-IV-V in C major. In other words just 12 bars using C, F and G.
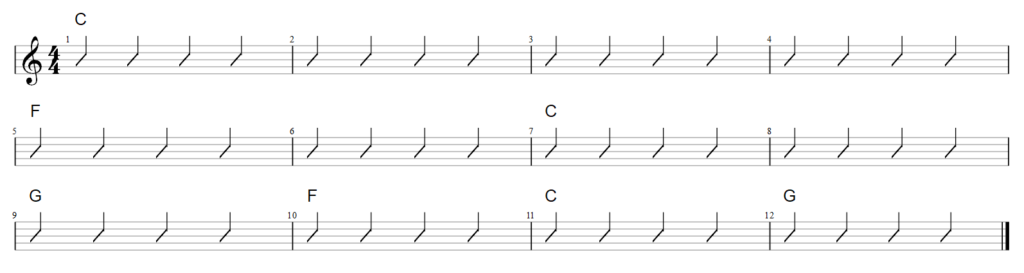
We can solo over this using the C major scale. Generally when playing around with scales as a beginner or early intermediate guitarist, we might try something that sounds like this.
Example 1:
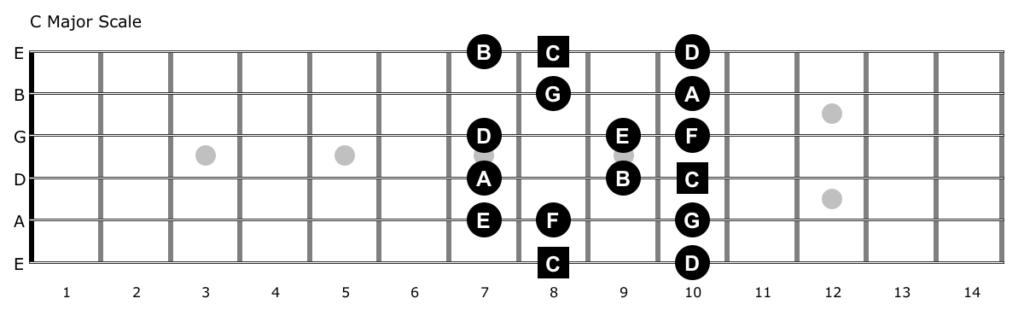
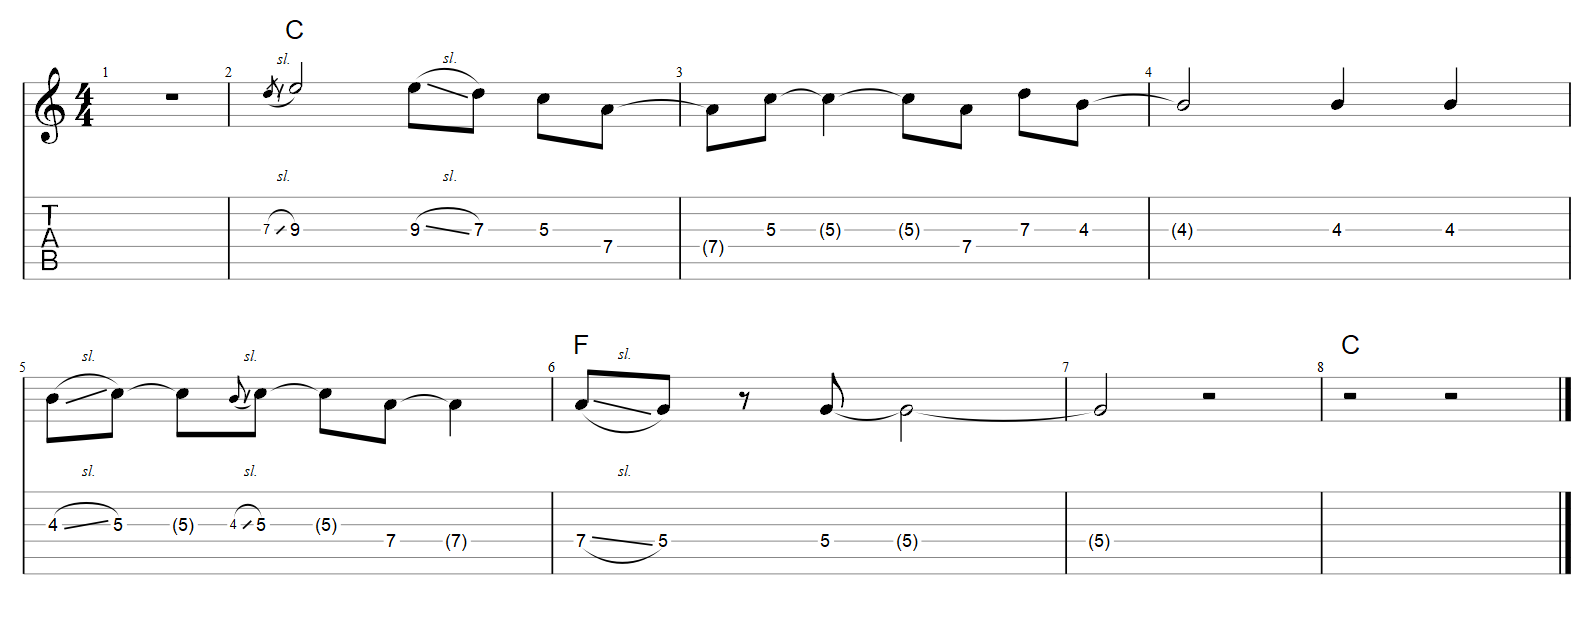
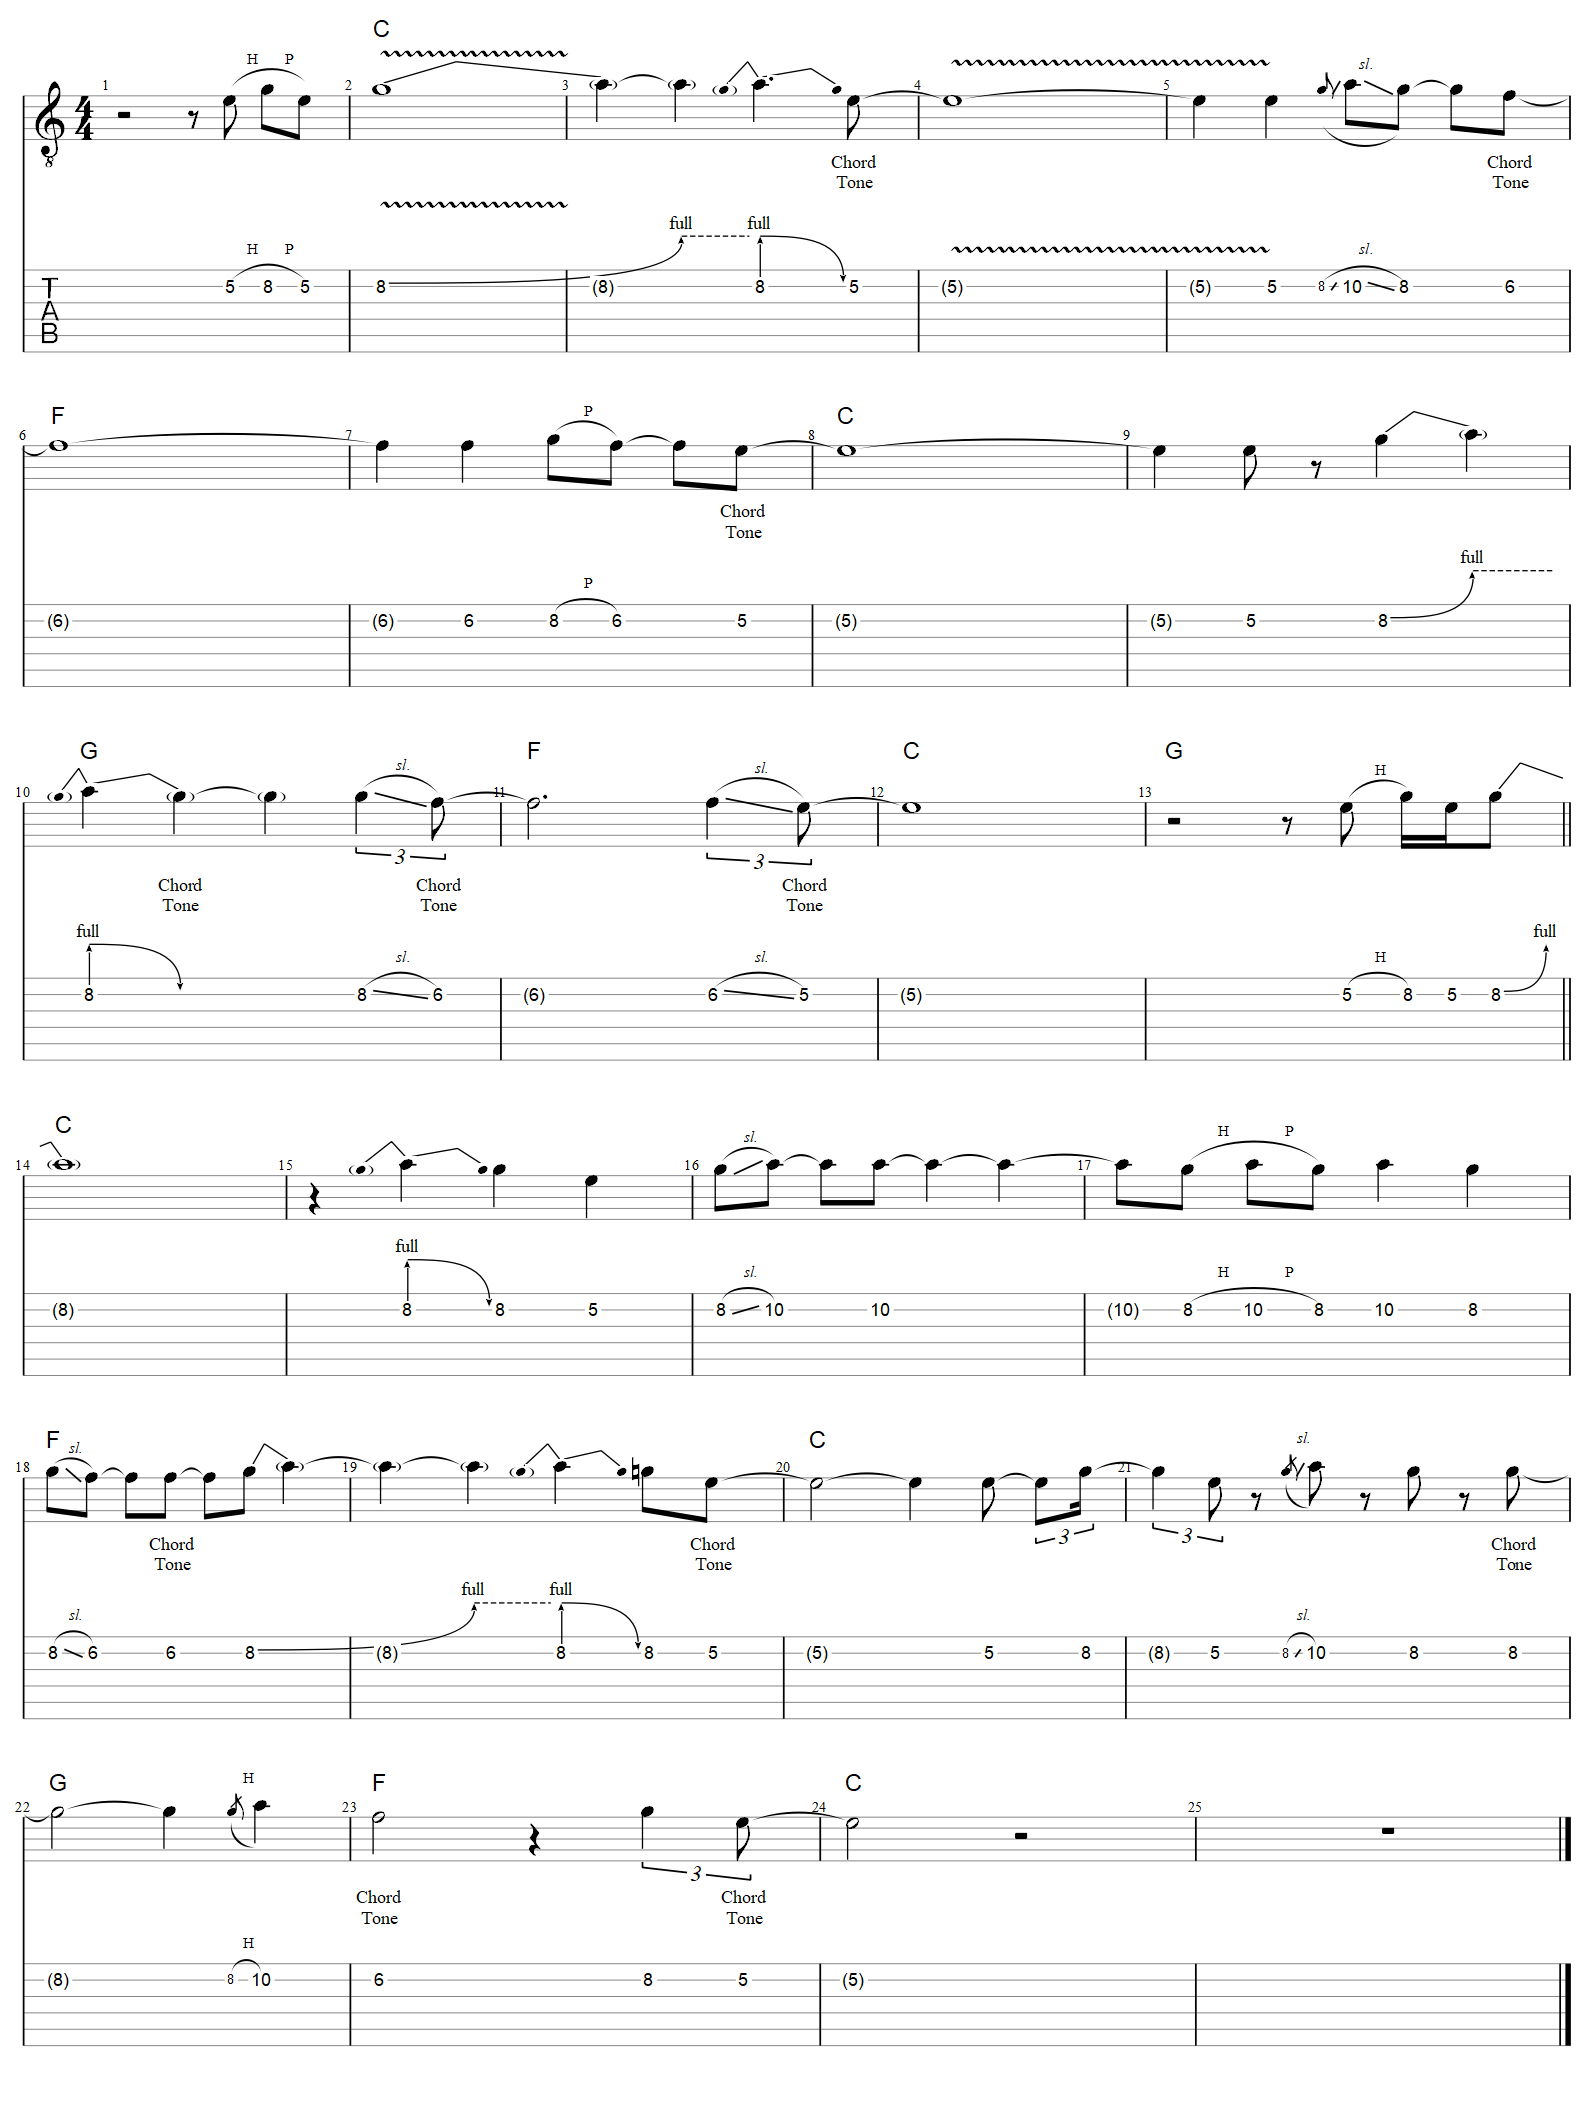
Let’s face it, it’s crap. It sounds like someone just playing around with a scale and trying to make it sound melodic but failing miserably. That’s OK, we have to start somewhere and in the beginning it’s how we all sound. I’m not going to waste time tabbing that out, it’s just an example of scale noodling and I’m using this scale pattern starting on the 8th fret.
Now, before we try to fix this, let’s listen to another example. I’ll copy and paste this exact solo over a different chord progression. Still in C major but we’ll use more chords in the backing.

Example 2:
Notice this time it sounds slightly better? It still sounds quite amateur and it still sounds like I’m just “scale noodling”, which I am. It is however, slightly better sounding. Why? Simple answer, we have fewer bad sounding notes clashing with the underlying chords. Because there are more chord changes, an ever changing flow of scale notes fits slightly better. There are other reasons which we will get to, but for now, let’s try something else.
We can all agree there’s too much going on in both examples. The solo is just stepping almost randomly through scale notes, I’m trying too hard to fit too many notes in and make use of the full scale pattern with no articulation or expression etc. OK then, let’s try something that sounds a bit closer to reasonable.
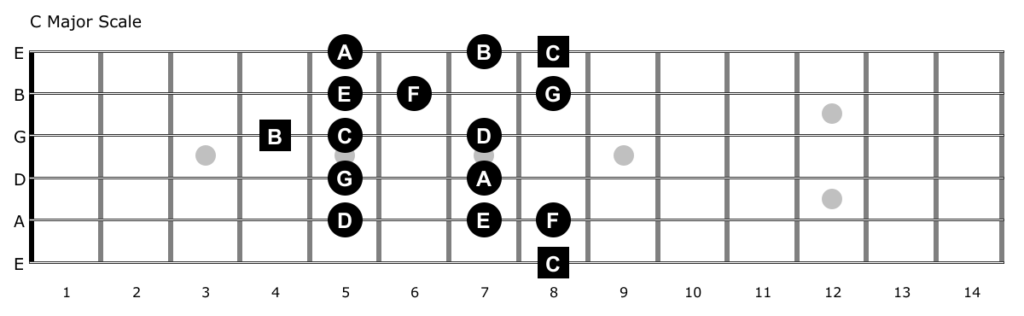
I’ll TAB this next one out. I’m also using a different scale position, mostly around this scale pattern.
Example 3:
Not bad, doesn’t sound too terrible, right? This is one reason why we should practise licks and phrasing. It gives us ideas to work with, and gets us in the habit of using better phrasing.
OK, so what if we learn a bunch of C major licks or riffs that we know already sound good and use those to improve our solos? Let’s try that exact thing over the first backing track that has fewer chord changes.
Example 4:
Hang on, that sounds like crap! WTF as the kidz say.
And so here starteth the lesson, tuck in, we have a lot to talk about. First let me just highlight a few important points.
1. If all you are thinking about is scale patterns, then your solos will always sound like scales.
2. If you try to cram too many notes in, you will likely sound amateur and robotic and still sound like you are scale noodling.
3. Just because a scale is in the same key as the chords, it doesn’t mean all scale notes will work all of the time.
4. If you slow down and add more space between notes you will sound more like music.
5. If you slow down and add more space, each note will stand out differently against the underlying chord – including the bad notes!
6. Music isn’t just about note choices. It’s also rhythm, dynamics and expression.
7. There is no easy formula for fixing any of the above problems. It just takes lots of practice, experimenting and experience.
The bottom line is this. A scale is not a group of notes that we can simply choose to play randomly with no regards to the underlying chords – whether they all belong to the same key or not.
Let’s start with the first point. We need to change our way of thinking before we can change the way we use a scale. There’s a big difference between playing a scale and actually using scale notes. A scale is nothing more than a selection of notes, not there to be played arbitrarily, but there to be made use of. There is a difference. If you focus mainly on the pattern then you will have a hard time NOT sounding like a scale pattern. Think of a scale pattern as a kind of container that just helps you find scale notes more easily. We don’t want to play the pattern, we want to “use” the notes that are contained within it.
One of the reasons we often sound better when using pentatonic scales is not because the scale is better suited, although it can be in some styles of music, but this is generally not the case. When using pentatonic scales we have fewer note choices. This not only gives us less chance of clashing notes, it also helps us naturally avoid trying to cram too many notes into a smaller space of time.
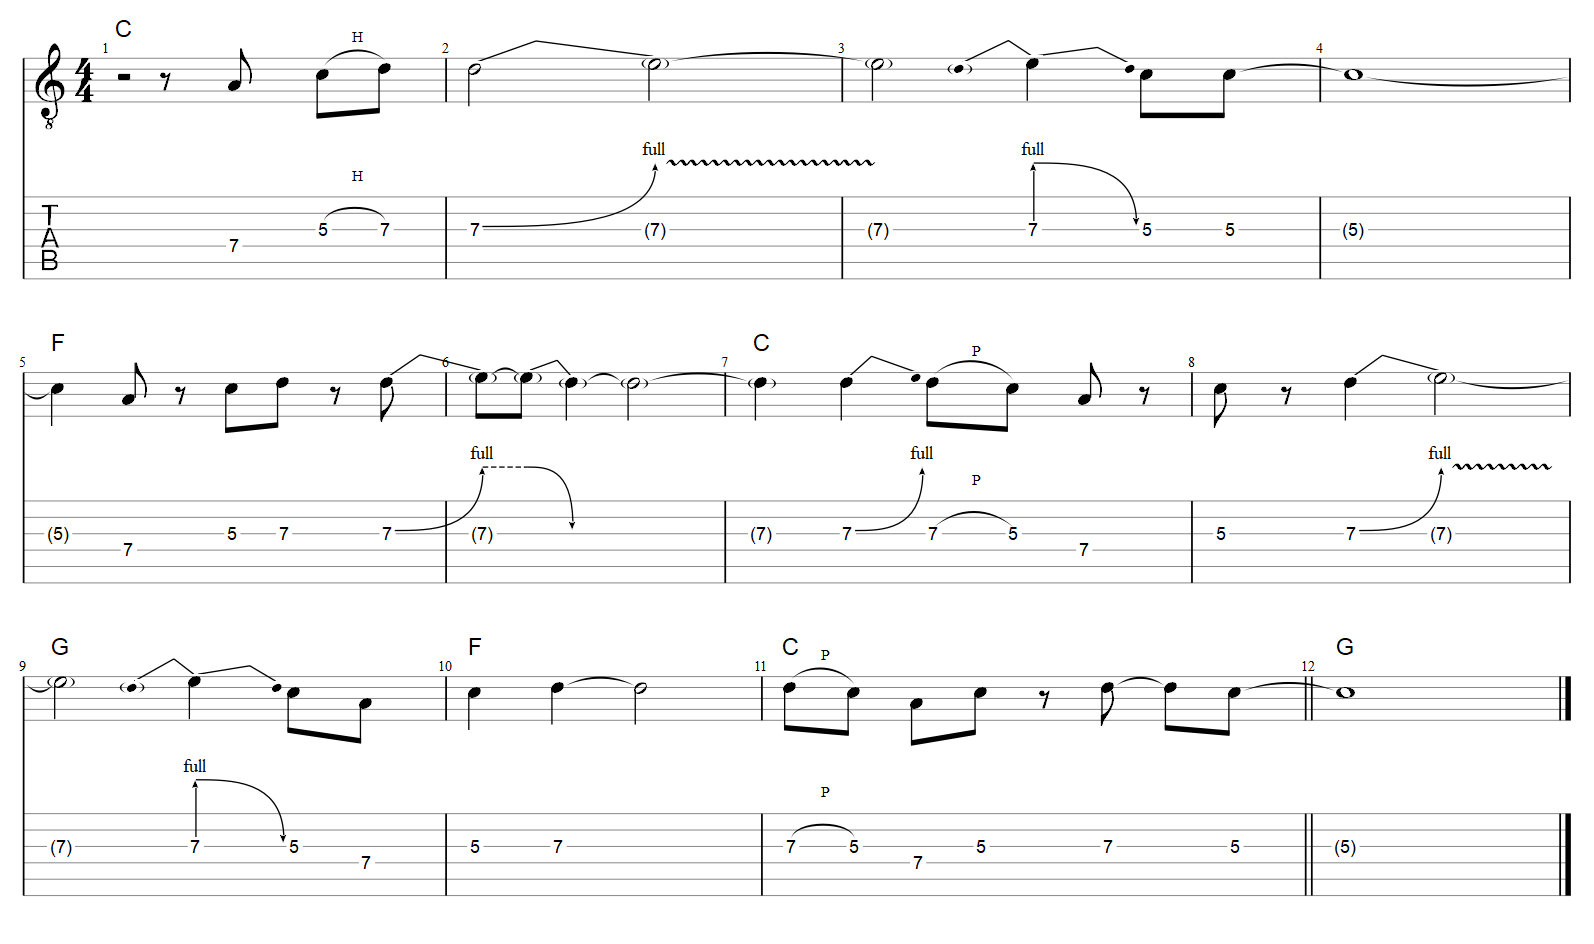
With that in mind, let’s trying something with an even smaller scale … just ONE note! Don’t think I’m joking, there is a very important lesson here. Do yourself a favour and try it. Do this for at least a few minutes. It will drive you mad to a point of epiphany. If it doesn’t, then do it again.
Listen to me doing the same. I will start out picking the note as often as I picked notes in the first noodling example (Example 1) … and no, I’m not tabbing it out!
Example 5:
If you do something like this, it should only take a few seconds before you naturally slow things down and actually try to phrase your picking to better fit the rhythm, maybe you’ll end up doing something like this.
Example 6:
The limitation of a single note will also drive you mad, so let’s add another and see what we can do with two notes. Here I’m playing just C and D at the fifth and seventh fret on the G string.
Example 7:
You may not realise it but your playing has already improved and the way you approach scale playing has already moved up a notch. You’ve probably done something you’ve never done before – actually listen and pay attention to the notes you are playing, not just the harmony of how it reacts with the underlying chord but also the timing, the duration, how you might be striking the note too often and many other things.
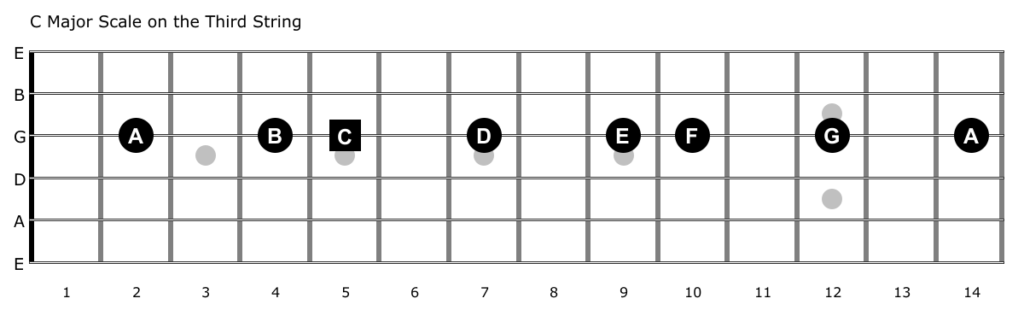
This all sounds a bit obvious and boring but believe me it is everything. This is how we need to practise and observe what we are playing. We’re not done yet, we are training our ears in the process but we still have a long way to go. Let’s move along to the next two scale notes and try the same thing again. We’re working on just one string at the moment. We started with the C and D at the fifth and seventh fret – now we’re going to do the same thing again but move along and use the D and E on the 7th and 9th frets. Here’s the C major scale on the third string for reference.
Example 8:
Exercises like these are forcing you to listen carefully and help train your ears to predict when a note isn’t going to work. Notice on some of the notes I hung onto for a bit longer than in the last example. This is because by restricting myself to just two notes I am really paying attention and memorising the sound. Where I hang on to the notes a little longer it’s because I could feel that it was a better choice than the alternative, I could predict how it would sound and knew it wouldn’t work. Don’t worry, we’re not trying to train ourselves for perfect aural skills here, we’re just getting used to listening and paying attention. If we spend all our time flying past a whole bunch of notes in a scale then we’re never really getting the chance to feel how the notes are sounding against the chords.
Let’s move along to the next two notes E and F on the 9th and 10th frets.
Example 9:
This is pretty much the same as before, I’m slowly getting used to hearing each note against the underlying chord and think about the note choices before moving to them.
We can (and should) go on right through the scale doing this exercise with two notes. Trust me, you will be improving with every few minutes of doing this. For the purpose of speeding things up, however, I am going to go back to the C at the third fret, but this time use three notes C, D and E.
You should be able to figure this one out but I’ll Tab it out anyway.
Example 10:
With this extra note I am able to find a reasonably good note choice for each chord. Even if you are a beginner, you should be able to come up with something like this in a short amount of time. It’s these restrictions that force us to listen more carefully and try to be more melodic. Sure, it’s not a solo to get excited about but it is a solo that works and it doesn’t sound like random notes.
Again, I’m going to move along and skip the rest of the exercise for the sake of this lesson, but you shouldn’t, you should spend time doing all of these kinds of exercises. Continue along the scale as before but this time using groups of three notes. You will see nothing but benefits in a fairly short time.
Example 11:
In the next exercise we are going to add a fourth note to the previous example, an A on the fourth string. These are the notes on the fretboard for reference.
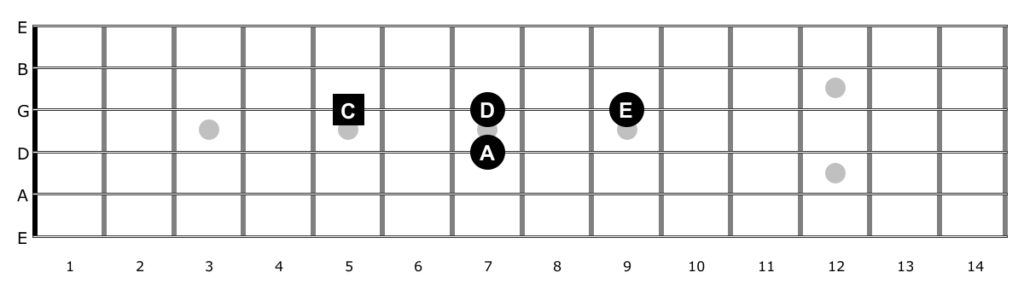
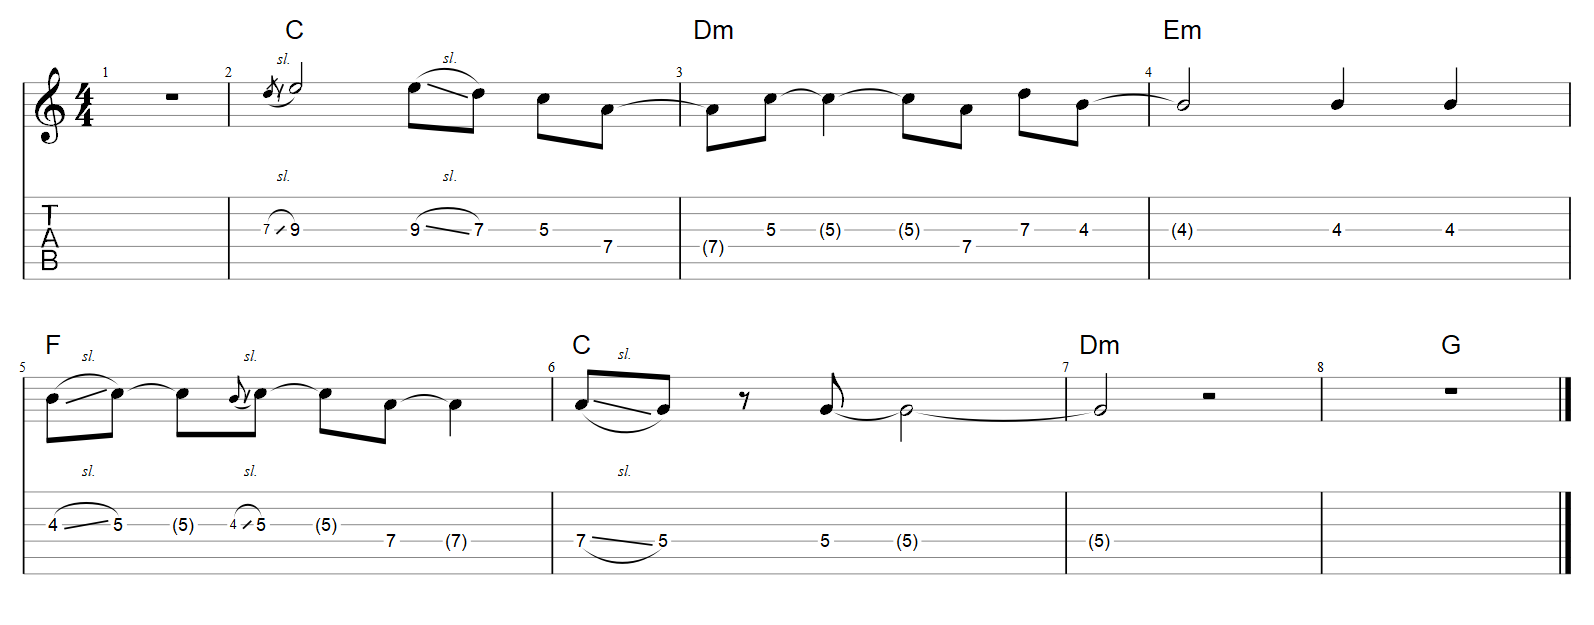
Before we start. Let’s just play each note individually over the C chord and listen, something like this. The TAB is just for reference, it isn’t exactly what I’m playing in the audio but close enough for demonstration.

We can hear that the D and A notes don’t sound good over the C chord. This doesn’t mean they aren’t usable, it just means we need to be careful with them. As a general rule, don’t hang on to them for too long a duration, don’t start the solo with them unless used as a lead in note, and maybe avoid them on the chord changes that they clash on, in this case, the C chord.
These notes are dissonant to the chord and create tension. This isn’t always a bad thing, it just means that when you play dissonant notes, they tend to want to go somewhere, so they work well as passing or “in between” notes.
In the following two examples I use the notes in short duration to lead into the good notes or as passing notes between and they don’t sound bad. Don’t look for formulas and methods for when we can or can’t use these clashing notes – there aren’t any. Just do what the rest of us do, play around with them, use them and learn from experience. No musician I know plans every single note ahead, at least certainly not when improvising. We will mess up but with enough practice we’ll just get better at covering things up and possibly make them sound intentional, even when they aren’t. Lots of practice and experimenting is the only way, it becomes a kind of muscle memory thing.
Example 12:

Example 13:

Let’s quickly recap
- Filling up space by cramming too many scale notes (unless done in small doses) will always make your solos sound like one long scale pattern.
- Slowing things down and hanging onto some notes for a longer duration will generally sound better and more professional.
- Just because a scale is the correct key, it doesn’t mean all scale notes work all of the time. Some notes create dissonance and clash with the underlying chord of the moment.
- The dissonant notes aren’t dissonant to the key, they are only dissonant to the surrounding harmony, e.g, the underlying chords.
- Notes that clash with one chord won’t necessarily clash with another and vice-versa. Good and bad note choices change with each chord, regardless of whether the chords still belong to the same key or not.
- Clashing notes mostly only sound bad when made to stand out. This happens when a clashing note is held for too long a duration.
- These same notes can actually sound good and enhance the chord notes when used as passing tones. Tension is often a good thing when it is resolved to a good note.
- No formulas or theory will teach you how to play this way and help you make good note choices easily. Regular practice and experience of listening, experimenting and doing exercises similar to all of the above is the way to gain this experience.
Moving on
In this lesson series we’re mostly just looking at scales and making note choices. Obviously there is a lot more to creating good sounding solos, for example, using expressions such as slides, hammer ons and pull offs, trills, vibrato, note bending, rhythms, dynamics … and so on. These are all things we should practise but they come more under the category of technique rather than “scale theory”.
I’ve mentioned a few times about hanging on to notes for longer durations. As beginners we tend to not do that so much as we should, probably because a plain sustained note can sound pretty boring. Most solos require movement in order to create a sense of melody. Playing a single note for twelve bars could be the aural equivalent of watching paint dry. That doesn’t mean it can’t sound great. Take a twelve bar blues or a lively rock song, for instance, add some overdrive with vibrato and string bending – alone can make a very long duration note sound great, possibly a whole twelve bars and sound exciting.
This might not work so well in a softer, more melodic pop song and some styles it wouldn’t work at all. These are all important things to think about – a scale isn’t just a scale without context. The more we realise these things, the more we can understand the difference between a scale pattern and making use of scale notes.
There is so much confusion around scales – the perfect example being modes. I’m not going to talk about them in this lesson, simply because until you really get to grips with everything we’re talking about here, you will never understand things like modes. I will do a lesson on modes at a later time.
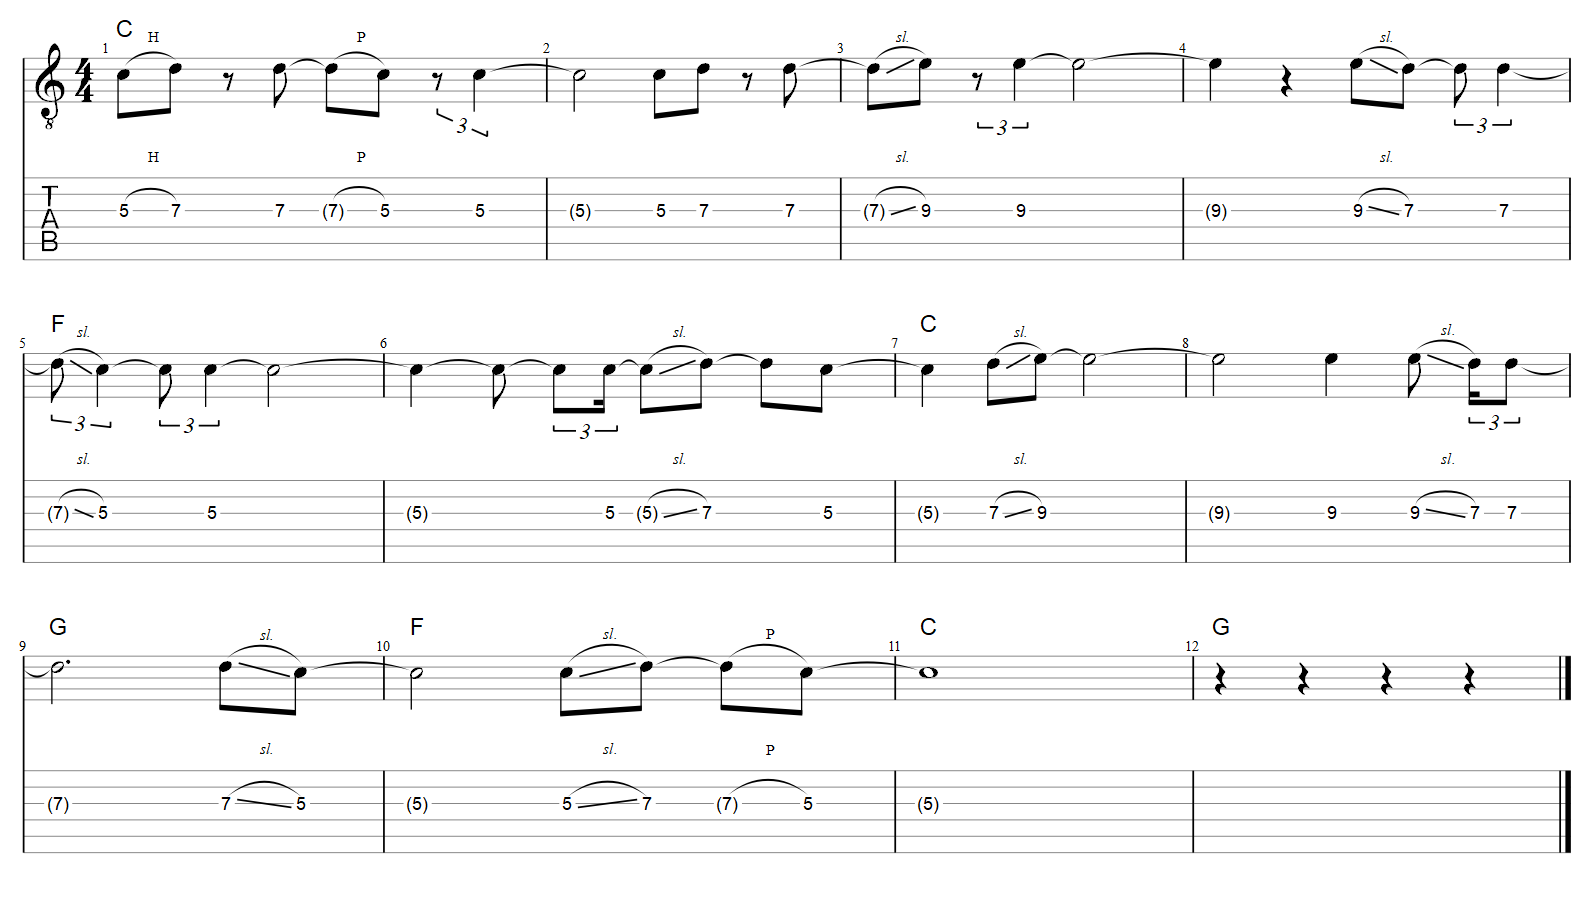
Ok, back to the examples, here we’ll use the three notes, C, D and E again on third string but instead of using the E on the ninth fret, we bend up to it from the 7th, so our fingers don’t leave frets 5 and 7.
Example 14:
Example 15:
Now let’s try the same idea but we’ll include the A note again on the D string.
Example 16:
Let’s try a similar thing but on a different string. We’ll use B string frets 5, 8 and 10, slides and bends.
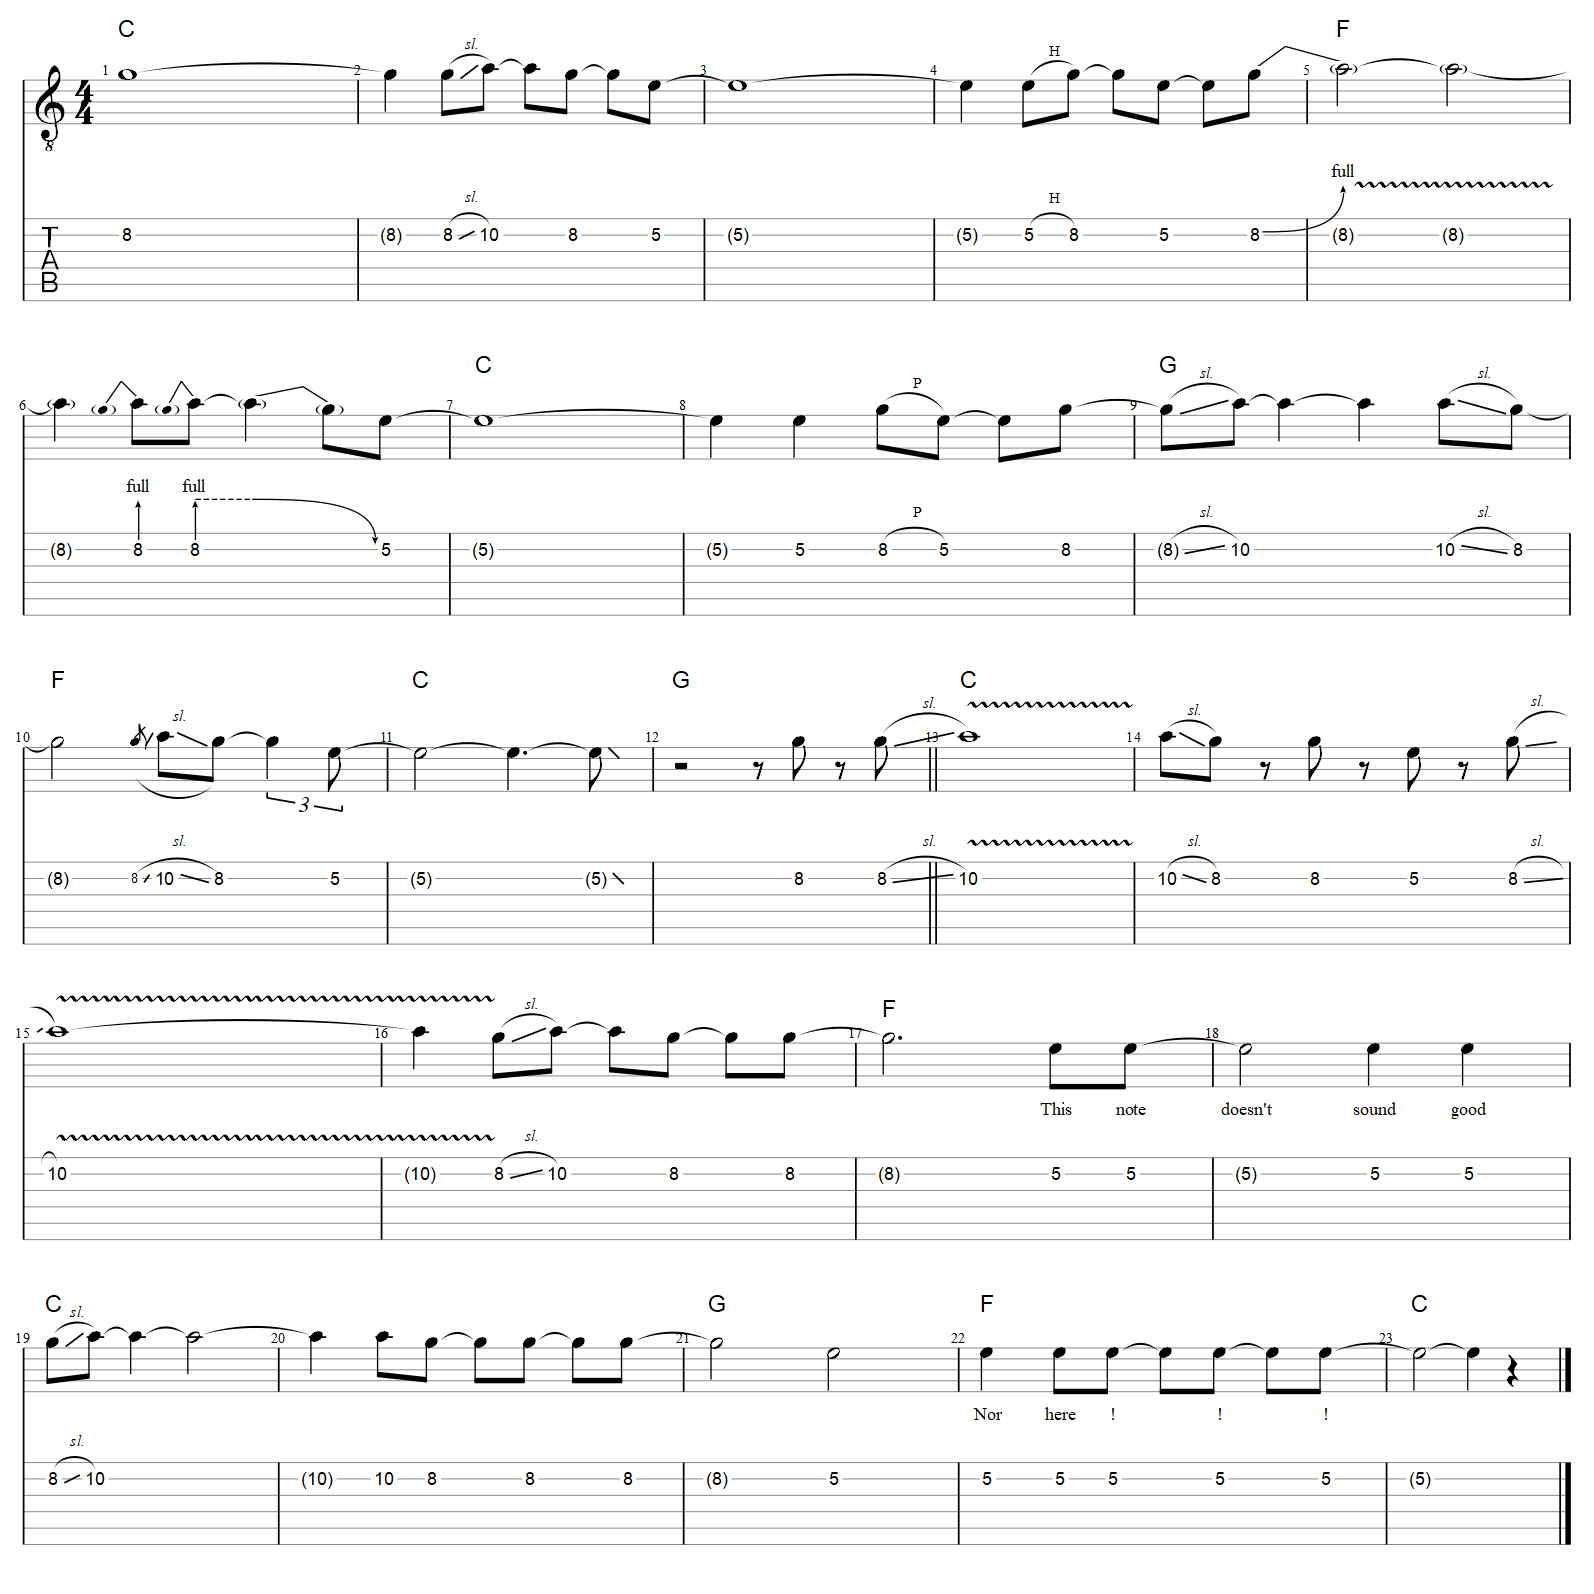
Listen to the example above. It starts out kind of Ok. In the second half I demonstrate how I might practise by listening to different notes over the chord. As you can hear, over the F chord, in bars 17 and 22, it doesn’t sound too good. The note I’m playing is an E, which is only a semitone from the F of the chord, so it’s creating a bit of a clash, our ears are probably expecting to hear this note resolve to an F. So let’s spend a moment to think about some chord tones that we can target when the chords change.
I’m not going to waste time on theory or CAGED chords here, there’s plenty about them elsewhere on the website so I’ll jump straight ahead and we’ll look at three chord shapes for C, F and G.
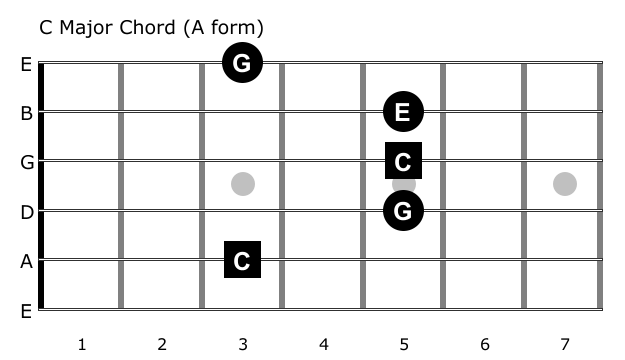
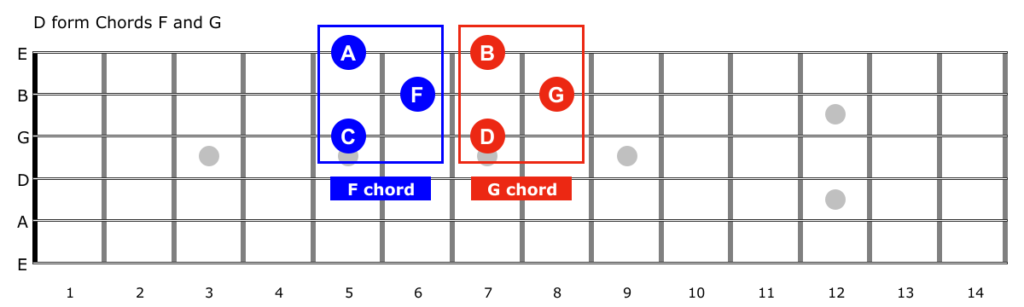
Let’s focus on the B string. In the D form chords we have the F on the 6th fret and G on the 8th fret. In the following example we’ll try to target those two notes over the chord changes.
Example 17:
Over the C chord I’m doing a fair bit of bending from the 8th to 10th fret which is the note equivalent of G to A. G is in the C chord but A isn’t so it’s not targeting chord a chord tone. I do however already know that it sounds OK because we tried it in the previous example. I do also resolve quite a bit to the E on the 5th fret, which is a chord tone of C (the major third). Over the F and G chords I’m mostly targeting the root notes on the 6th and 8th fret.
One more thing to notice I’m often anticipating the chord change by targeting the chord tone slightly earlier than the first beat. You’ll also notice my timing is rough in bars 20 / 21. When we’re playing around with ideas on the fly, these things can happen if we just hit record and start playing. Rather than do another take I’ve left it in because it’s a good representation of how we have to mess around to find what works – don’t be afraid to go wrong.
Keep doing this stuff over and over, experiment and listen to what you are doing – you have to get used to it to get it etched into muscle memory and your ears. Spend some time doing this and then maybe add the third string back in and mix them up. Things should start slowly sounding more like a solo. It’s slow and maybe not too exciting but that’s not the point. This is all about making note choices that we are practising and getting used to.
In example 18 below I combine the two and use both strings. It’s still quite simple sounding but it works and it does sound like a solo. We can spice things up more with some better phrasing, more interesting bends, add some cliché licks etc, but for now, continue experimenting with all of the examples we have done so far – at the moment this is all about scales and note choices. Your playing style will come from this kind of practice and your fretboard knowledge and your aural skills will improve rapidly. Don’t underestimate the simplicity of these kind of exercises.
Example 18:
One more example with the G string added back in.

Next in Guitar Soloing Part 2 we’ll look at making use of the chord tones.
Dyaknow what that were reet good. Its kinda like “advanced motorcycling” (for me) you know a hell of a lot already it just needs pointing out to you for you to act on it. Really enjoyed that, thank you.
Quite a difference looking at strings to use and different notes of the scales or aiming at triad notes a real difference
Interesantes sus lecciones y fáciles de entender. felicitaciones
Very revealing – how in the beginning, limiting yourself to just a few notes and exploring simply phasing serves as the basis for a solo. Reveals how the beginner’s mind set of using many notes of there scale complicates and confuses the aim.
Restriction is one of the best ways to learn and improve. Not enough people try it.
Very helpful lesson – your email came right at the time I was trying to get better at this – many thanks
Very helpful lesson! I stopped halfway thru to really absorb the concepts because its a lot to take in all at once.
I will apply the concepts in practice then return to this lesson when I feel comfortable to move on.
Thank you very much!!
Just sent an email thanking you Lee for making all of this available.
I’m a rhythm guitarist and have tried to get my Am pentatonic scales to sound musical. Bending and phrasing haven’t been successful. I’m really wanting to get to play some nice bluesy improvised stuff and I’m hoping that this kinda thing is gonna help. I then need to think about acoustic or electric. Can’t make my mind up!!
Acoustic or electric? … Both! 🙂
Just keep practicing string bending, check out some Youtube videos and try to figure out where you are going wrong if you are still struggling. Try anchoring the first knuckle of the first finger under the neck as a pivot and use two or three fingers if necessary. Hard to describe in text but there will be plenty of videos to watch.
Have you checked out this article? It might help with phrasing.
https://www.guitar-chords.org.uk/blog/guitar-soloing-intermediate-and-beyond/
Hi Lee, I just found your site and I’m really glad. I’ve been playing about sixty years and never could figure out lead guitar.
I’m 80 now and promised myself I will play lead on one ,or more of your jam tracks. With your help I am sure I can do it .
Thank you very,very much. Bob (slide)
Thanks Bob. Never too late 🙂
I’m busy creating some Youtube backing tracks with licks and workouts at the moment … more coming on this topic!