
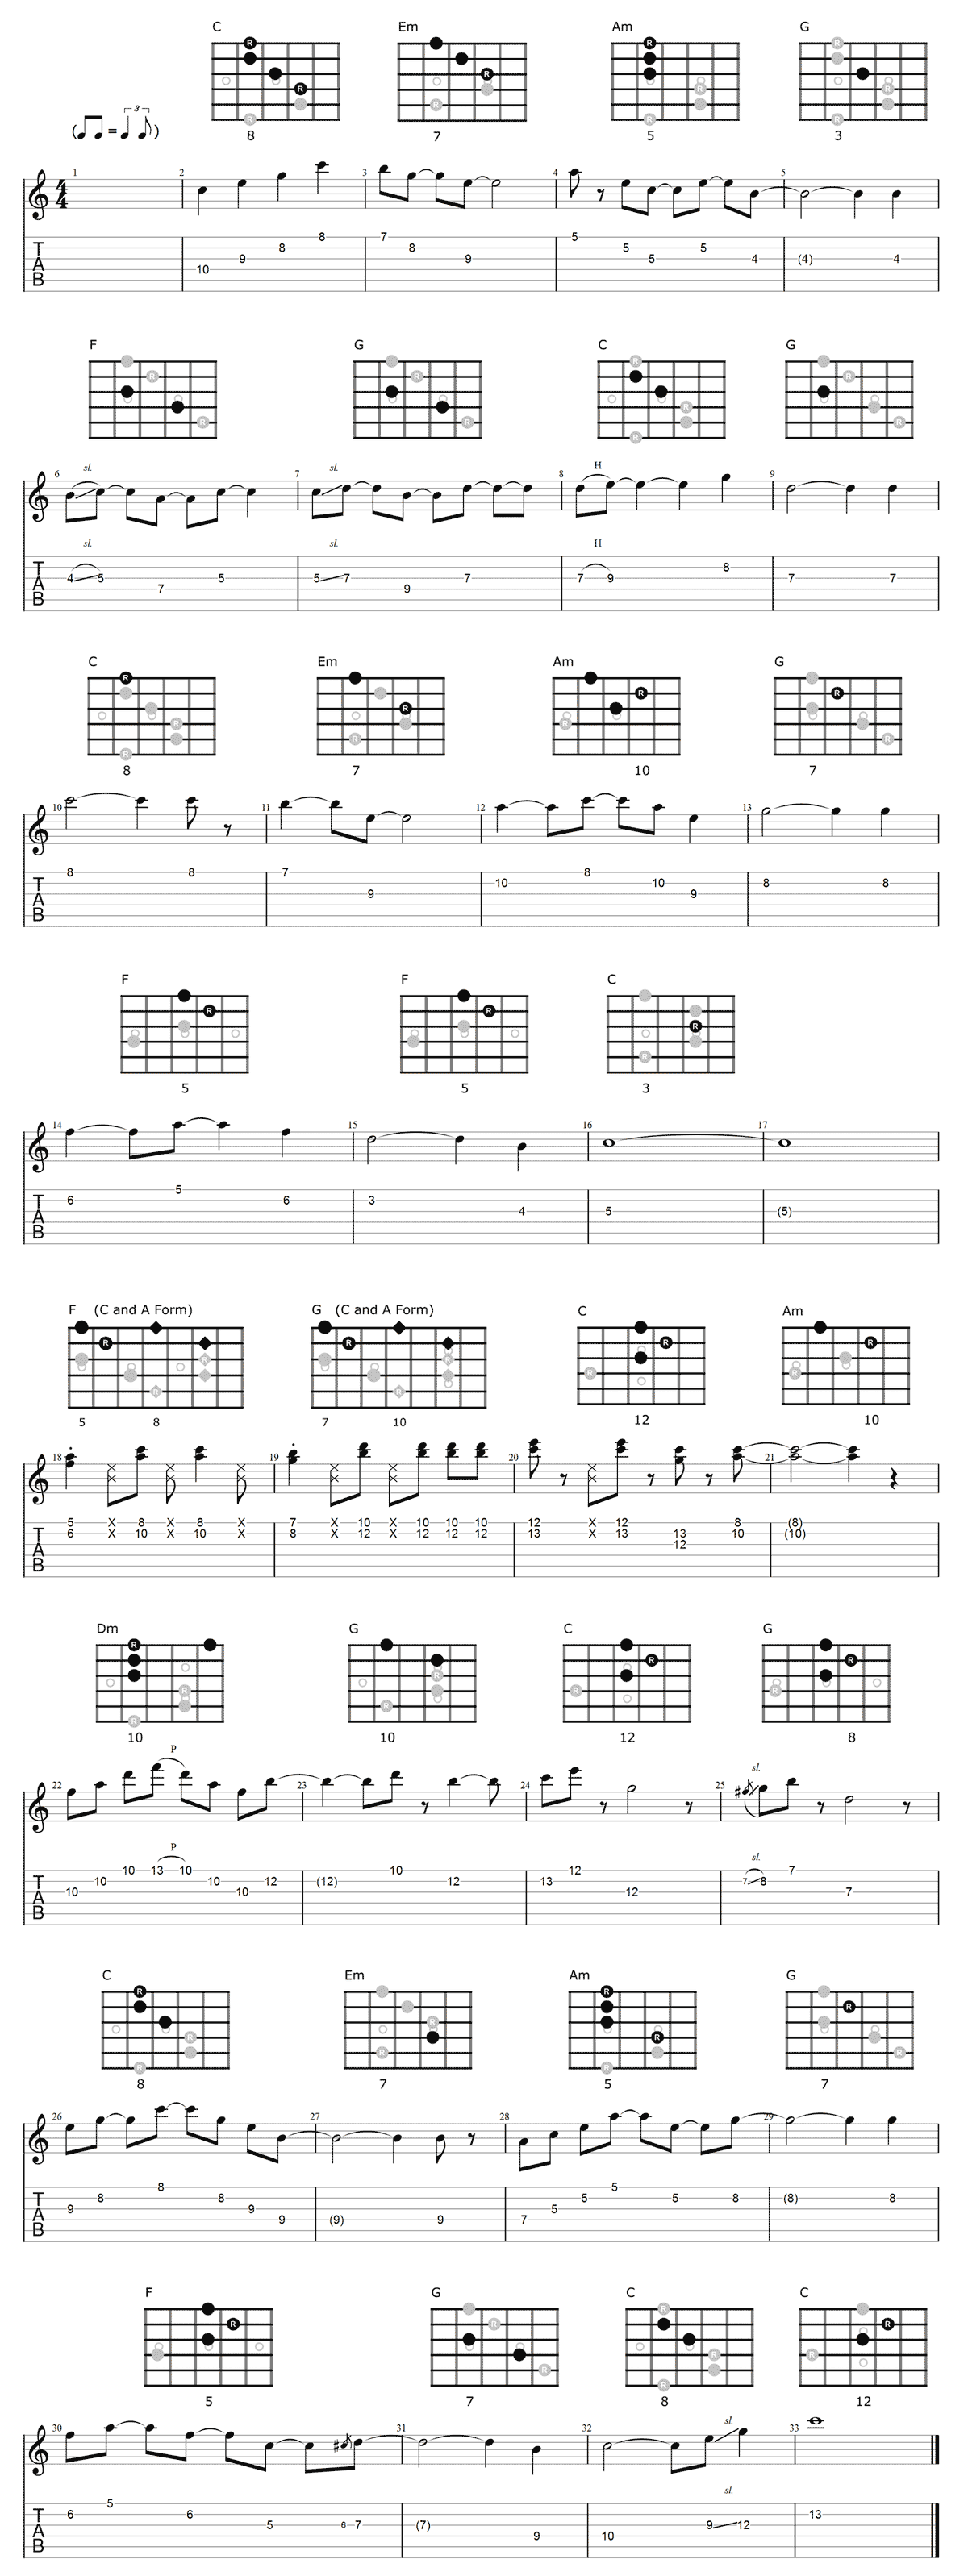
Basic Chord Tone Solo
Playing around with these chord positions can be useful but it doesn’t have to be all about just strumming chords. We can use the same ideas to create melodic solos. We could just as easily choose one of the previous examples and play something similar using arpeggios, i.e., picking the notes one at a time, or better still, just pick notes out of the chord forms to create something that resembles more of a melodic solo. The following example shows this kind of idea.
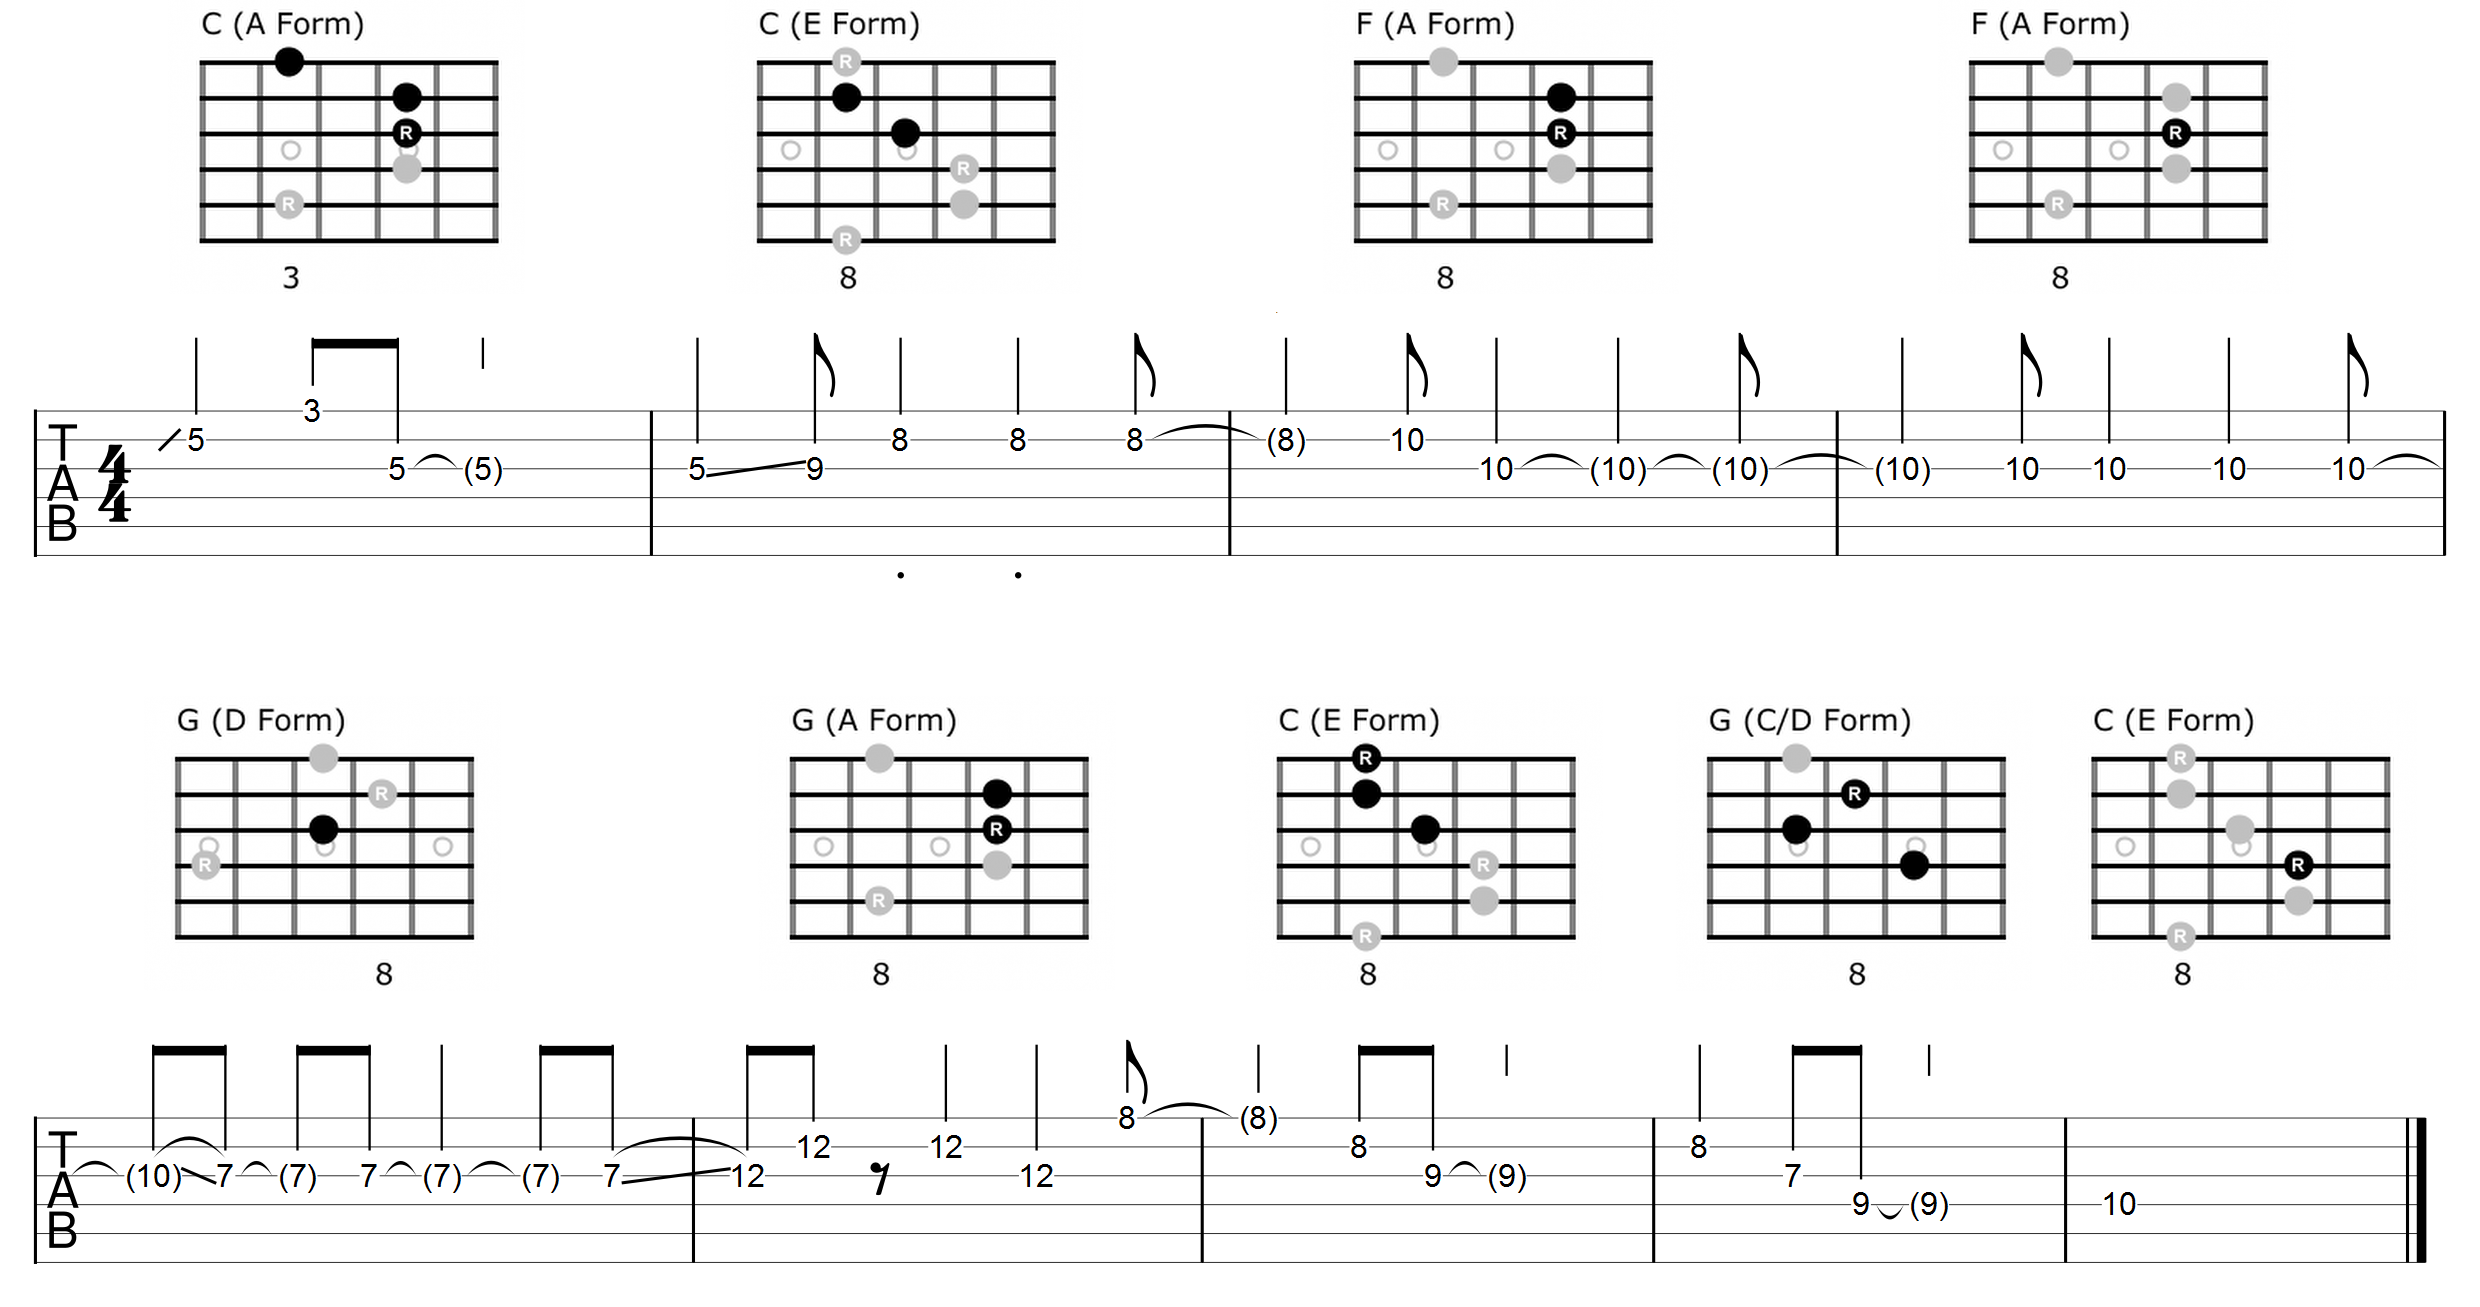
Example Solo 1
It’s a bit simple sounding but that’s OK. This is how you should practice this stuff, it’s about the best thing you can do to learn your way around the fretboard. Find as many variations as you can and keep looking for new ideas until you can navigate your way between each chord form quickly and easily. These kinds of ideas form the basics of chord tone soloing.
This chord progression is a simple I-IV-V in C major, it would also work very well with C major pentatonic scale or C major scale. You should experiment with all options and mix them up. For example you could play some of it using the C major pentatonic and some using the ideas above. With practice you can, if you wanted, play mostly with C major pentatonic and use the above ideas to target chord tones on the changes. This generally makes your solos sound a bit more interesting and strengthens the chord changes which makes you sound more like you know exactly what you are doing, as opposed to arbitrarily noodling around scale notes.
Practice makes perfect
The fundamentals of using CAGED chords and chord tone soloing aren’t really that difficult to grasp. Putting it into real world practice is a little different, especially in songs with more chord changes or when trying to apply it to different musical keys. Even with a simple I-IV-V chord progression like used in the previous example, this can cover a whole lot of the fretboard if you wanted it to. Being able to find all of the chord forms quickly and easily looks simple on paper, but can be quite challenging in reality. When you first start out with all of this it would be quite normal to feel like your brain is having a meltdown and can’t possibly keep up, the song has already moved on to the next chord before you’ve figured out where your fingers should be.
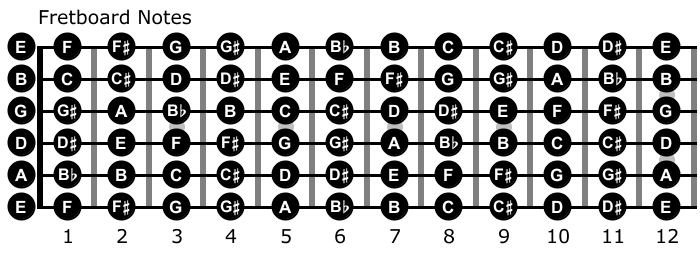
There’s no easy way out of this, you have to learn the chord forms, learn where the root notes are in each chord form and know how to find these notes quickly on the fretboard. You have to just keep practising over and over. Always start simple. You’ll get there quicker if you play along with jam tracks using fewer chords and reasonably moderate tempos. Expect this to take some time. I practice this stuff quite regularly, I’ve been playing guitar for 35+ years and I still stumble occasionally, especially if it’s in a key that I don’t play often.
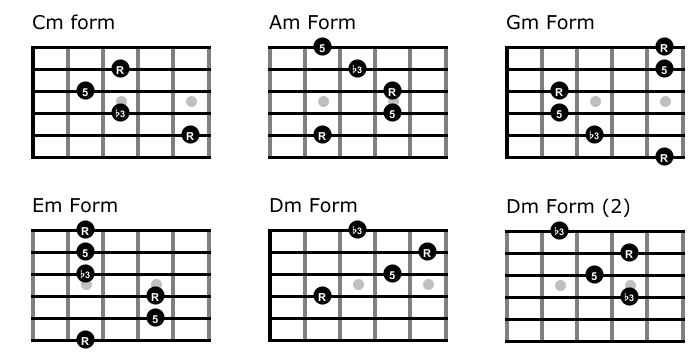
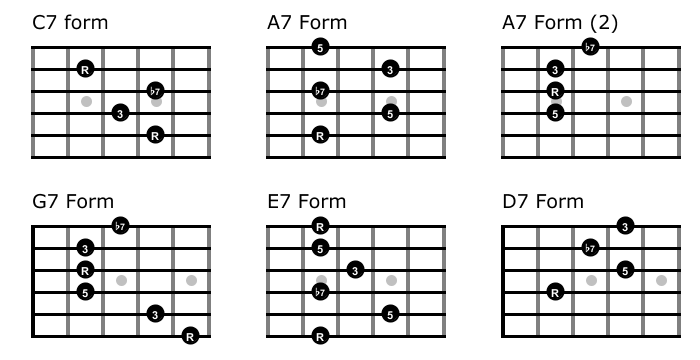
Many guitar solos will spend the majority of time using just the first three or four strings of the guitar. This is a good way to practice as it doesn’t bog your mind down with too much information at once. Also, it’s perfectly OK to not be 100% fluent. There will be thousands of permutations that you could use to map out the fretboard with just a few basic chords. You don’t need to nail the whole lot. Practice just a few ideas and concentrate only on getting good at those. You can do a whole lot of stuff with just the A, D, and E form chords on the first three or four strings. Learn these in major, minor and 7th form and with just this alone you’ll have a pretty decent grasp of the fretboard which will give you plenty of ideas over the majority of common chord progressions.
What we’ll do now is take a look at a few diagrams of some minor and 7th chord forms with their intervals. Learn where the root notes are in each chord so that you can use them over various chord progressions. Your job is to learn as many chords as you can and learn the notes on the fretboard. It takes time so just stick with it. Your only goal is to be slightly better today than you were yesterday. Within a few months you’ll be surprised just how far this can take your guitar playing to another level. The diagrams below aren’t an exhaustive list but more than enough to get you going.
Chord Tone Solo 2
The following solo uses nothing but chord tones taken from the CAGED forms, played over a nice little Ukulele / Pop backing track with quite a few chord changes. It demonstrates how using nothing but chord tones can make a solo very melodic, especially where the chords change often. Even though I’ve created this as more of an example exercise, I think it still could work as a reasonably passable guitar solo with a few minor tweaks.
Something like this will take a fair amount of practice, not because it’s difficult to play (unless you are a beginner) but just for keeping up with the chord changes. I probably spent about half an hour jamming along before even starting on this example, just to etch the chord changes into my mind first. In the next part of this series I’ll add some shorter loops and exercises that will help build up your fluency. For now though, let’s take a look at the solo TABs. The chord boxes over each bar show the notes used from each chord form.
Play Example Solo 2
There are a few places in this solo where the next chord is anticipated before the beat. For example, the last note in bar 4 over the A minor chord moves to the 4th fret on the G string. This is part of the G chord so it’s not shown in the Am chord diagram. Just worth mentioning in case it seems confusing. Obviously there are many ways you could approach this solo. In the next part we’ll take a look at some exercise examples that we can use to practise and get more fluent with using ideas like this.
Backing track for solo 1
Backing track for solo 2
You can download the chord solo TABs in PDF version here.
Download PDF
The Ukulele jam track is also available in other keys here
Go to: Part 1 . . . Part 2 . . . Part 3 . . . Part 4 . . . Part 5
Got a question or confused about something? Just leave a comment below.

I really enjoyed this lesson may God continue to increase u in knowledge
Thanks Johnson.
Parts 3 and 4 hopefully up in a few days. I think it might carry on a bit longer than the 3 parts I originally intended, I’m already thinking about part 5 🙂
Thank you Lee for all of your hard work my friend. Now I’m ready for parts 3 and 4.
Thanks James. I must get my act together 🙂
Parts 3 and 4 are done – I just need to check through them for typos etc. I’ve also started on a part 5 but got a bit sidetracked.
Hi Lee, I just started with part 2 and I can say that this helps me lot and hopefully brings me to a better level someday. And know it‘s time for me to practice, practice, practice….. to become a bit better every single day. Thanks for your effort doing this. Means a lot to me.
You’re welcome.
To become a little bit better each day, that’s really all it’s about. No matter what you learn, no matter how small – if you know something today that you didn’t know yesterday then you’ve already improved. Something as simple as knowing what note is at the 8th fret on the B string, it’s all accumulated knowledge and along with your practice it becomes exponential.
\There is no way to go to “ukulele / pop style jam track”! I can’t listen to track 2.2 solo backing without that!/
Can you be more specific as everything is working OK my end. What is track 2.2? Are the other tracks working?
I really like Example Solo 2. I find following the chords while trying to construct a solo line very difficult; it’s so hard to keep in step with the changes. I shall spend some time with this one as an exercise and see where it gets me.
Tony
This track has quite a few chord changes so it does take time to get used to. I’m quite used to doing things like this and I can find chord tones fairly quickly for basic chords like this. However, I still need to take a while getting used to a chord progression, I won’t just fire of this kind of solo on first attempt.
I’ll maybe spend half hour or longer first playing the chord progression round a few times and then play it a few more times with the chords in different positions while building up ideas as I go.
You really need to learn this stuff slowly, break it down into parts and don’t try to get ahead of yourself. You could spend a while just playing single root notes over each chord and let each one ring for a bar. Learn the chords in a different place on the neck, keep them all close together and play rhythm only – then once you’re used to the chords, start picking the chord notes arpeggio style. Gradually section by section just get used to a variation of simple ideas.
It won’t take long to get comfortable with simple stuff and once you do this your brain and fingers should be able to keep up better. Too much too quickly and you go into brain meltdown.
I came up with this solo quite a few months ago and quickly forgot it. If I were to try again now, I’d still want half hour or more playing around and re-familiarise myself with it.
Just keep at it and you’ll get there.
Thanks for your encouragement.
I won’t pretend to have mastered everything in Part 2, but I am going to move on to Part 3 anyway as I can see some interesting stuff there.
I picked up on what you say in Part 3 about just using a single chord for 5 minutes. And I had forgotten all the things I can do in Band in a Box – I don’t make enough use of it. I have put in hundreds of hours learning the CAGED positions, all the pentatonic shapes and where the extra two notes in the major scale add to the pentatonic, so I should have enough to move on a bit.
And I stumbled on this in another forum:
“A very good lead guitarist I know here in London said to me when I told him I wanted to start playing lead, “Lead guitar is just rhythm with pitch.” Eventually I learned what he meant…… ”
This is a very insightful thought, I will experiment with how I can better use it.
Sounds like you’re working hard! Enjoy the journey. For me that’s the fun part.
I’m no master of the guitar, far from it. Sometimes I feel like a bit of a fraud calling myself a teacher when I look at what others can do with guitar and I’m nowhere near them, not even close.
On the other hand, we just have to be happy with what we do, and try to be good at that one thing. I can’t shred, I’m very limited with jazz etc.
The point is you don’t need to fully master everything. In my opinion, (technique aside) playing the guitar is just piecing together a bunch of ideas that you are comfortable with. Everyone has their own set of limited ideas – we listen to others just to learn more and add to our repertoire. This is ongoing.
CAGED and pentatonic positions, you don’t need to know every permutation. When I put this series of articles together, I experimented and played around with things that I wouldn’t necessarily do ordinarily. A few months later and I’d probably need to revise a little. I understand it all obviously – but I don’t use all of it, I stick with the stuff I practise regularly because generally it’s enough.
There’s probably a thousand ways we could play the pentatonic scales and the CAGED chords across the neck. I have a select few that I use often, I can find them quickly and adapt them on the fly. For CAGED chords that might be mostly A, D and C forms and often only partial, i.e., on three or four strings. I can find the rest of them but might need to think about them more because I rarely use them. Same goes for pentatonic scales, I’ll mostly play around two or three positions, not always using all six strings – I’ll join them up with general runs and licks that I do use often.
Anybody watching me might think I have full command of the neck – I don’t. I just look like I do because I’m confident with the stuff that I do know. There’s tons in between that I’ve probably never thought of and I pretty sure many great guitarists could say the same.
This is my point about regularly spending five minutes with one chord. Get good at that one thing. It’s easier and quicker to master a single idea. The result is often surprising. Do this with a few chords for half hour a day and after a month or so you should find other things happening with less effort. It’s far quicker and more beneficial than doing what most people do – try to play too fast without getting the basics down, or too much fragmentation – learning too many different things and moving from one thing to the next. This usually results in a harder time piecing things together and seeing them as one.
Here’s an example of what I would say you could spend a couple of months with and see massive improvements in your playing and creativity (this is just an idea). Learn some major, minor and 7th arpeggios in A, C and D form and two or three pentatonic scale positions. Keep them all reasonably close together on the fretboard, don’t worry about using all six strings unless you want to. Use a single backing track in one key. Experiment everyday with that and by the end of it you’ll have a better understanding. Not only would you have improved but you’ll now have a better grasp on the concept which makes everything else fall into place much easier. There will still be a ton of stuff you don’t know or have never thought about. Join the club! It doesn’t matter.
Band in a Box – I have a love hate relationship with it, however, despite all its ills and diabolical design – it’s a fantastic practising tool. I use it all the time for quickly throwing down backing tracks. There is nothing else I ever use it for. It’s absolute garbage for everything else but for backing tracks it’s the best thing out there. Expensive but worth it so definitely make use of it if you own it.
I like the lead guitar analogy. I’ve used a few similar ones myself.
Rhythm is nothing more than a variation of dynamics and timbre with silence in between. Add pitch and you get melody. All together it makes music. The rest is just getting the balance right.
Lee
Thanks for your detailed response. Lots of good ideas for many more hours.
Tony
Lee
I can’t remember if I actually started on Part 3 yet because your last post above gave me enough ideas to stick with what I am doing so far. I really liked the idea of just sticking with one chord for a period, I’ve done a lot of that already but taken with being reawakened to Band In A Box, I shuddered and started looking for alternatives – without finding anything …
What I have been doing with the single chord idea was really because I was forced to do it as I couldn’t reliably remember where the VI and V chords where in relation. I knew perfectly where they were if I strummed a rhythm – all of them up to fret 12, but when it came to thinking notes rather than chords I couldn’t make the leap.
Anyway, thanks for the heads-up on BIAB, it is a mess but it does what I want for now; every time I look at it I am bemused at the forest of options, sub-screen, settings, etc and usually find something that can only be a called a bug within the first 5 minutes. Eg. Changing Styles in the middle of a song doesn’t work reliably so I won’t use it – I was just experimenting.
Your backing tracks are good and all the key signatures – excellent! Very useful, but I will probably just carrying on using BIAB now that I have forgiven it for being awful but useful.
It takes a while trying to remember where the chords are, that’s why it’s better to spend time on one chord at a time until you’ve really got it down – and then just come back and refresh it regularly.
I always use the root notes around the chords as my guide, which is what you should aim for but it requires you being able to find the notes quickly on the fretboard. Keep at it, it will all come together.
Hi Lee,
I have really fun here.
From the point of note lenght I’m not sure if what I hear corresponds to the sheet note In the example 1, 3rd bar. I think you play 2nd note as a quarter note instead of the first one in that bar.
I donť want to bother with such detail, but because I learn notes it would help me to clear up my uncertainty.
thanks.
correction: … I think you play 1st note as a quarter note instead of the second one in that bar….
Yep, well spotted. I’ve corrected it now but you might need a full refresh to see it.