
The CAGED system in a nutshell: Take one of the common open chords and move it along the neck so that it becomes a different chord. That’s pretty much it!
That’s the short version but it still pretty much sums it up. This doesn’t mean it isn’t useful, just don’t forget its simplicity otherwise you, like many others, will forever be searching for a system that doesn’t exist. If you want to make use of the CAGED system then the best thing you can do is forget all about the word “system” and just swap it for the word “chords”. I’m not going to spend a lot of time telling you all about the marvels of the so-called system. I’m going to give a quick explanation of what it is and then jump straight into showing you some things you can do with it. Let’s get to it.
CAGED refers to the open chords C, A, G, E and D. These are the common chord shapes you learn as a beginner.
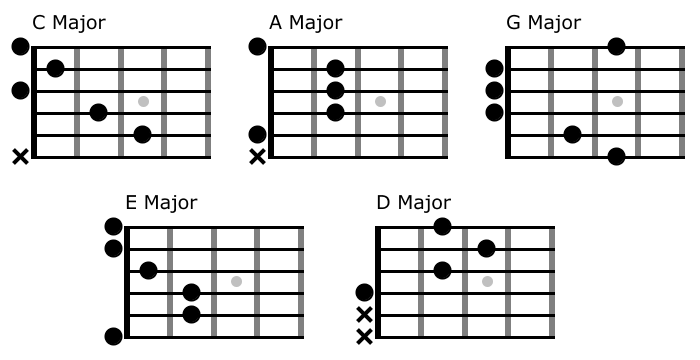
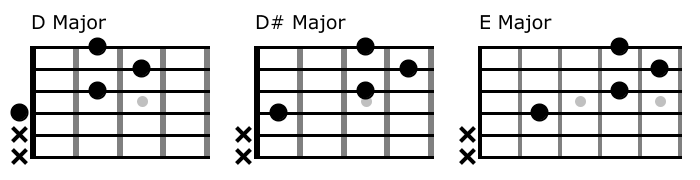
Each one of these chords can be referred to by their chord form. C form, D form etc. You should already know that each fret on the fretboard is a semitone (half step) apart. You should also already know what the chromatic scale is. If you don’t know this stuff already then go learn them first. If we move any chord up the fretboard by one fret then the whole chord will move up by a semitone. In other words if we move the D major chord up by one fret then it will become D# major. Move it up another and it becomes E major, etc.
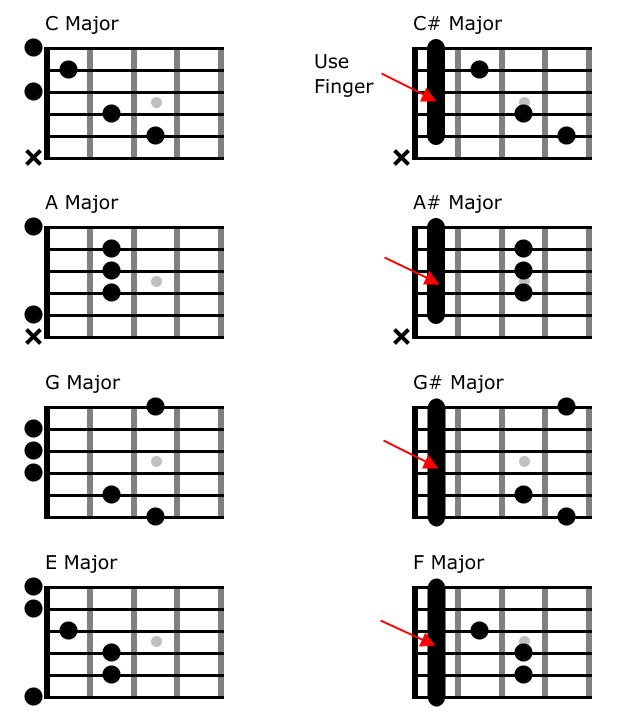
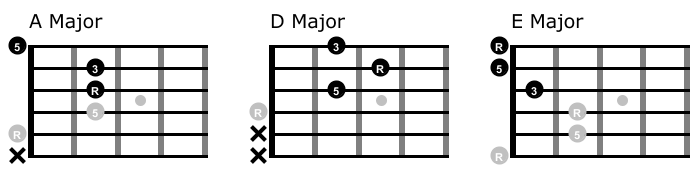
When we move a chord that ordinarily uses open strings, we need to move those along too. Easy to understand, not necessarily easy to do. For the D chord this requires some difficult finger stretching. For the rest of the chords we use the first finger to bar the fret to act as a capo. Not too hard for the E and A form with a bit of practice. Still quite difficult for C and G. Here are the barred versions of these chords all moved up one fret and using the first finger to bar the first fret.
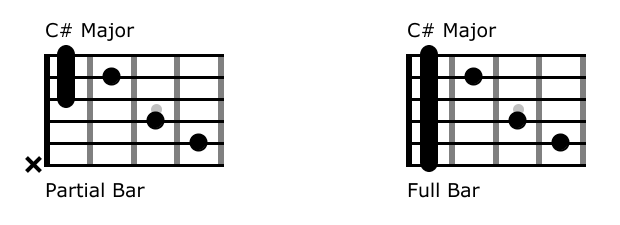
Most of the time we’ll probably bar across all six strings with the finger, but we don’t have to, it could be just a partial bar or a full bar, something like this for the chord C#.
For the C form chord when barring all six strings, it’s OK to play the sixth string but will change the sound as it will put the 3rd in the bass instead of starting on the root. Any variation of the barred C from chord is quite difficult to perfect, it’s a difficult stretch, but to be honest, most of the time we don’t worry too much about it because often we will just use partial chords. More on this in a moment.
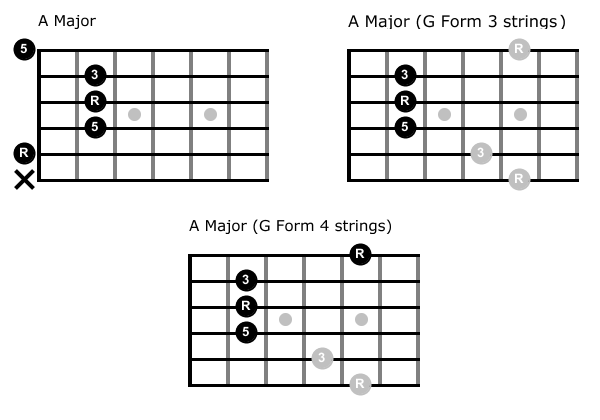
This is pretty much the entire concept of the CAGED system. Now to be honest, there’s not a great deal of things we can do with all of this, so far, other than play chords in a different position, but it’s also very useful for visualising chords in various places along the neck. From here on out, we’ll use the chord forms as our underlying knowledge of moving around and visualising the fretboard. We’ve only looked at common major chords. It can, however, be any chord we want. Any chord that does not use open strings can be moved anywhere along the neck in this way. Even more important than this is to realise that many chords can be broken up into smaller parts. Here are some examples of how we could play the A, D and E forms on just the first three strings, i.e., just play the black notes only.
In the diagrams above I have included the intervals so you can see that even when using just the first three string, we still get to use all of the chord tones; root, 3rd and 5th, so nothing is missing other than the notes that would normally be repeated in the lower octave.
These three chord forms are probably the ones you will use the most. We can still make use of the C and G forms but not on the first three strings. If you look closer at the C form you’ll see that if we play it only on the first three strings then essentially it just becomes the D form. For example, if we move the C chord up two frets to make it D, then the first three strings just overlap our normal D chord.
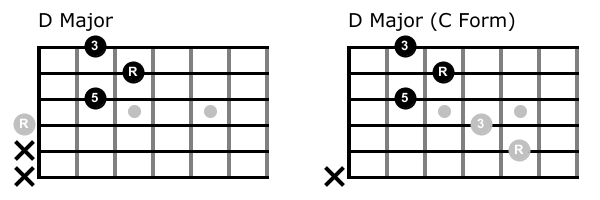
For the G form, if we want to use all three notes, i.e., root, 3rd and 5th, then we would need to use either the first four strings, or just strings 2, 3 and 4, in which case it will essentially become the A form of the same strings. A picture is worth a thousand words so just look at the diagrams below to make sense of this.
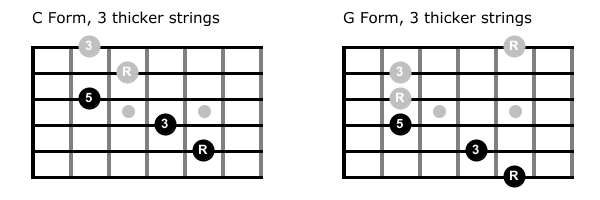
Although the C and G forms don’t have quite as much usefulness on the thinner guitar strings, there’s nothing stopping us playing the chords on the thicker strings. Chords played only on the thicker strings sometimes create a sound that is thicker than we might want, they can sound great though when played one note at a time for riffs or arpeggios. Just this simple three note shape can be very handy.
To make any of this useful to our guitar playing, we need to be able to find the chord positions quickly. This is where most people get stuck. You’ve got to know where the root notes are in each chord shape and you need to be able to find those notes on the fretboard. There’s only two ways this can be done. You start at a note you know and count frets, or you just learn where the notes are. Counting frets is slow and not of much use in the real world. Learning the notes on the fretboard takes time. There’s no tricks, no magic, no secrets. You need to learn them if you want any of this to be useful to you. How do you learn them? You just get on with it. You play, you practice, you think, you learn one thing at a time and just improve as you go. The more you do it, the quicker you’ll get there.
Let’s get practical with some very basic examples.
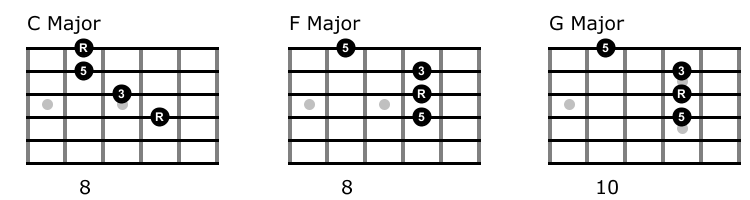
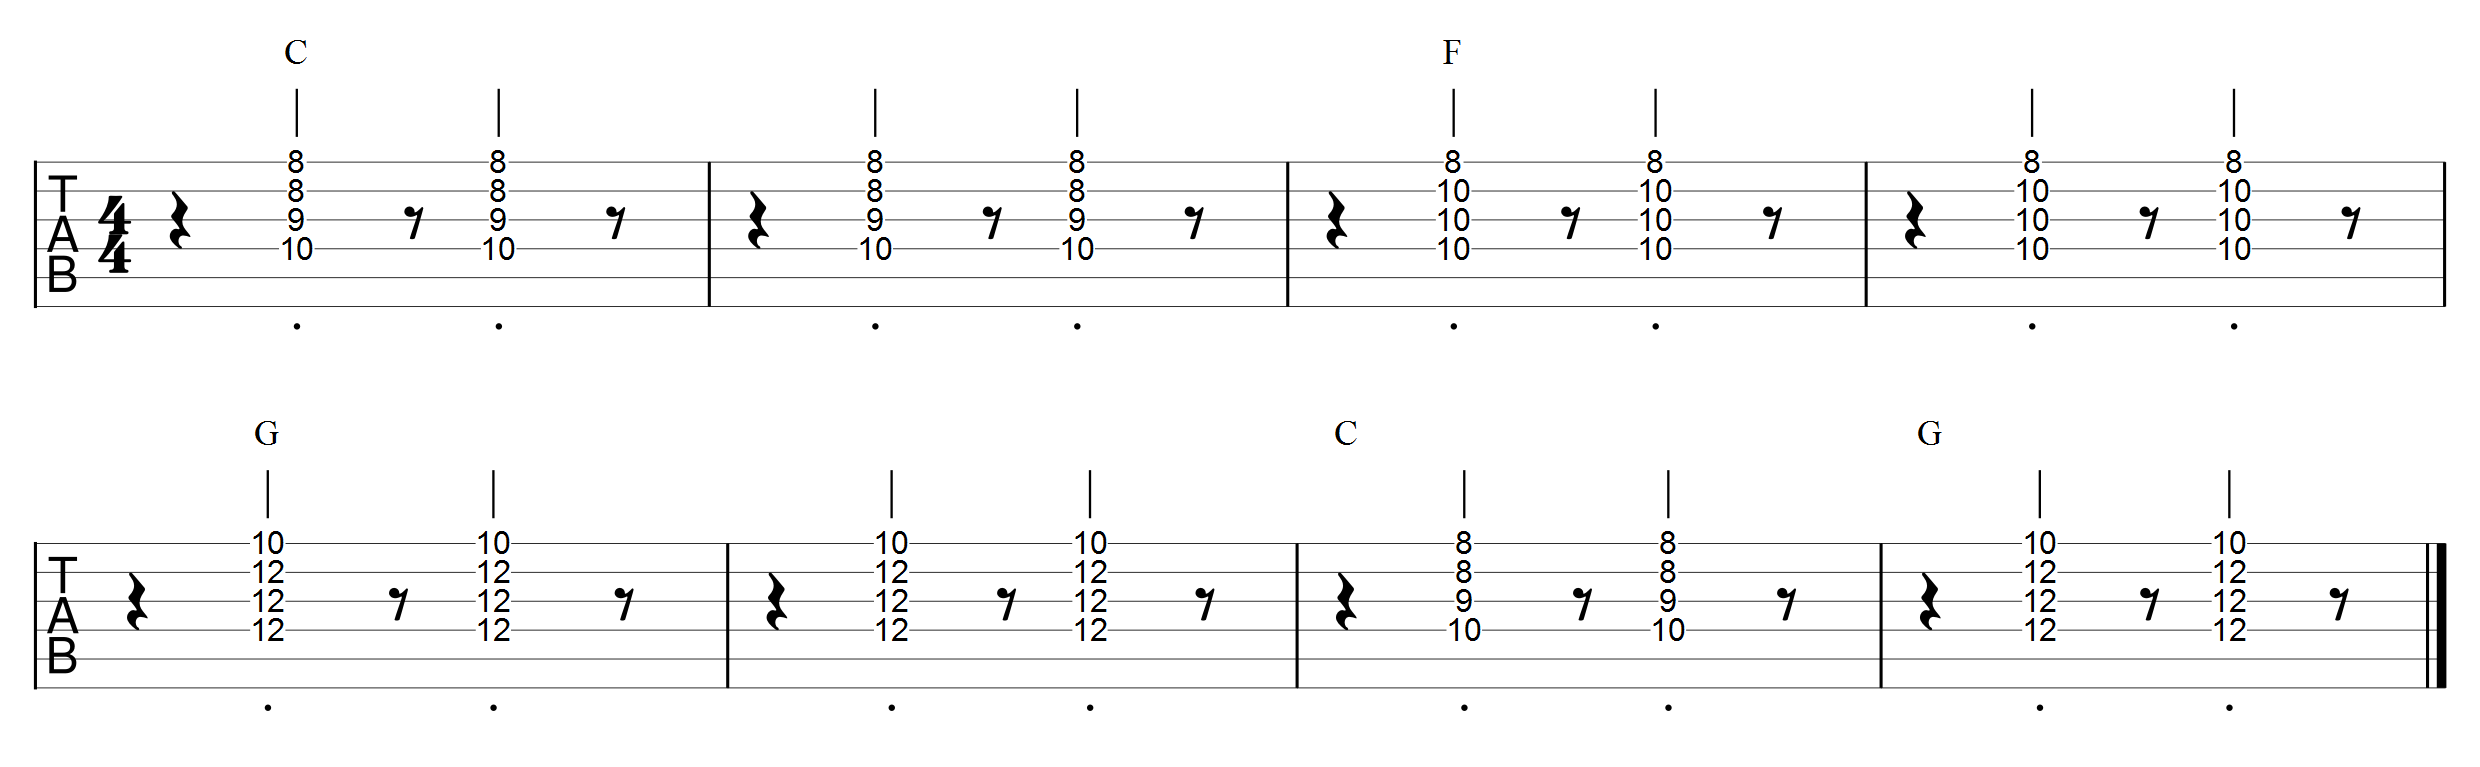
Imagine we’re one of two guitarists in a band playing a simple three chord progression. The other guitarist is playing open chords, we want to do the same thing but stay out of the way (harmonically) of the other guitarist. The easiest way to achieve this is to play the chords higher up in a different octave and maybe use a slightly different rhythm while we’re at it. For this we are going to use an E form chord for C and A form chord for F and G, all on the first four strings.
Example 1
Play Audio Example 1
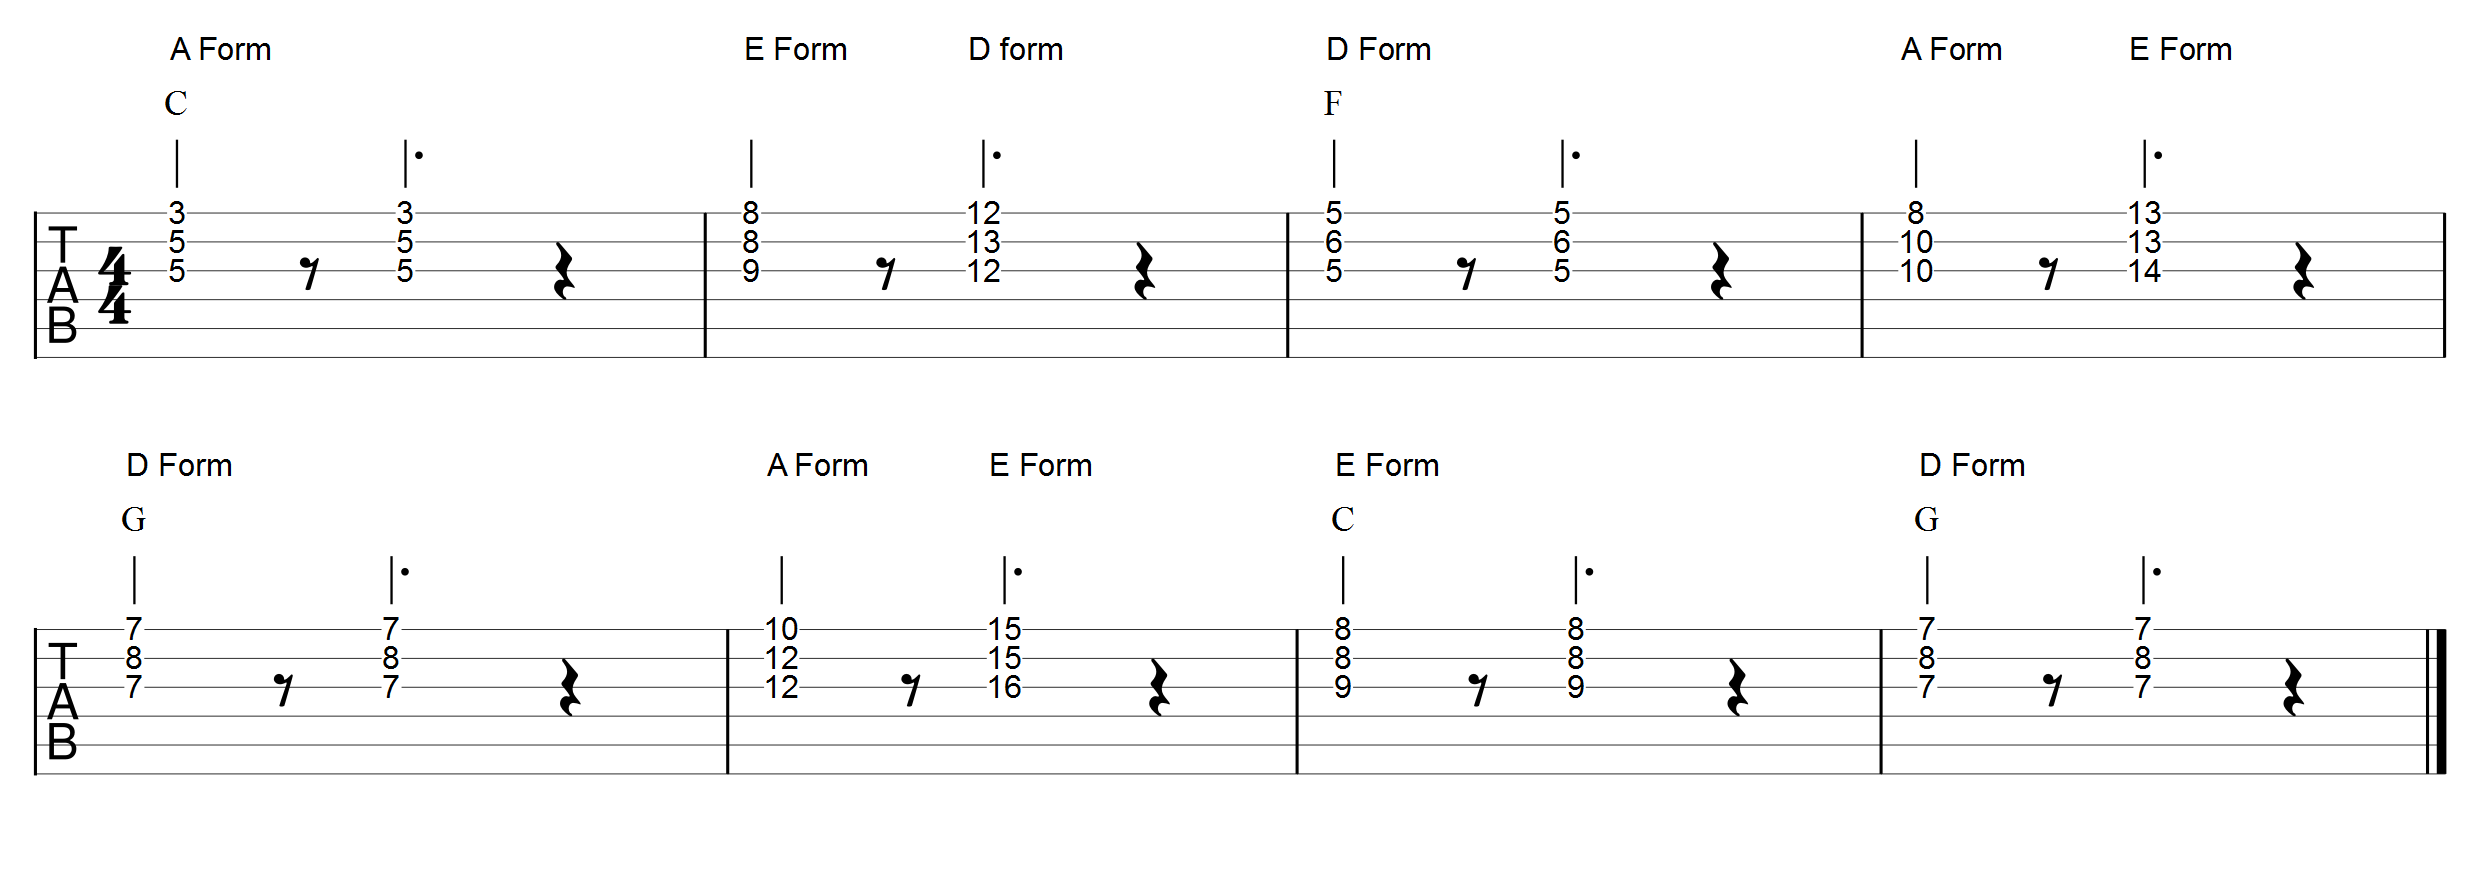
Sounds OK but how about we spice it up a bit? We could do so by mixing up and using more chord positions. For example we could use the A, D and E form for each chord just on the first three strings.
Example 2
Play Audio Example 2
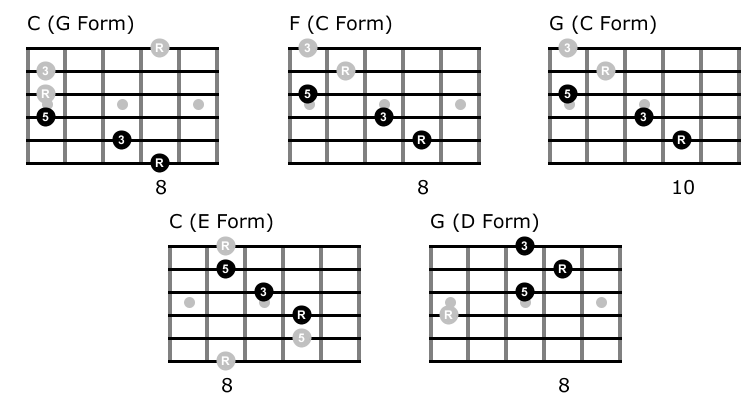
Example 3
Another idea we could use is to play arpeggios. For this we’ll use the lower three strings from the C and G form. We’ll end it with three notes from the E form (C) and D form (G). Here’s the diagrams with the notes we will use in black.
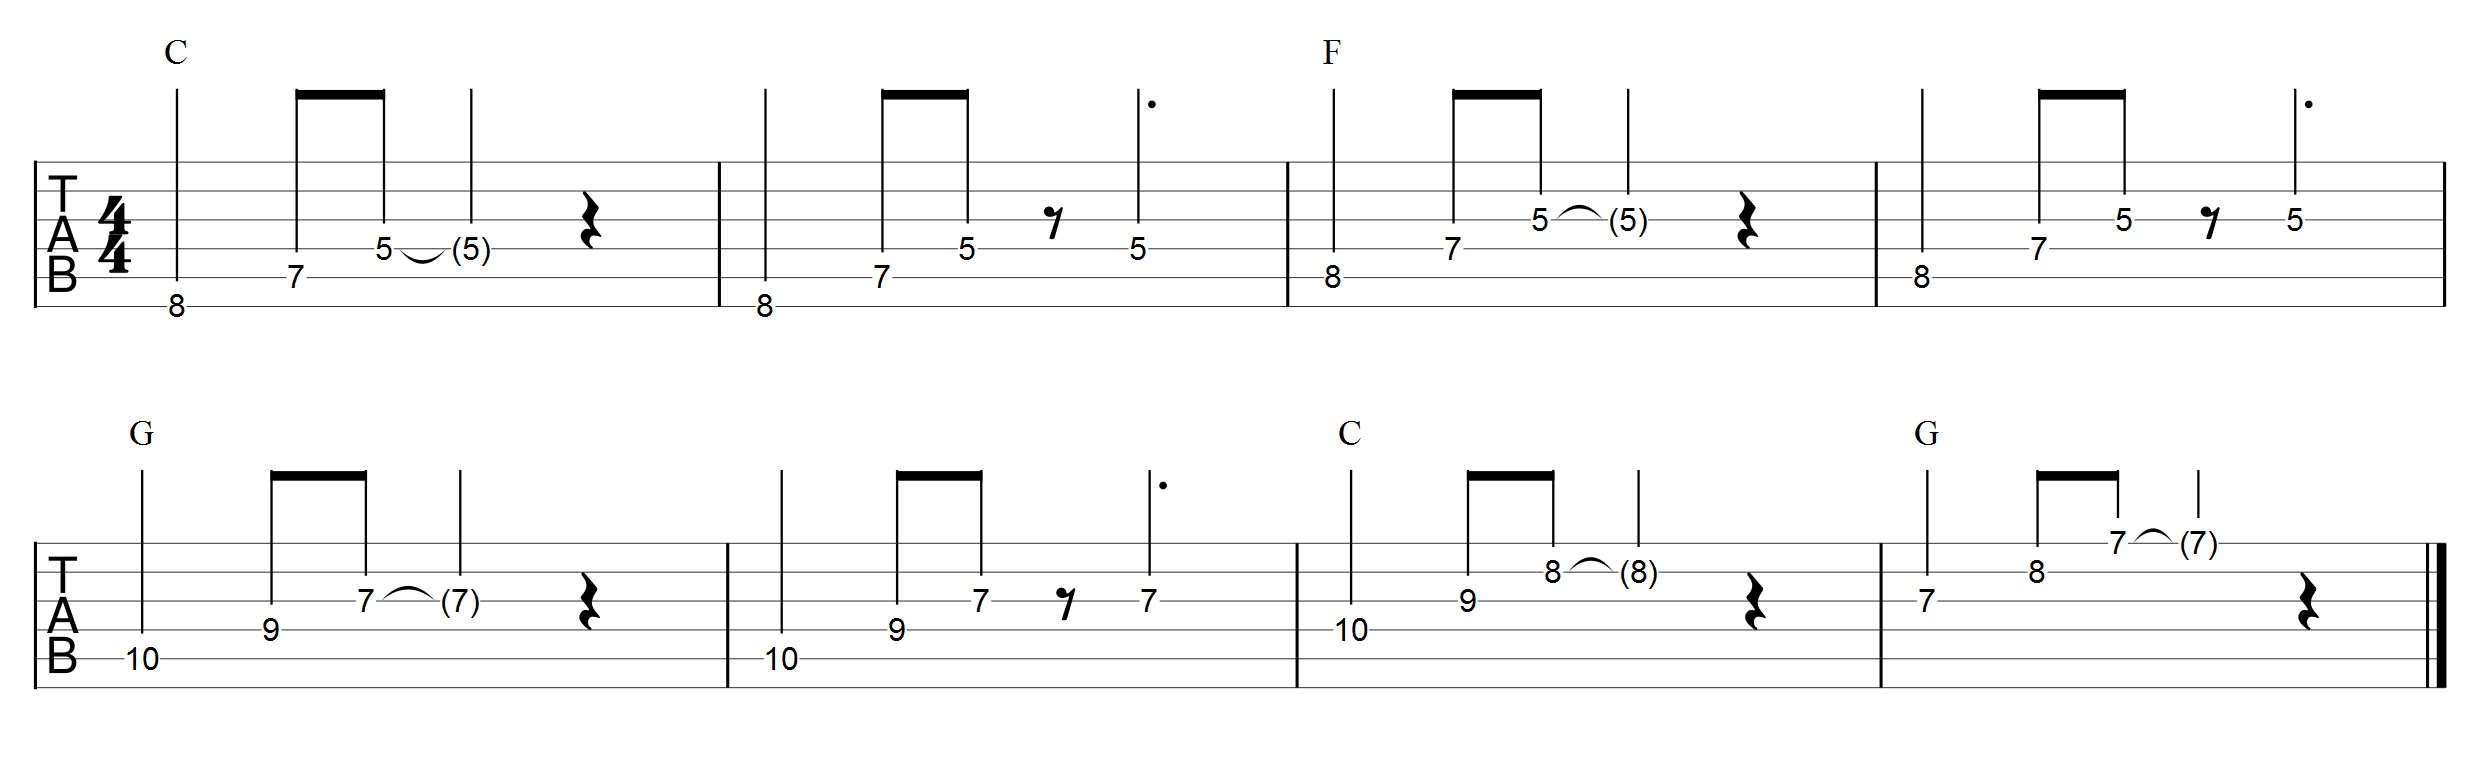
Play Audio Example 3
That covers the basics of what the CAGED system is and how we can use it. Breaking up and visualising each of the chord forms is what leads to giving us more ideas to play with, especially when it comes to chord tone soloing, which we’ll take a look at next.
Go to: Part 1 . . . Part 2 . . . Part 3 . . . Part 4 . . . Part 5
Got a question or confused about something? Just leave a comment below.

I’m a relative beginner learning music theory and this is a really clear explanation, especially with the examples.
Thanks Colin
Thank you for the lessons. You do a fine job explaining things clearly.
you should learn some Jimi Hendrix! Maybe a Woodstock tune!
Very clearly taught. Thank you.
Thanks John
Thank you for taking the time to produce this valuable, free, resource. Much appreciated.
Thanks paul
Lee, this is weird. I just started searching for lessons on chord tones after someone on a forum suggested learning this concept.
I have your Pentatonic Scale Fluency book which I am plugging away at so have more work to do there for sure.
Question- do you consider the chord tones concept as a replacement for learning scales or as a more advanced concept after one has learned scales?
Thanks for all the good content you are producing!
I don’t see it as a replacement or alternative, just other things you should be thinking about and learning. I think of scales, chords and chord tones as a whole.
The thing with chord tone soloing is it can never really sound wrong, the notes are already in the chord. That don’t mean they won’t end up sounding boring if over-used. Something like the solo in part 2 over the Ukulele track, this is using purely chord tones. I think it works because it suits the track. Do that on everything and you’ll get bored with it, possibly.
Most people that think purely in terms of scales, once they are experienced and have trained their ears to some extent, they are pretty much using chord tones anyway, they’re just doing so without necessarily being able to explain or name the notes they are landing on.
Most musicians tend to mix things up. As a quick and crude example, let’s say we have a bluesy / rock kind of backing. A lot of the time this kind of track will sound best with pentatonic scales and some of your favourite licks thrown in.
One of the most common problems for the less experienced using scales is that they just think about the scale. This often ends up with noodling up and down through the scale notes which becomes predictable sounding.
Here’s a very simple idea that can almost immediately improve this kind of playing.
1: Use the scale as you would normally, but …
2: Add a bit of space and hang onto some notes a bit longer, i.e., don’t continually move from note note without pause.
3:Try skipping a note or two and jump to the next one so that each note you play is not consecutively the next note in the scale. Maybe learn some scale sequences and skip strings occasionally.
4: Land on a chord tone over each chord change and just hang there for a bit before moving on back to your scale noodling.
Step 4 alone will make a big difference to your playing. It’s not the only way to do things, it’s just an idea that most people can get to grips with fairly easily and with this you should get a few light bulb moments and notice an improvement in your playing.
The only problem with it is it takes a while to get experience with. In part 3 I’ll be putting together a few exercises to help with this.
Hope that helps.
Wow! Thank you for that detailed response. A lot to take in and I will come back to that often as I continue to work through the book.
No problem. This gives me some ideas of what to write about and the kinds of exercises to include in part 3 … might even end up with a part 4!
thankyou lee,i purchased your pentatonic book because i liked your style of teaching as shown on your sites and it is excellent.very generous of you to post these lessons as well as all the hard work youve obviously put in on your site. much appreciated.
Thanks Chris
Lee, you have given me much to think about and do during this time of “sheltering in Place.” I;m a 73 yr. old. learning guitar who has struggled with the idea of improvisation, or soloing, during jams (the slow ones–faster ones leave me struggling to make transitions. However, you’ve given me hope I can play a solo next jam session. My guitar instructor hosts a “slow jam” for his students monthly, so I’m going to be ready when we resume post Covid-19. As a retired teacher, I appreciate your pedagogical style.
Thanks Beverly, glad to hear you are getting something useful out of it.
Chord tone soloing takes quite a lot of practice but stick with it and you’ll get there.
Also don’t forget when you’re thrown in at the deep end and don’t have time to think, you can still do a passable solo with only using a few notes, perfect for slow jams.
Hi Lee, perfect lesson and so easy to understand. Well done!!!
In combination with triad learning it better helps me to understand the CAGED system and though the fretboard. Interesting learning from my side (not sure if this makes sense for anybody but it helped me at least): I was learning all versions of triads + their inversions. It helped me to mark or remembeer the position of a particual pentatonic. So for instance I know that in Major pentatonic position 1 I can find 3 versions of a triad while in Major pentatonic position 2 I have only two possiblilites to play a triad. And so on (Minor pentatonic is a bit different).
I hope this is not to confusing but I believe that Lee knows what I’m talking about :-).
Thanks Mikael
Yes, definitely worth knowing where the triads, major and minor, also the 7ths + b7ths are withing chords and scales. Just knowing a few is enough to get by, but probably more important to know the notes around the root. It seems like a difficult task, and it is to some extent, but once you know a few you can find the rest of them easier.
I still have to think sometimes, it’s not all on instant recall – I don’t think it needs to be.
I just wanted to thank you for this treasure chest of a site. This is definitely going to help me. I see an instructor once a week for an hour and will be using your site in between lessons. Thanks a lot!
Also, do you have a book or other stuff for purchase?
Thanks,
Arkansas Dave
Thanks Dave, I appreciate the comment.
I’ve been promising parts 3 and 4 of this series for a few weeks but I got sidetracked as usual 🙂
Anyway, I’m back on it so look out for parts 3, 4 and 5 in the next few days.
I have two books available on Amazon, you can see them here.
https://www.amazon.com/-/e/B07C44KVFR
Hi Lee. I just wanted to say a BIG thank you for such a wonderful site full of very useful information and instruction for guitarists. My only regret is that I didn’t know about it sooner! Stay safe and well in these strange and unpredictable times.
Best wishes,
Sean.
Thanks Sean, glad you’re finding it useful.
I have been so confused about the caged system.yiu have made it do much clearer thanks
No problem
just discovered your website and already i’m blown away I’ll got on and order the pentatonic scale fluency thanks for all your work
You’re welcome.
The stuff on this web site is just so useful. It has been my go to for chords and scales since I started the guitar two years ago and now I find this. Particularly like the arpeggio part. My teacher has been teraching me a lot but today is the first time that I can see them being any use.
I would like. to say Thank You for. your help in so many areas! Thanks
This and most of the other content on this site is, for me as a beginner, so much easier to understand and instructive than any other guitar website I’ve looked at recently. Thanks!
Thanks all for the nice comments.
Hi Lee,
I’d like to ask for you recommendation about how to put fingers on strings when playing F chord on four strings in the Example 1.
As I move higher the fretboard, the frets get narrower and its hard to keep three fingers in the same fret area. Especially if I have shorter scale guitar.
I can use one finger to bar three strings but there is higher risk of muting the fourth one.
Could you share your opinion, ideas. Maybe photo would help.
thanks
Honestly, it’s a problem for many guitarists. Two answers really, practise until you can do it – or do things differently and work around your limitations.
You might find you can never do it, your fingers are just too big or awkward. I’m in that camp myself. Simply put, I can’t easily (if at all) play that chord when the frets get too narrow.
Some guitarist have fingers that are small enough and some have fingers that can bend out wards at the first knuckle join. Great if you have that ability.
If I’m playing live with a band, I don’t care. For a chord, I bar the lower three strings with one finger and mute the first string, nobody would notice it missing among the rest of the noise. If I’m playing single notes / arpeggio then it doesn’t matter – I get time to move my fingers about to make it work. If I’m recording and can’t get it with practice or a few attempts, I’ll just do a punch in – nobody would know or hear any difference.
If all else fails, try to find a different place on the fretboard if possible.
Many people have some limitations, don’t worry too much unless it is having a big impact on your playing.
Just wanted to say thanks for your hard work 🎸
No problem, thanks Wille.
such a clear place to go.